
Introduction
Today we’ll be covering a new automation built with Device42 that provides dynamic user access to devices based on the lifecycle stage. This use case was requested by one of our clients who wanted a way to use Device42 to streamline their provisioning workflow for new servers.
Provisioning workflows will typically require multiple people to have access to the machine and the machine’s CMDB object to perform their role in the workflow. Passing default credentials around to all of these people quickly becomes disorganized, and brings up more than a few security concerns. Instead, we will show how to utilize Device42 and some automation design to assign which CMDB objects each user has access to at a given time. Additionally, by automating user permissions to only the people who need it, we minimize the attack surface of our network. Once a user completes their task in the workflow and no longer needs permissions, the lifecycle is updated and the automation ensures their permissions are revoked and the next user’s are granted.
To build this functionality, we will be relying on many components of Device42: password management, permission groups, object categories, lifecycle stages, and both webhook actions and endpoints. Additionally, we will showcase the Device42 package for Stackstorm. If you’re not already familiar with Stackstorm, it’s an open source “If This Then That” integrations and automation platform that is well loved by the community because of how extensible, flexible, and diverse it is.
For this automation, we’re going to use a relatively simple yet realistic workflow one might encounter for server provisioning. Four groups coordinate with one another in this workflow:
- Purchasing: Facilitates the purchase of machines.
- Mounting: Mounts the machines on racks in the data center.
- Deployment: Deploys required software and applications to the machines.
- Production: Maintains and supports the devices once in their production role.
Part 0: Environment and Architecture
The two major components of this integration are Device42 and Stackstorm. Both of these need to be configured to interact with one another. They should be able to communicate over HTTPS in both directions. Here’s a ten-thousand-foot-view of the architecture that shows how all the components of the automation interact with one another.
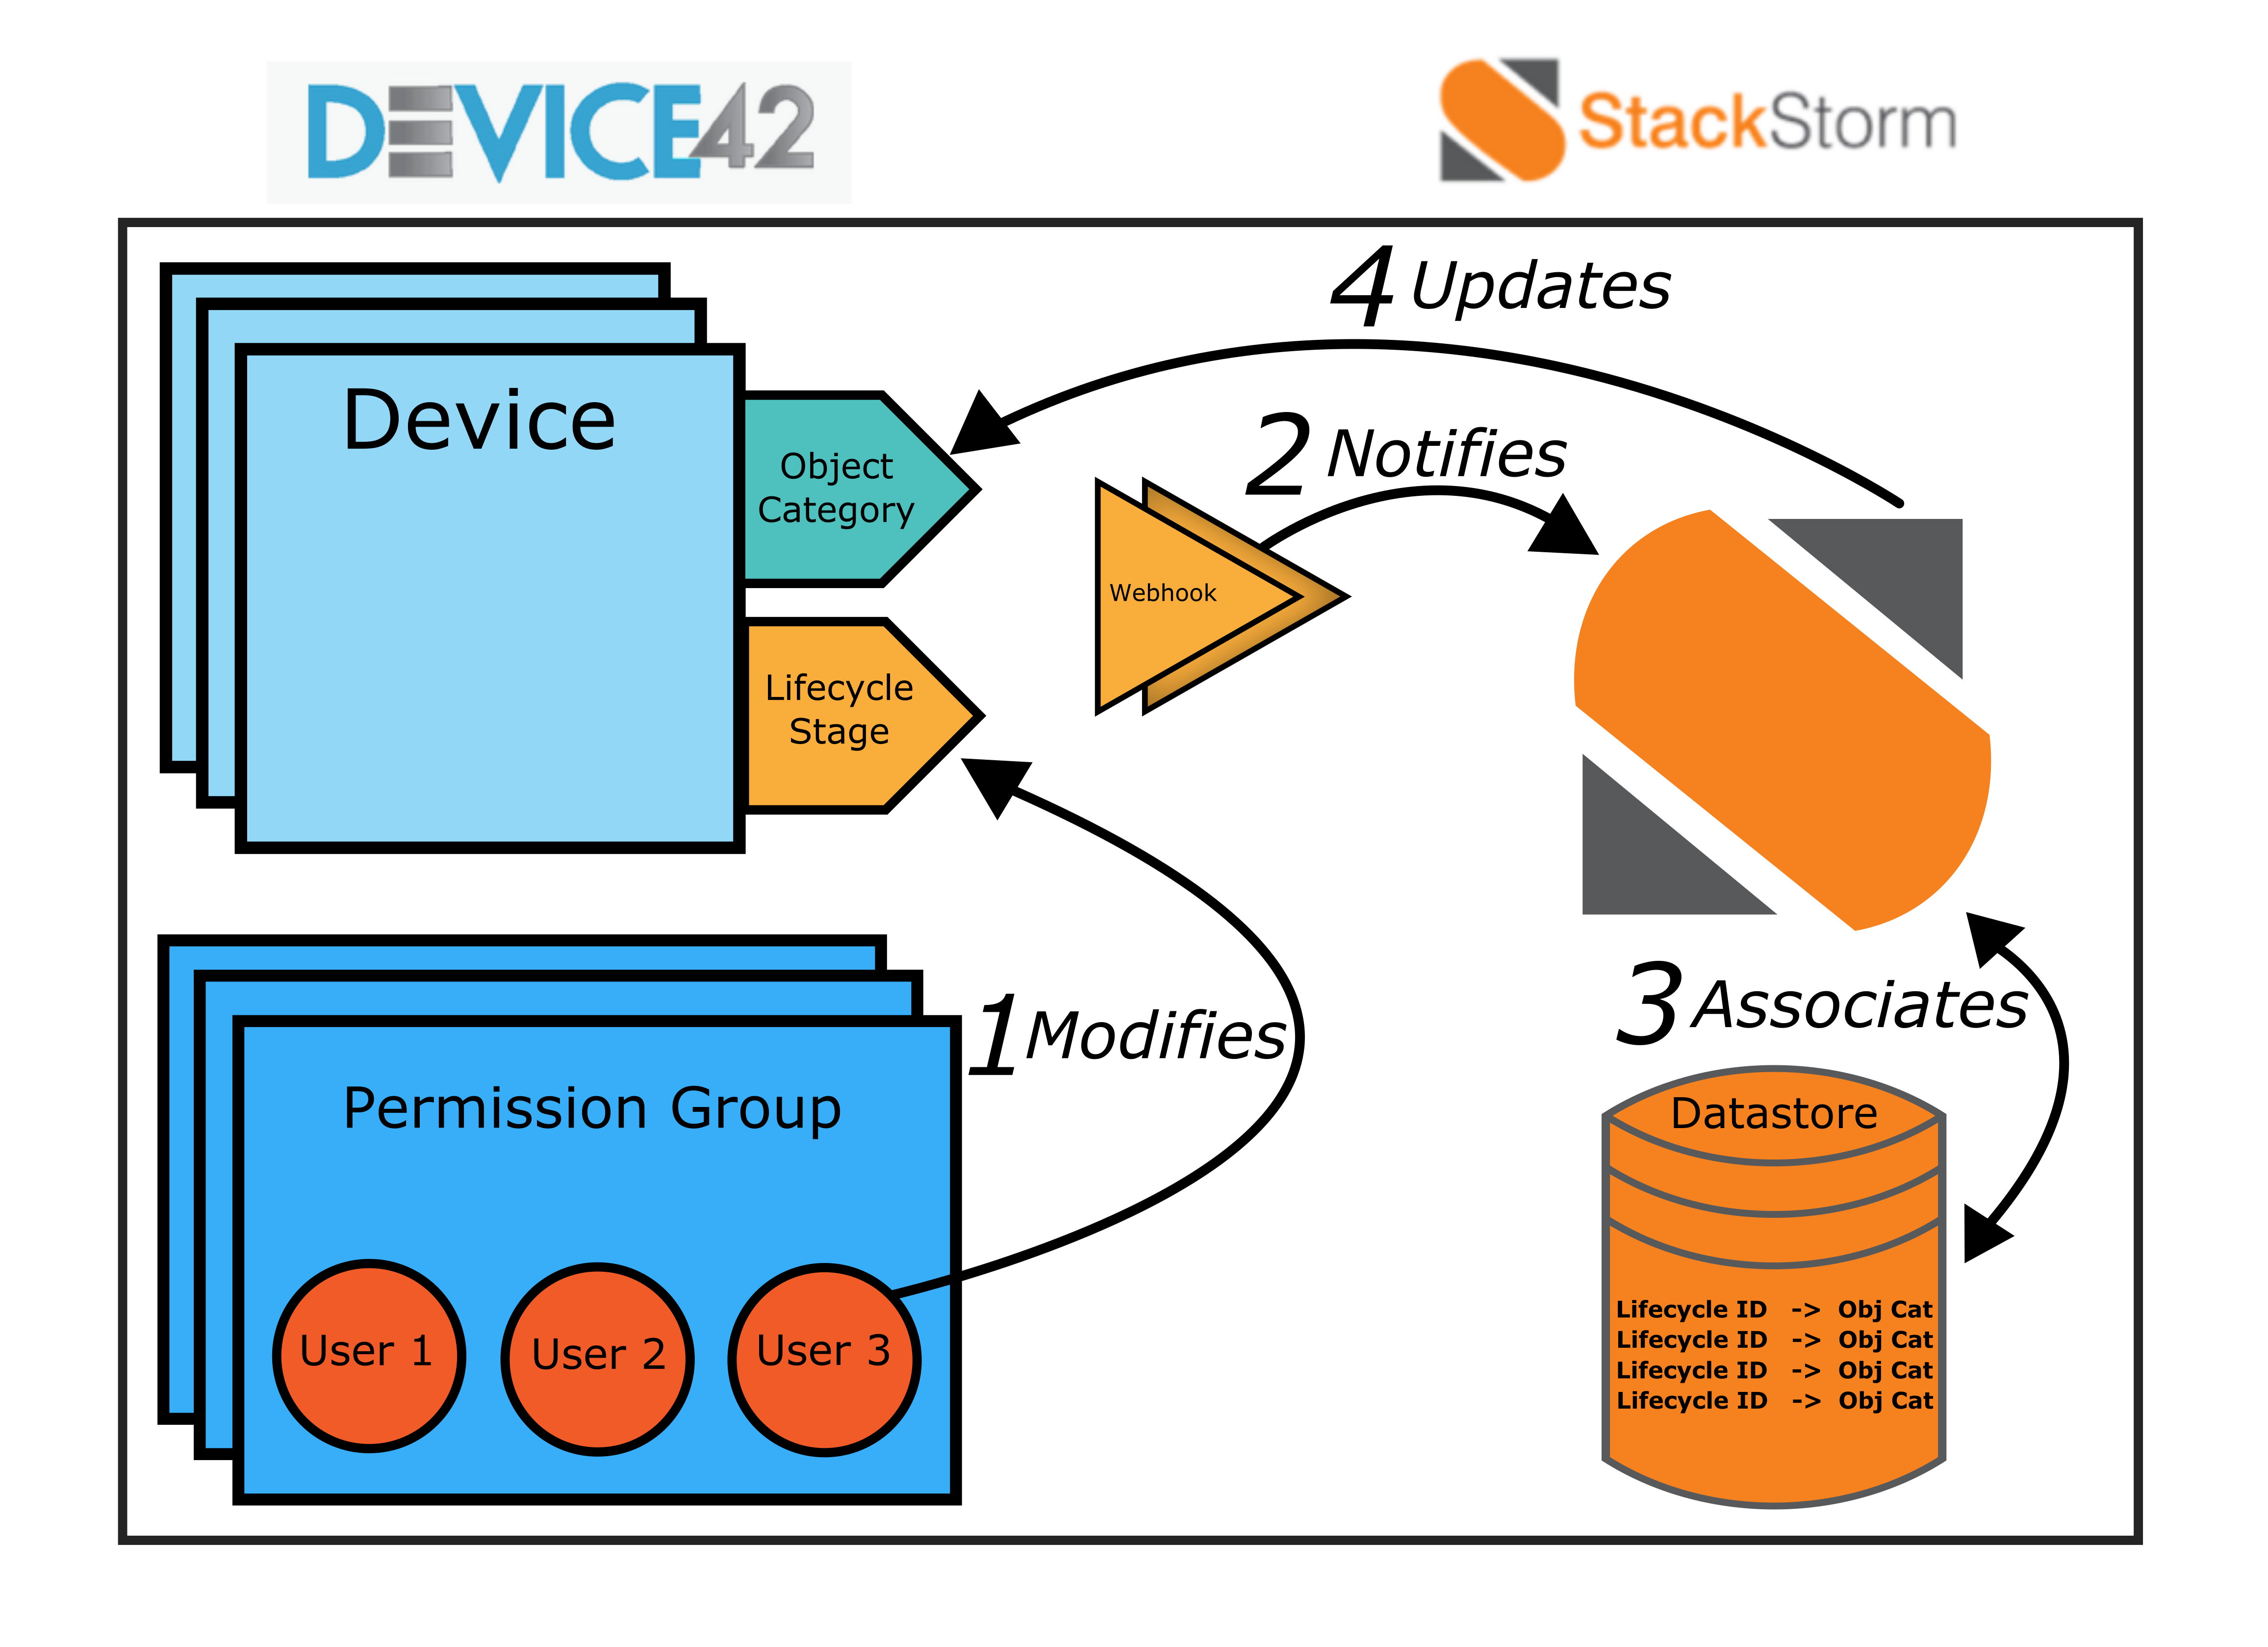
In Device42, we will need to create Users, Permission Groups, Object Categories, Webhooks, and the Multitenancy feature will need to be activated. All of this will be covered in Part 1.
Our Stackstorm server will be running on an Ubuntu 14.04 machine located within the same subnet as the Device42 appliance, ensuring connectivity. We’ll be using the official Device42 Expansion Pack for Stackstorm to build out some key interactions. The Stackstorm datastore will be populated with key value pairs relating our Device42 lifecycle events to object categories. Lastly, we’ll need to generate API keys for our Device42 webhooks to communicate with Stackstorm. We’ll be looking at Stackstorm specifically in Part 2.
In Part 3 we’ll show that users in different permission groups are granted access to devices based on the current lifecycle event and object category of the device.
Part 1: Configuring Device42
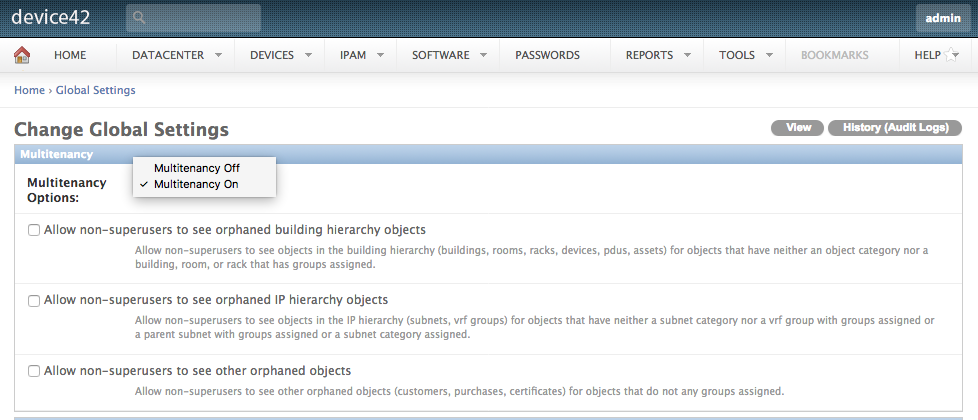
Activate Multitenancy
In Device42 we will need to activate the Multitenancy feature which will allow us to configure granular user permissions. Turn on Multitenancy mode by navigating to Tools > Settings > Global Settings within the Device42 web app. Once on the Global Settings page, hit “Edit” and activate Multitenancy.
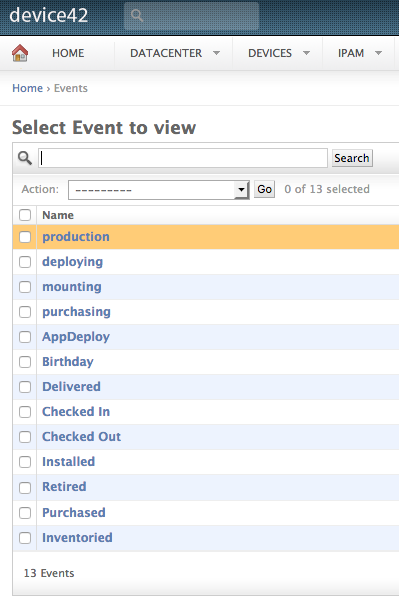
Create Device42 users, permission groups, object categories, and lifecycle events/stages.
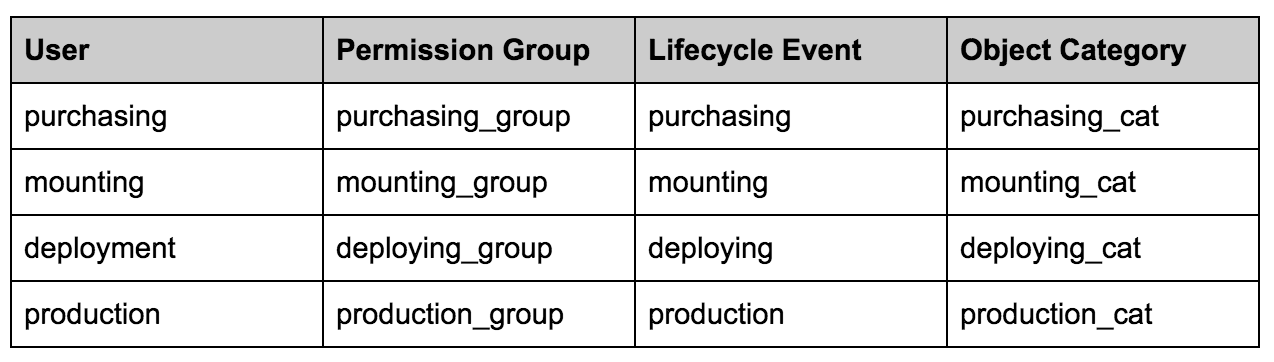
In our example, we are going to have 4 users: purchasing, mounting, deployment, and production. Each of these users will have their permissions set by a permission group, referred to as administrator group in the UI.
Additionally, we will have 4 lifecycle event stages and a corresponding object category for each lifecycle.
Let’s start by creating each of the permission groups. Navigate to Tools > Admin & Permissions > Admin Groups. While creating each of the 4 administrator groups, set what Device42 objects users belonging to each group have permission to interact with.
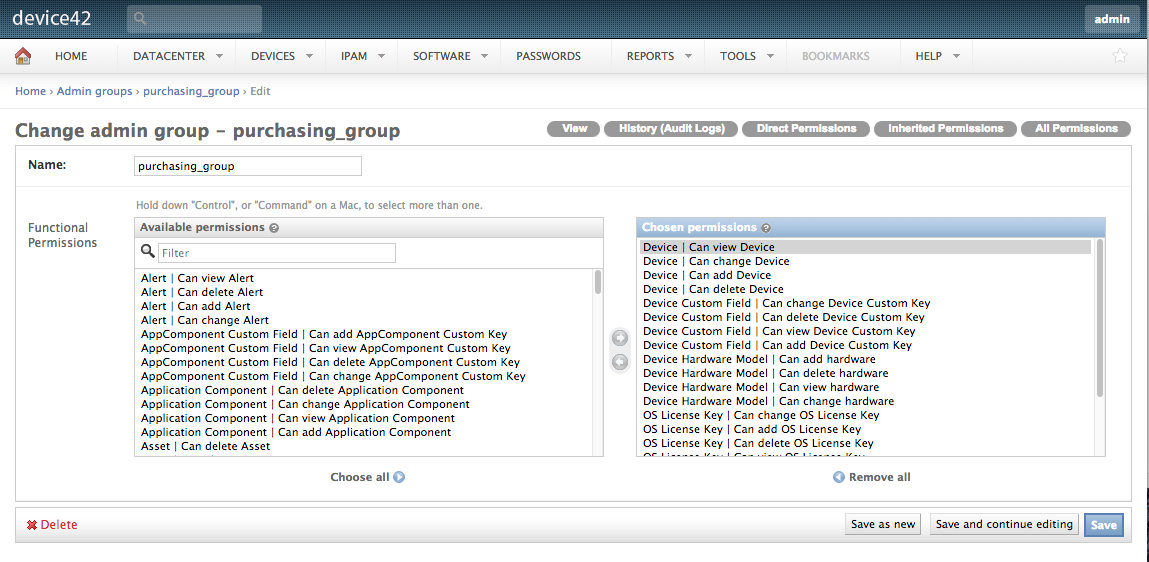
Our purchasing_group has permissions to view, change, add, or delete devices as well as their custom fields and hardware models. It’s largely up to you and your requirements as to which permissions you grant to each group.
Once the 4 permission groups are created, let’s create 4 users and add them to their respective group. Add users by navigating to Tools > Admins & permissions > Administrators. On that page, select “Add Local Admin”.

After saving the new user, a page will pop up that allows you to further configure the user. Scroll down to the Permissions section and add your new user to their corresponding group.

Now that all 4 users are created and added to their permission groups, let’s move on to object categories and lifecycle events.
We will be linking our permission groups to object categories, so let’s start with creating those object categories. Object categories will be applied to a device when a lifecycle event occurs, which represents the device moving to the next stage of our provisioning automation.
When a device with the “purchasing_cat” object category is updated with a “mounting” lifecycle event, our webhooks will communicate with Stackstorm which will then update the device’s object category to “deploying_cat”.
We’ll need to create our object categories before any of that though. Navigate to Datacenter > Object Categories and select Add Object Category.
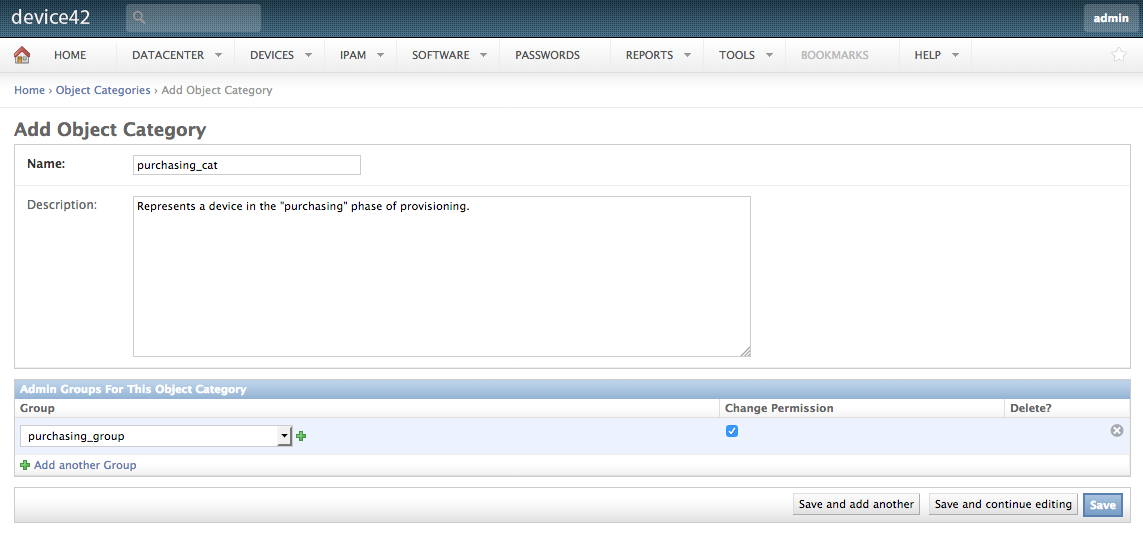
Select the corresponding admin group created earlier for this object category in the “Admin Groups for this Object Category” section. This makes it so that device’s with this object category are accessible to users within the linked admin group. Repeat this step for each object category, remembering to link it to its respective admin group.
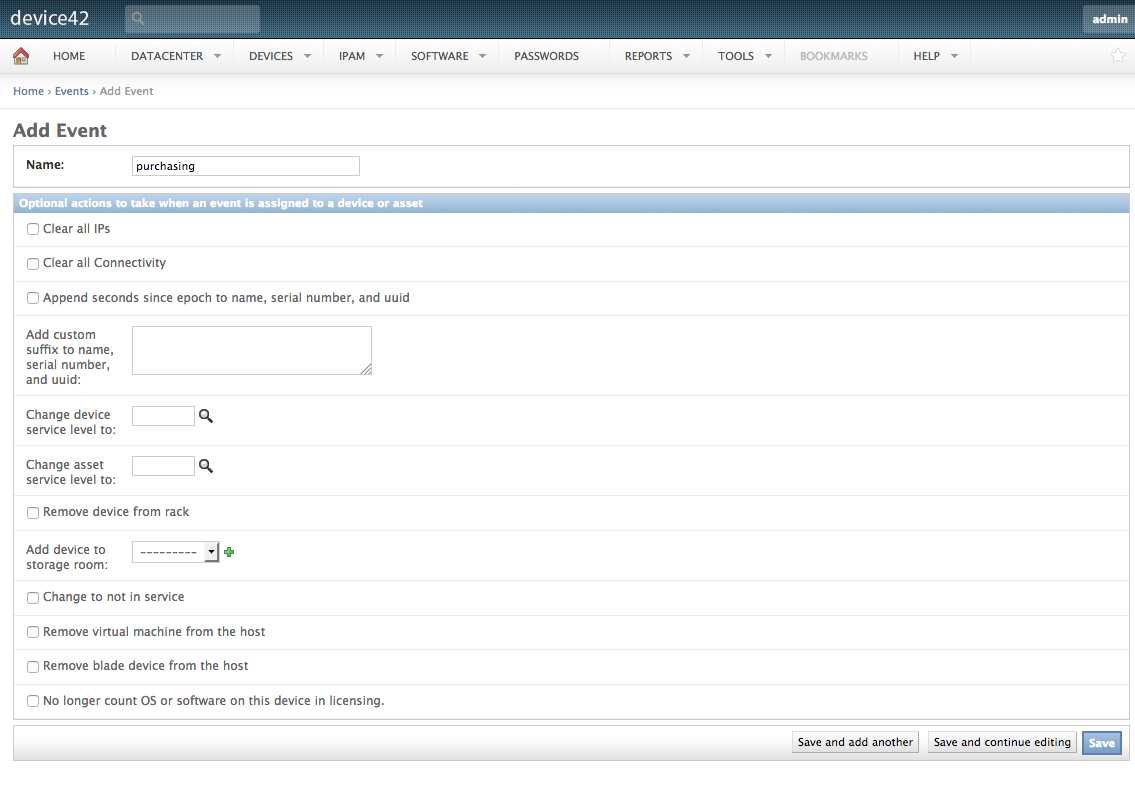
Next we’ll create our lifecycle events. When applied to a device, these lifecycle events will trigger an update of the object category on the device they were added to.
Navigate to Tools > Template and Bulk Operations > Lifecycle Event Actions and select Add Event. Name the event and hit save; we won’t be requiring any of the additional features of lifecycle events for this automation.
Repeat this step for each lifecycle event stage much like we’ve done for each of the previous elements.
Create a Webhook Endpoint to communicate with Stackstorm
With all that covered, let’s begin building the interactive components of the automation. Because we’re going to need to inform Stackstorm of new lifecycle events, we’re going to need to use a webhook.
The webhook endpoint will be pointed at the Stackstorm server, and more specifically at an endpoint we will define within a rule in Stackstorm. The rule is named device42.lifecycle_triggered_object_category_change and is included in the official Device42 pack for Stackstorm, which is configured in Part 2. We can create the endpoint now even though it’s not pointing at anything yet.
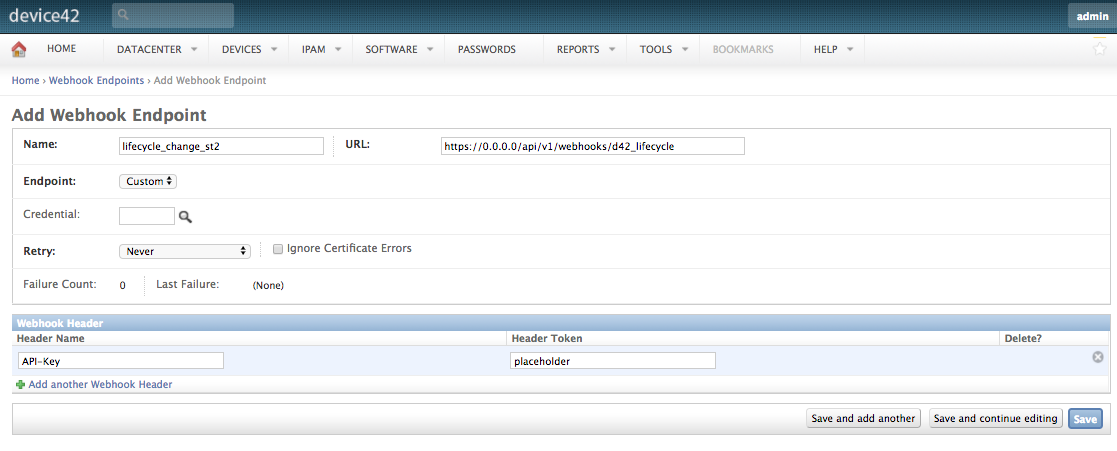
Navigate to Tools > Webhooks > Endpoints and hit Add Webhook Endpoint. Point the URL towards https://{stackstorm_ip}/api/v1/webhooks/d42_lifecycle” where {stackstorm_ip} is equal to the FQDN or IP address of your Stackstorm server. Add a header to the endpoint named “St2-Api-Key” but leave its value set to “placeholder” for now.
Create Webhook Action triggered by Lifecycle Events
Next we’ll need to create a webhook action that will respond to new lifecycle events. Navigate to Tools > Webhooks > Actions and select Add Webhook Action.
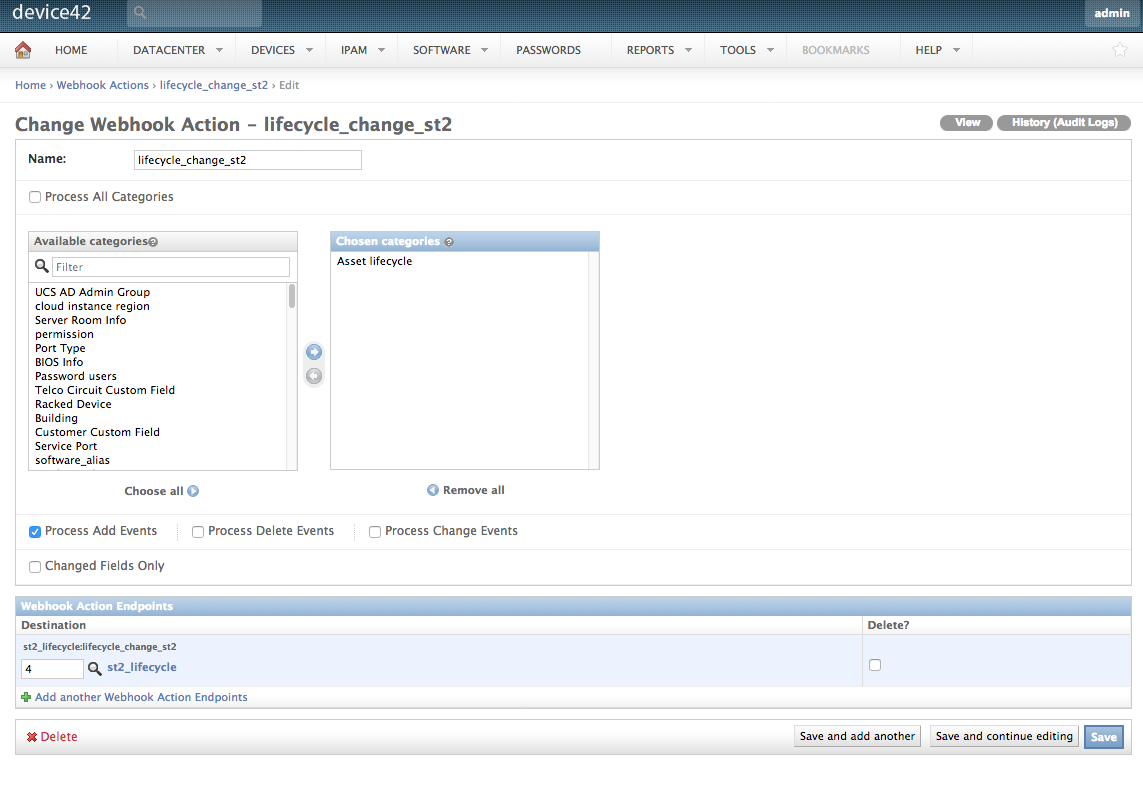
Find the “Asset Lifecycle” category in the list of Available Categories and add it to the new action. Also select the first checkbox directly below to process add events for lifecycles. For the destination, select the webhook endpoint created in the previous step. This will tell Device42 to utilize our webhook endpoint whenever a lifecycle event occurs, informing whatever system on the other end of the endpoint of the new lifecycle event to process.
Speaking of what’s on the other side of that endpoint, let’s get started with Stackstorm itself!
Part 2: Stackstorm
Getting up to speed with Stackstorm won’t take long as it itself is quite straightforward and its documentation is excellent.
Create API Key for Webhook Endpoint to authenticate with Stackstorm
There are a few authentication options available for the Stackstorm API. The simplest to configure and most durable is probably with a generic API key attached to the header of your requests. Conveniently, Stackstorm provides a command line tool that has the ability to generate API keys. Execute this command and save the output somewhere secure; you won’t be able to retrieve it later.
$ st2 apikey create -k -m ‘{“used_by”: “device42 webhook”}’

<API_KEY>
Now we can take this API key and apply it to the header of the requests made by our webhook endpoint in Device42. Return to webhook endpoint you created in Part 1 and replace our placeholder text with this API key string. With that, your endpoint should be authenticated to interact with Stackstorm.
Install the official Device42 pack for Stackstorm.
Now that we have Device42 authenticated and pointing towards Stackstorm, let’s setup that endpoint Device42 will communicate with. We’ve created a package for Stackstorm that contains various actions and rules that will help connect Device42 and Stackstorm for this automation and any future automations.
Check out the D42 Stackstorm Package Github repo here.
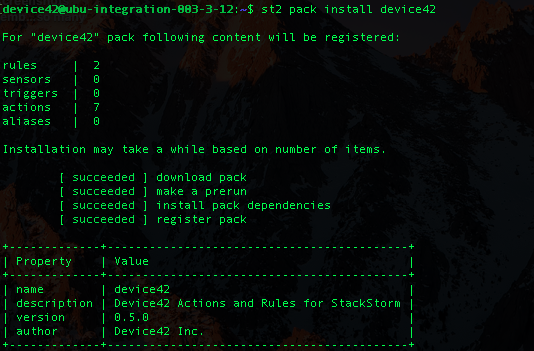
Configuring it is really simple. First, SSH onto your Stackstorm server and install the package like so:
$ st2 pack install device42
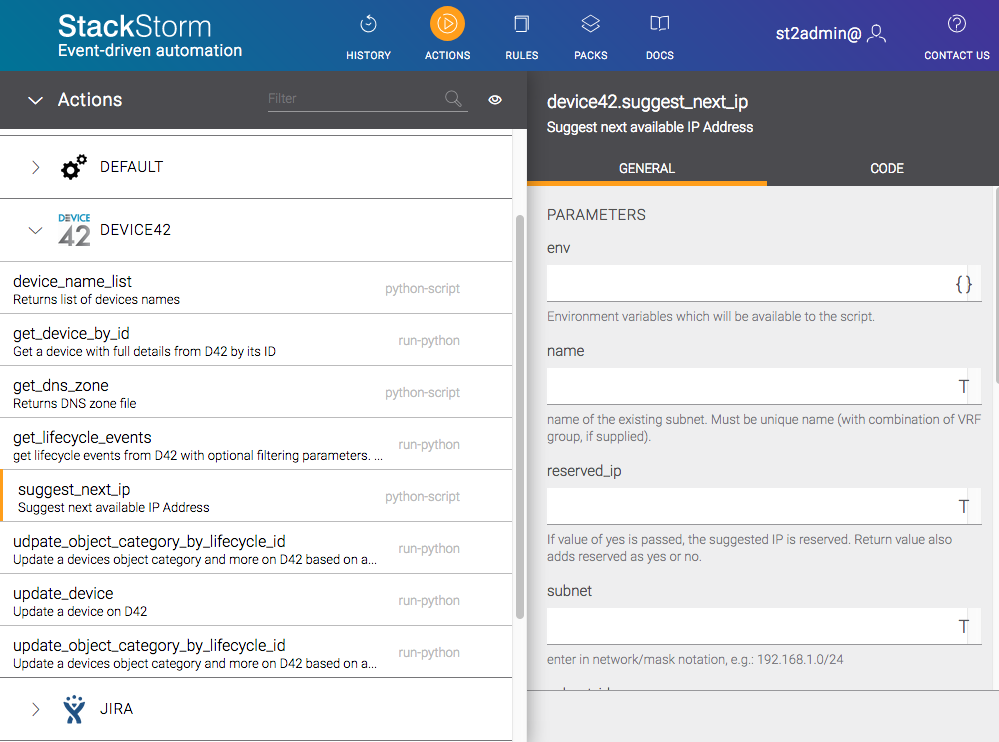
You can also install the Device42 package through the Stackstorm UI itself. Whichever way you install it, if you open up the Stackstorm UI, navigate to the Actions tab, and expand the Device42 section, you’ll see each of the actions provided by the package. The update_object_category_by_lifecycle_id action is particularly relevant here as it will be an instrumental component of the user permissions automation, as you might expect.
Configure Device42 Pack
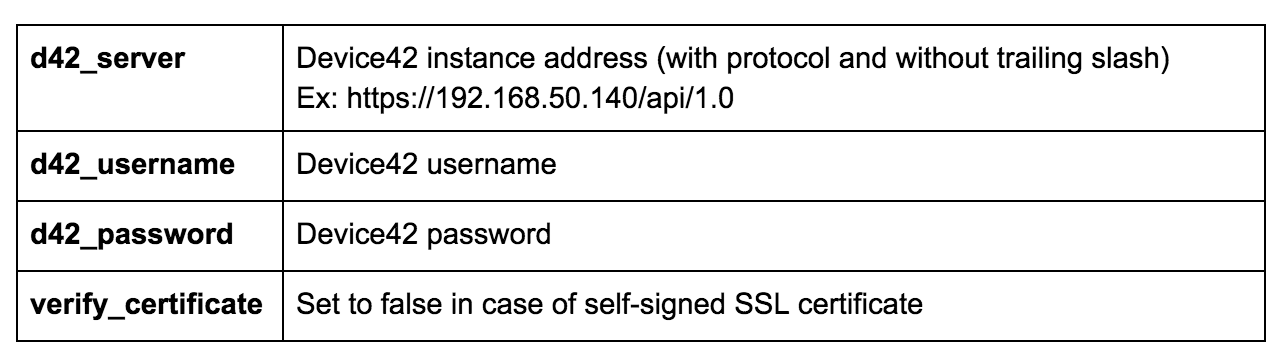
Now that we have the Device42 pack installed, we’ll need to set some environment variables in its config file. The configuration of the pack should be done on the Stackstorm server itself over SSH.
A directory for the Device42 pack should exist in your Stackstorm deployment at: /opt/stackstorm/pack/device42/.
Copy the example configuration in device42.yaml.example to /opt/stackstorm/configs/device42.yaml and edit as required.
You can also use dynamic values from the datastore. See the docs for more info.
Note: When modifying the configuration in /opt/stackstorm/configs/ please remember to tell StackStorm to load these new values by running st2ctl reload –register-configs
That should handle configuration. To verify your setup, try calling the get_device_by_id action either in the Stackstorm UI or on the server.
$ st2 run device42.get_device_by_id device_id=15
Which will return with the device details as stored in Device42:

Seed Stackstorm Datastore with Lifecycle ID -> Object Category pairs.
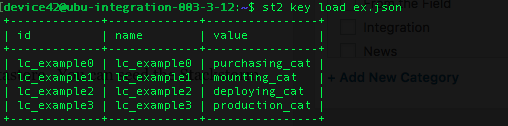
We will need to store some key value pairs in Stackstorm’s datastore. These pairs will link incoming lifecycle event IDs to their corresponding object category that should be applied. I’ve appended “lc_” to the IDs of the lifecycle events because to me, storing “1”, “2”, “3” right in the datastore seems bad practice.
The two methods for finding the IDs for each Device42 lifecycle are somewhat quirky, but reliable. The first method is to navigate to Tools > Templates & Bulk Operations > Lifecycle Event Actions. There you’ll find a listing of all your lifecycle stages. Click on each of the lifecycle stages we created in Part 1 and note the ID that is in the URI path.
The second method is to perform a DOQL query through the data services API provided by Devie42. Make a HTTPS POST request to
https://10.42.2.241/services/data/v1.0/query/
In the request body, include a field named “query” with the following DOQL query string. It should look like this:
{query":"SELECT * FROM view_assetaction_v1"}
The response will include the ID of the lifecycle event alongside the name. It will be something along the lines of this, but the IDs or names may be different depending on your environment:
...

10,purchasing,f,f,f,"",f,f,,,,,f,,f,f,f,f

11,mounting,f,f,f,"",f,f,,,,,f,,f,f,f,f

12,deploying,f,f,f,"",f,f,,,,,f,,f,f,f,f

13,production,f,f,f,"",f,f,,,,,f,,f,f,f,f

...
Whichever method you used to determine the IDs of your lifecycle events, the next step is to write up a JSON file which will be used to associate lifecycle event IDs to their corresponding object category. This JSON file will be used to seed the Stackstorm datastore. The JSON file should be formatted like this: J
[

{

        "name": "lc_10”,

        "value": “purchasing_cat”

    },

    {

        "name": "lc_11”,

        "value": "mounting_cat"

    },

    {

        "name": "lc_12”,

        "value": "deploying_cat"

    },

    {

        "name": "lc_13”,

        "value": "production_cat"

    }

]
Finally, you’ll need to create these key value pairs in the Stackstorm datastore. You can seed the Stackstorm datastore with your environment specific data with this command:
$ st2 key load lc_to_objcat_map.json
You can also create these 4 datastore entries in the Stackstorm UI by running the st2.kv.set_object action with the lc_# string in the “key” field and the {lifecycle}_cat string in the “value” field.
At this point, everything should be all set! The rule contained in the Device42 pack for Stackstorm is enabled.
Demonstration
Let’s try this out and prove that the user permissions are being applied correctly.
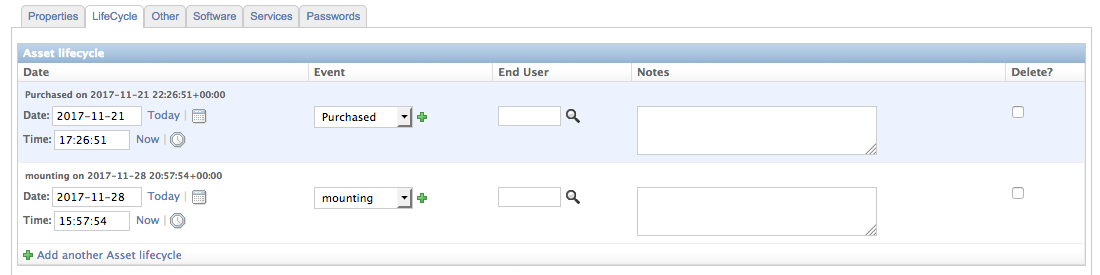
Add a mounting lifecycle event to a device by editing the device and opening the Lifecycle tab:
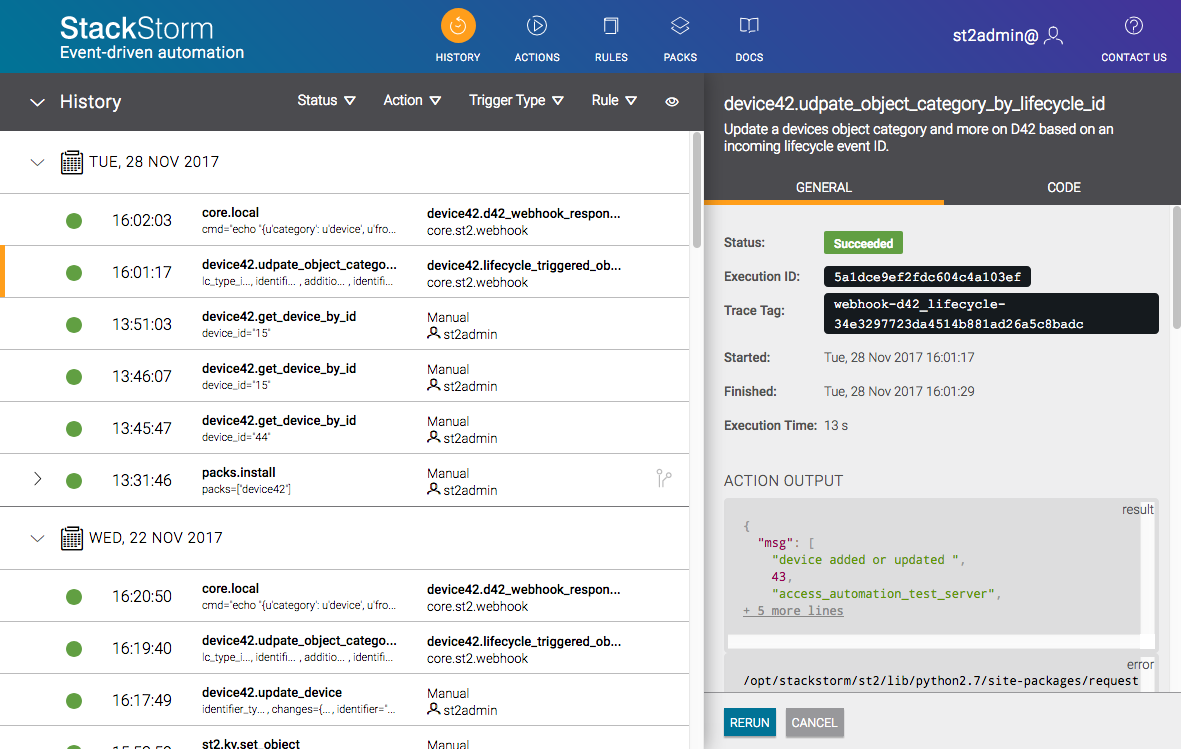
After hitting save, the webhook action listening for Lifecycle Events will fire the webhook endpoint pointing towards Stackstorm. Stackstorm will accept this event and run the device42.udpate_object_category_by_lifecycle_id action. That action will look in the Stackstorm datastore for the key “lc_{lifecycle event ID}” and the value, which is the object category to apply to a device when this lifecycle event is processed. In this case, the “mounting” lifecycle event ID is 11, and the value stored underneath “lc_11” in the Stackstorm datastore is “mounting_cat”.
After a few seconds, if we reload the device page, we should see a new object category present on the device.

And if we look in the Stackstorm UI’s History tab, we can see the action call.
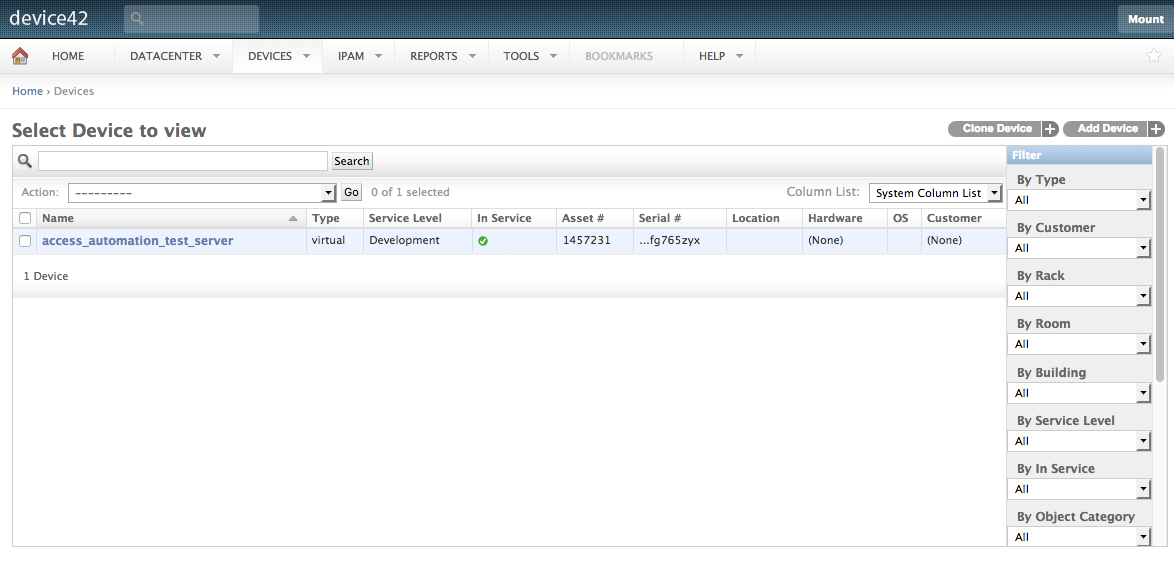
This lifecycle event was created by the Admin account for the Device42 appliance. Let’s log on to Device42 as the the Mounting user, who only has permissions to interact with devices of the “mounting_cat” object category.
Loading the Devices page in Device42, we see that this is the case! Note the “Mount” user name on the top right.
If we log into the Deployment user account, we won’t be able to see this device. Let’s prove that. After logging into Deployment, let’s see what’s on the Devices page.
Conclusion
Using automation techniques like these to create dynamic user permissions saves you time and improves your security. The more people who have access to a server, the more vulnerable that server is. By limiting access to the server to exactly the people who need access at a given time, we go a long way towards plugging that vulnerability.
I hope this walkthrough has provided you with the necessary understanding to build further automations using Device42 and Stackstorm. And if you do, we here at Device42 very much want to hear about your creation! With the techniques and architecture laid out in this post you should be able to create a great deal.
In this era of automation and programmatic infrastructure, an authoritative source of configuration data is absolutely critical. Automations are only as good as their information source.