
TL; DR This automation will provide a path through a provisioning workflow that can stand up any number of new servers in a data center with a controllable configuration at the device specific level. We’ll be using Device42 as a central hub for configuration info and to store the current lifecycle stage of a machine within the automation, and Stackstorm will orchestrate the workflow and handle remote execution. Finally, we’ll utilize a dynamically distributed PXE Kickstart system for the actual work of installing a customized operating system on client machines.
If you’re looking for a high-level overview and demonstration of the automation, check out the accompanying blog post Automated Server Provisioning with Device42, Stackstorm, and PXE Kickstart.

Contents
Environment Overview
Installation
Understanding the Provisioning Automation
– Webhook Configuration
– Lifecycle Overview
– Purchasing Lifecycle: Order and Upload
– Mounting Lifecycle: Rack and Stack
– Networking Lifecycle: Fully Automated
– Configuring the Networking Lifecycle Automation
– The Networking Lifecycle Automation Action Chain
– OS_Provisioning Lifecycle
Conclusion
Environment Overview:
Given the many moving pieces in this automation, let’s take a moment to discuss and understand each. We’ll cover the responsibilities of each component as they relate to this automation.
Device42
First off is Device42 itself. We will utilize many features from the D42 toolset. For example, once the procurement team has ordered the required hardware, they will compile a very simple spreadsheet containing details of each machine. This spreadsheet will be uploaded to Device42 via the Spreadsheet Import/Export tool. We’ll also use Device42 to request the next available IP for a given subnet and assign it to the machine. At any point in time, each device will be pinned down to a particular lifecycle stage in Device42. As devices move through each lifecycle from purchasing to os_provisioning, various actions in Stackstorm will be triggered by the D42 webhook event system. Most excitingly, we will also show how to use Device42 as a dynamic PXE configuration distributor that specifies how to provision an OS on each machine.
Stackstorm
In this automation, Stackstorm is responsible for responding to events from Device42. Stackstorm is notified of these D42 events by way of a webhook emitted by Device42 whenever a configured event occurs.
All of the Stackstorm specific functionalities used in this automation (and more) are available to our users via the Device42 package on the Stackstorm Exchange and on our github. The D42 ST2 package contains actions and rules that build the foundation for this automation, and provides the ability to design your own as well. We use Stackstorm version 2.4.1 running on an Ubuntu 16.04 LTS server.
PXE Kickstart Server
The last big chunk of environment to cover is the PXE Kickstart server itself. PXE Kickstart systems are built up out of a handful of familiar tools in the system / network operations world.
First, the machines themselves will need to be set to attempt a PXE boot upon startup, usually within their BIOS. A DHCP service assigns IPs to machines based on IP reservations and responds with the location of a boot image on a TFTP server. Once the client machine receives its IP, it will make a TFTP request to obtain and execute the boot image. After executing the boot image, the client machine will reboot.
Our PXE configuration has a parameter named “ks” which points to an HTTP address [http://192.168.41.1:8080/ks.cfg], which is hosted by a Nginx web server. When the client machine reboots, it will obtain the Kickstart file from this address. This Kickstart file specifies the installation procedure: everything from downloading the OS files from a local NFS, setting up the default users, setting the hard drive partitions, and much more.
You can learn more about how Kickstart works by checking out Redhat’s superb Kickstart documentation
Our PXE Kickstart server is running on the same server as our Stackstorm instance (Ubuntu 16.04). Installing and configuring of each component of the PXE Kickstart server is beyond the scope of this tutorial, but there are many resources online that will help you set up a simple PXE Kickstart system.
Ubuntu’s own documentation on setting up PXE is insightful and Oracle has a great top down overview as well.
Now, let’s cover each component of the PXE Kickstart server as they relate to this automation and Device42.
DHCP
We will be using a standard Linux DHCP program ISC-DHCP-Server. However, other DHCP servers should work if they are able to accept OMAPI requests.
The DHCP server will be responsible for responding to OMAPI requests that will create reservations between MAC addresses and IP addresses. That way, when a machine boots and requests an IP, the DHCP server will respond with the IP as assigned by Device42 for that MAC address. These OMAPI requests will be made by the D42 Stackstorm action called create_ip_lease_reservation which utilizes the pypureomapi library to make OMAPI requests.
The final thing that DHCP is responsible for is informing a newly booted machine about the location of a TFTP server and boot image (pxelinux.0) to receive.
TFTP
TFTP, otherwise known as Trivial File Transfer Protocol, is a stripped-down version of FTP that, for our purposes is only responsible for distributing PXE files to machines upon a PXE boot. We are using the tftpd-hpa service for this example.
Installation of TFTP for PXE booting is beyond the scope of this tutorial, but Ubuntu has great documentation to get you up to speed.
Once configured, the tftpd process will serve the pxelinux.0 file from /opt/tftpboot/. The pxelinux.0 file is configured within the directory /opt/tftpboot/pxelinux.cfg/. In the pxelinux.cfg/ directory there will need to be at least be a default PXE configuration. In this example, we’ve created a ubuntu_default PXE configuration file for our PXE booted Ubuntu installations. Given that we can have multiple PXE configuration files and naming conventions of these files, we can control which OS is provisioned on a machine and how on a per device basis. More on that later.
Kickstart
Kickstart is a well-loved tool that handles automating through the OS installation wizards of which we are all familiar. Kickstart can do much more than just navigate the TTY Ubuntu installer, however. Kickstart can set up all the users on a Linux host, install any packages via package managers like rpm, apt, or yum,partition hard drives, and the list of capabilities goes on from there… The takeaway is Kickstart is very cool.
Once a machine reboots after working through DHCP, TFTP and PXE, a Kickstart file will be obtained by the machine at a network location specified by the PXE configuration file.. That Kickstart file is named ks.cfg in our case and is served to the client machine via the Nginx HTTP web server.
Nginx
Nginx has a simple role in the PXE Kickstart process, namely to serve up the Kickstart file that will automate through the OS installation.
NFS
The Kickstart file served to the client machines by Nginx will contain instructions to download all OS files from a NFS location. The NFS should of course contain the files listed in the Kickstart configuration. In our case, Ubuntu 16.04 LTS is stored at /opt/pxe/ubuntu/ and the 3rd line of our Kickstart file says as much: nfs –server 192.168.41.1 –dir /opt/pxe/ubuntu/.
Moving forward
It may seem like there are a lot of moving pieces in this system, but truthfully once everything is stood up and working together, it becomes quite understandable. To get from here to there, I’ll be stepping through the lifecycle events in Device42 and discussing what actions occur, and how they’re configured and executed.
Installation:
So, now it’s time to install the Device42 Stackstorm package on your Stackstorm server and come along with me through the belly of the machine! Installing the automation is easy, just log onto your Stackstorm server and run:
$ st2 install device42
or
st2 install https://github.com/device42/stackstorm-device42
Understanding the Provisioning Automation
Now with all the components of the automation understood, lets step through each of the lifecycle stages and examine what is going on in each. We’ll also discuss all of the Stackstorm actions, rules, and chains that listen and respond to events triggered by Device42’s webhooks.
Device42 Webhook Configuration
If you haven’t been taking advantage of the webhook feature of Device42, I’ll take a moment to get you up to speed. Device42 webhooks consist of an action and an endpoint. The endpoint points to a remote location, in our case various Stackstorm sensors implemented by rules. The webhook event is a conditional trigger within Device42 that also triggers the webhook endpoint to send a message.
I’ve written a detailed guide for how to create webhooks in Device42 as a part of my previous blog on Dynamic User Permissions. Creating these webhooks is covered in the sections titled “Create a Webhook Endpoint to communicate with Stackstorm” and “Create Webhook Action triggered by Lifecycle Events”. The information there is compatible with today’s integration, so if you’re unfamiliar, I encourage you to look there.
Device42 Lifecycle Overview
As mentioned in the introduction, we will be keeping track of the current stage of each device throughout this automation using Device42’s lifecycle event actions.
This automation will take machines all the way from procurement to having a full OS installed on it. We’ll represent that process with the following lifecycle stages:
- Purchasing
-
-
- Machines are purchased
- Spreadsheet is uploaded to D42 to initially create all the devices.
- Spreadsheet contains (at least): serial number, MAC address, hardware model number and a string “provisioning_auto” in the notes field.
- The string in the notes field can be customized. This is discussed later
- All other fields are optional, but the OS field can be used to specify what PXE the machine gets upon first boot
-
- Mounting
-
-
- Physical machines are mounted in the data center once delivered.
- Physical machine’s BIOS should be set to PXE boot
-
- Networking
-
-
- Device42 suggests an IP for the machine in a specified subnet.
- Stackstorm creates IP for device on D42 and adds the IP to the subnet
- A DHCP reservation is created for that device’s MAC and IP address.
- A specific PXE configuration file is copied from a template matching the OS field in Device42, allowing for device specific PXE installation.
-
- OS_Provisioning
-
- The device properly boots for the first time and:
- requests an IP from DHCP
- receives a PXE configuration over TFTP
- reboots
- obtains Kickstart file from Nginx server
- automatically installs the OS via Kickstart
- The device properly boots for the first time and:
While this automation is specifically designed to be used when procuring and provisioning physical machines, it could also provision virtual machines. The differences would mainly be that the ‘purchasing’ and ‘mounting’ lifecycle stages would be replaced with a VM specific lifecycle, such as ‘vm_bootstrapping’.
The magic of the automation occurs in the ‘networking’ lifecycle. As long as devices entering the ‘networking’ lifecycle possess at least a serial number and MAC address, the ‘networking’ stage can complete its tasks regardless of whether the machine is virtual or physical.
That said, let’s dive in and take a walk through the architecture of this automation!
Purchasing Lifecycle: Order and Upload
The first stage, purchasing, is concerned with responding to a procurement request. The procurement request might come from the IT Department or from a Developer Manager and could be for any number of machines. For the purposes of full lifecycle automation, we would like to have these newly ordered devices created in Device42 as early as we can.
The Procurement team is most likely quite comfortable producing spreadsheets. This lets us take advantage of Device42’s Spreadsheet Import/Export tool to create devices on D42.
Once the machines are ordered, the procurement team should produce a spreadsheet containing baseline info about the devices. This should include the: serial number, mac address, hardware model, and the notes field containing “provisioning_auto”. The ‘notes’ field is being utilized to designate that this is a machine that will go through the provisioning automation.
Any additional fields may also be added. Later, when we discuss the networking lifecycle we’ll discuss how the OS field can specify which custom PXE OS configuration to distribute.
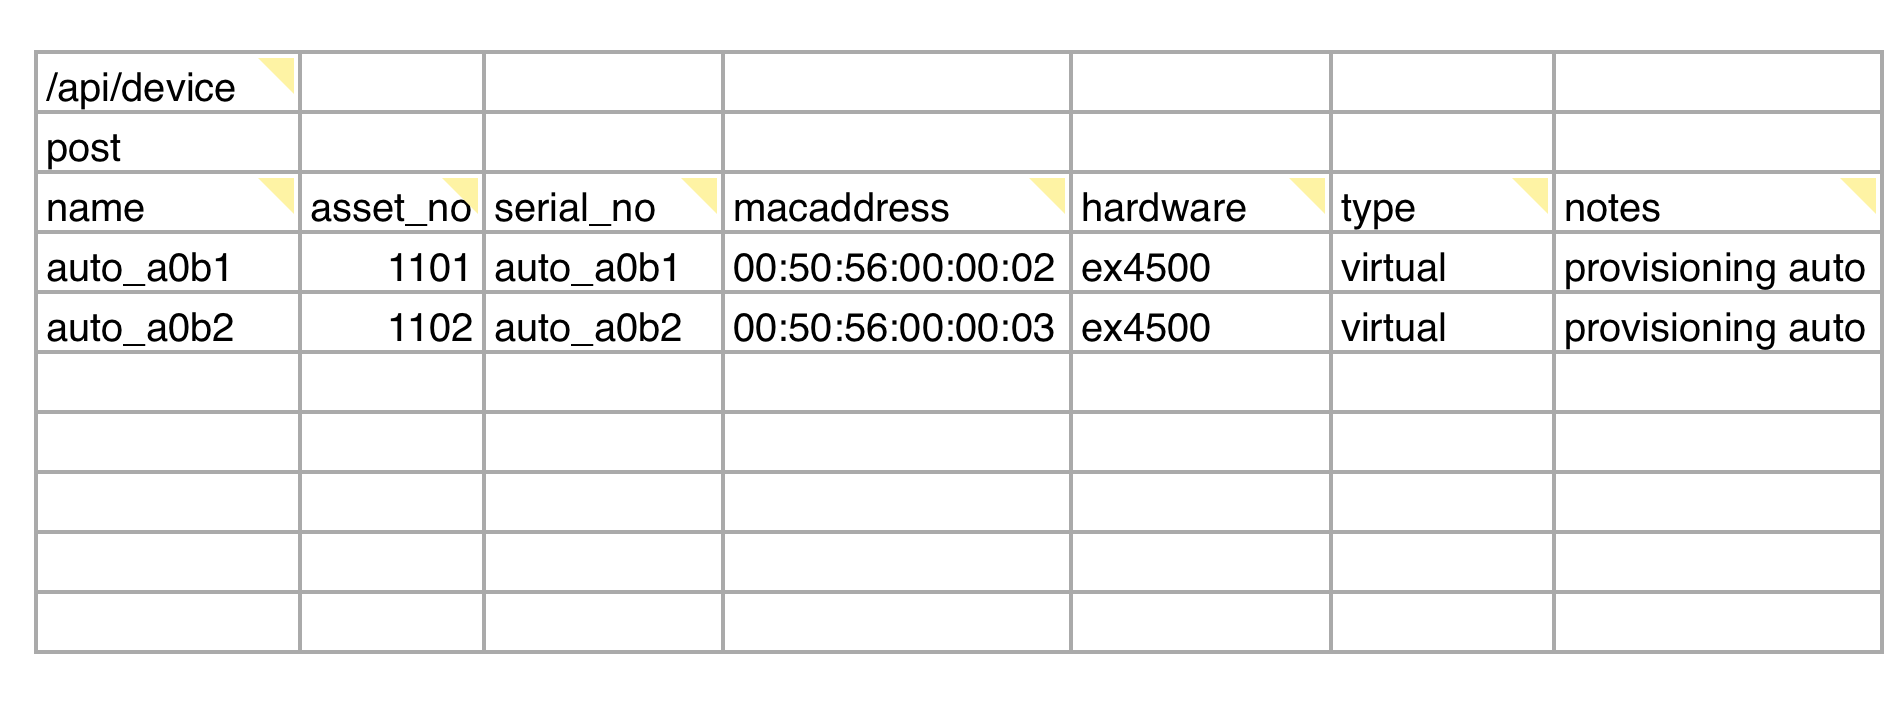
Example of the spreadsheet that needs to be uploaded at the end of the Purchasing lifecycle stage.
The spreadsheet import/export tool is found in Tools> Spreadsheet Imports/Exports (xls). There you will find many spreadsheet templates, but the one that we’re interested in is listed under Create or update devices. Download that file and add one row per device ordered.
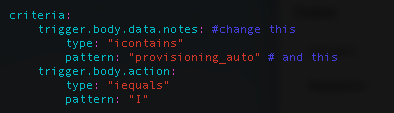
At this point, we want to make sure that these devices are put into the ‘purchasing’ lifecycle on Device42. There is a ST2 rule in our package called device_created_initial_lifecycle that will do just this. This rule relies on the contents of the ‘notes’ field from Device42. The rule will update the lifecycle of a freshly created device if the ‘notes’ field contains ‘provisioning_auto’. The exact string to check for and even the field to check is totally customizable.
If you want to change the string expected in the notes field, or to use another field besides the notes field, load up the /opt/stackstorm/packs/device42/rules/device_created_initial_lifecycle.yaml file and edit the criteria block’s first trigger field and pattern:
Now the devices should all exist on D42 with at least serial numbers, MAC addresses, and hardware models. Next up is the data center operations team and the ‘mounting’ lifecycle.
Mounting Lifecycle: Rack and Stack
Once the physical devices have been delivered to the data center, the devices should be moved into the mounting lifecycle by the data center operations team. This is accomplished by data center operators editing the device pages in D42 and adding a mounting lifecycle event to the device under the lifecycle tab.
At this point, the data center operations team can consult Device42 to design rack allocations to best utilize available space and power. After the devices are mounted in their racks, the data center operator can either manually document the port and switch configuration of the device or wait to use auto discovery later. Finally, they can now move the mounted devices into the networking lifecycle and call it a day.
Networking Lifecycle: Fully Automated
Our machines are now in the data center resting snug and mounted in their server racks. It’s time to configure their place in the greater network. Many things are taken care of automatically during the networking lifecycle. These tasks are executed in order by a Stackstorm ActionChain called networking_lifecycle_automation.
When triggered by a device entering the networking lifecycle, the networking_lifecycle_automation action chain performs the following:
- Gets the full device object from Device42.
- Request an IP suggestion for that device within a given subnet.
- Creates that IP in Device42 and assigns it to the device’s MAC address.
- Executes an OMAPI request to the DHCP server that creates a lease reservation for that MAC -> IP relationship.
- Checks if the device has a specific OS set in its OS field on D42.
- If it does, make a copy of that OS’s PXE configuration template and save it under the device’s MAC address in the PXE configuration directory.
- Update the device’s lifecycle on Device42 to os_provisioning.
Configuring the Networking Lifecycle Automation
The networking_lifecycle_automation action chain is executed by a similarly named Stackstorm rule:networking_lifecycle_automation_rule.
Because of the number of things this action chain will take care of for us, we’ll need to configure the environment a bit. Open the main configuration file for the networking automation rule located at:
/opt/stackstorm/packs/device42/rules/networking_lifecycle_automation_rule.yaml
Its contents are a relatively simple to understand YAML file:
---
    name: "networking_lifecycle_automation_rule"
    description: "Executes whenever a device enters the networking lifecycle."
    enabled: true

    trigger:
       type: "core.st2.webhook"
        parameters:
           url: "d42_lifecycle"

    criteria:
        trigger.body.data.type_id:
           type: "equals"
           pattern: "{{st2kv.system.networking }}"

    action:
       ref: "device42.networking_lifecycle_automation"
        parameters:
           subnet_id: 4
           device_id: "{{trigger.body.data.id}}"
           subnet_name: "provisioning_automation_internal_network"
           subnet_network_mask: "192.168.41.0/24"
           omapi_key:"<secret>"
           omapi_key_name: "<key_name>"
The underlined fields will need to be updated based on your specific networking requirements.
The criteria block’s pattern argument is referencing a key value pair in the Stackstorm datastore. Stackstorm offers this lightweight, convenient datastore as a place to keep important information. We are storing a key named “networking” that contains the ID of our networking lifecycle event in Device42.
We need to know the IDs of our lifecycle events in Device42.  A Stackstorm action is provided in the D42 package that will print out all the lifecycle event objects on your Device42 appliance.  Open the Stackstorm webapp and execute the get_lifecycle_event_objects action.  There are no input parameters for this action.  You should get a response similar to this:

17,vm_bootstrapping,f,f,f,"",f,f,,,,,f,,f,f,f,f
10,purchasing,f,f,f,"",f,f,,,,,f,,f,f,f,f
11,mounting,f,f,f,"",f,f,,,,,f,,f,f,f,f
12,deploying,f,f,f,"",f,f,,,,,f,,f,f,f,f
13,production,f,f,f,"",f,f,,,,,f,,f,f,f,f
14,os_provisioning,f,f,f,"",f,f,,,,,f,,f,f,f,f
15,networking,f,f,f,"",f,f,,,,,f,,f,f,f,f
16,drp_initialize,f,f,f,"",f,f,,,,,f,,f,f,f,f
With these we can create the ST2 datastore entry for the networking lifecycle event as needed. Adding key value pairs to the datastore is easy. Just run this:
$ st2 key networking 15
+------------------+--------------------------+
| Property         | Value                    |
+------------------+--------------------------+
| name             | networking               |
| value            | 15                       |
| expire_timestamp |                          |
+------------------+--------------------------+
Now the criteria pattern field in the networking_lifecycle_automation config file will function in as intended.
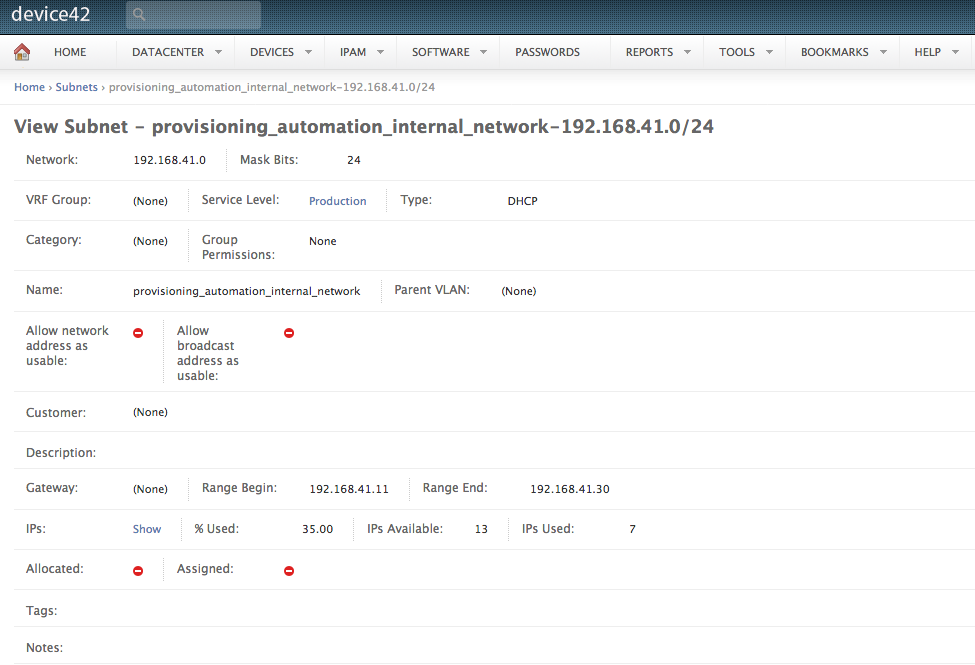
Looking at the action block, we can see the input parameters for the actual networking_lifecycle_automation action chain. The ‘subnet_id’ and ‘subnet_name’ should match the subnet where you want machines to be provisioned in. The ‘subnet_network_mask’ should contain the subnet IP + network mask, i.e something like 10.0.42.0/24. All of this can be found on the detail page of any subnet in Device42.
Next, we have the omapi_key and omapi_key_name fields. OMAPI requests need to be authenticated using an authorization key. The auth key needs to be configured on the DHCP server itself. The author of pypureomapi wrote up a simple guide on how to configure the DHCP server to accept OMAPI requests. Open /etc/dhcp/dhcpd.conf and add these lines to the file:
key defomapi {
    algorithm hmac-md5;
    secret <secret>;
};

omapi-key <key_name>;
omapi-port 7911;
Generate a key using the following command:
/usr/sbin/dnssec-keygen -a HMAC-MD5 -b 128 -n USER <key_name>
That will create two files. Copy the secret from the file ending in .key and place it in the network_lifecycle_automation_rule.yaml config where <secret> is. Do the same for <key_name>. You can use any value you like for <key_name>, but keep it consistent.
Lastly, if you want to support multiple OS provisioning strategies (i.e. multiple PXE configurations) we will need to lay some foundation for the yet to be discussed device42.write_pxe_cfg action.
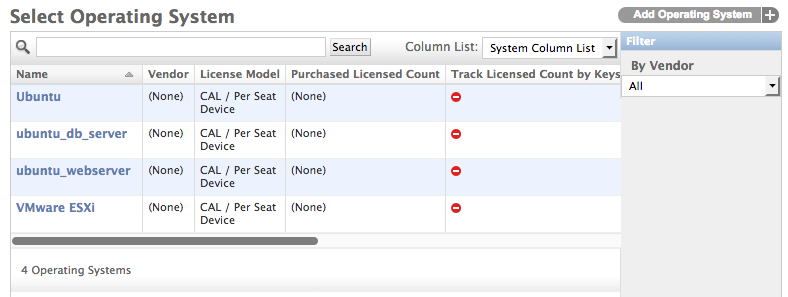
Let’s consider an example where we want to have two PXE configurations, like our imagined situation in the introduction. One PXE template will provision Ubuntu 16.04 and configure it to act as a web server. The other will also provision Ubuntu 16.04 but will configure machines to act as a database server. We’ll create Operating System objects for both PXE configuration templates in Device42.
Navigate to Software > Operating Systems > Operating Systems and create the two objects.
Now we can assign an OS value to devices. This can happen all the way back in the purchasing stage by setting the OS column in the spreadsheet. The OS need not be set by the purchasing department and could also be set by during the mounting lifecycle.


A device with a specified OS, ubuntu_webserver
We need a method of determining which PXE configuration should be returned for a given OS value from Device42. We can store this in the Stackstorm datastore.
The name for the datastore entry is simply the name of the OS on D42 followed by “_pxe_cfg”. The value for the datastore entry is the name of the actual PXE configuration file on the PXE server. That should be located at /opt/tftpboot/pxelinux0.cfg/<pxe_cfg_file>. The path to the PXE configuration directory can be set as a parameter of the device42.write_pxe_cfg action itself and defaults to the directory shown above.
Set the datastore key to <d42_os_name>_pxe_cfg and the datastore value to name of the PXE configuration file.
root@:/# st2 key set ubuntu_db_server_pxe_cfg ubuntu_db
+------------------+--------------------------+
| Property         | Value                    |
+------------------+--------------------------+
| name             | ubuntu_db_server_pxe_cfg |
| value            | ubuntu_db                |
| expire_timestamp |                          |
+------------------+--------------------------+
Once all your operating systems are set in the datastore, we can check to ensure everything looks good by executing:
$ st2 key list

And there they are!
That will take care of the configuration for the network_lifecycle_automation_rule. Now let’s look at the network_lifecycle_automation action chain itself.
The Networking Lifecycle Automation Action Chain
First, the action chain will use the device42.get_device_by_id Stackstorm action to request information about the device. This is needed to get the MAC address of the device from D42. Since this action chain is triggered by a lifecycle event webhook from Device42, we only have the contents of the webhook to reference. Thankfully, that contains the device_id where the lifecycle event was added to.
   -
           name: "get_device"
           ref: "device42.get_device_by_id"
           parameters:
               device_id: "{{device_id}}"
           on-success: "suggest_ip"
           on-failure: "get_device_fail"
Next the automation executes the device42.suggest_next_ip action:
   -
           name: "suggest_ip"
           ref: "device42.suggest_next_ip"
           parameters:
               subnet_id: "{{subnet_id}}"
               return_ip_only: true
           on-success: "create_ip"
           on-failure: "suggest_ip_fail"
If that returns a valid IP, we’ll subsequently create the IP address, add it to a subnet, and associate it with the device’s MAC address with the device42.create_or_edit_ip action.
   -
           name: "create_ip"
           ref: "device42.create_or_edit_ip"
           parameters:
               subnet_name: "{{subnet_name}}"
               subnet_network_mask: "{{subnet_network_mask}}"
               ipaddress: "{{suggest_ip.result}}"
               ip_type: "{{ip_type}}"
               device_name: "{{get_device.result.name}}"
               macaddress: "{{get_device.result.mac_addresses[0].mac }}"
               tags: "{{tags}}"
               vrf_group: "{{vrf_group}}"
               vrf_group_id: "{{vrf_group_id}}"
               debug: false
               available: "0"
           on-failure: "create_ip_fail"
           on-success: "create_dhcp_reservation"
After the IP address is created within Device42, we need to create a DHCP lease reservation between the device’s MAC and IP address. As we’ve discussed, our DHCP server is configured to accept OMAPI requests that allow for remote control over the isc-dhcp-server. There is a convenient python library called pypureomapi that we can use to make these OMAPI requests using python. The device42.create_dhcp_reservation action implements this functionality for us.
   -
           name: "create_dhcp_reservation"
           ref: "device42.create_dhcp_lease_reservation"
           parameters:
               reserved_ip: "{{suggest_ip.result}}"
               mac_addr: "{{get_device.result.mac_addresses[0].mac}}"
               server_name: "{{get_device.result.serial_no}}"
               dhcp_host: "192.168.41.1"
               dhcp_port: "7911"
               auth_key_name: "{{omapi_key_name}}"
               auth_key: "{{omapi_key}}"
           on-failure: "create_dhcp_lease_reservation_fail"
           on-success: “write_pxe_cfg”
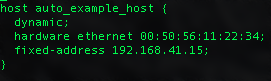
The DHCP reservation with add a new host to the dhcpd.leases file located at /var/lib/dhcp/dhcpd.leases:
Reaching near the end of the networking lifecycle, we’ve arrived at the device42.write_pxe_cfg action. This action sets up the dynamic distribution of PXE configuration files. We’ve previously imagined two PXE configuration templates: an Ubuntu 16.04 web server, and an Ubuntu 16.04 database server.
   -
           name: "write_pxe_cfg_file"
           ref: "device42.write_pxe_cfg"
           parameters:
               mac_addr: "{{get_device.result.mac_addresses[0].mac}}"
               os: "{{get_device.result.os}}"
           on-failure: "write_pxe_cfg_fail"
           on-success: “add_device_lifecycle”
Our automation will create a new PXE configuration file for each device filed under the device’s MAC address. The file name of this device specific PXE configuration file will begin with “01-” for physical network cards. The write_pxe_cfg D42 Stackstorm action will search the PXE configuration directory (typically /opt/tftpboot/pxelinux0.cfg/<pxe_config_file>) for a PXE configuration template that matches the OS specified on the device in D42. This mapping is stored in the Stackstorm datastore as we set up earlier.
If the OS field is empty in D42 for a device, PXE will simply serve the default PXE configuration file to the machine during its boot sequence.
When that device boots for the first time and attempts to provision using PXE, it will receive the specific PXE configuration created for it over TFTP. Remember, these PXE configurations also point towards which Kickstart file will be used to drive the OS installation and further configure the machine.

When a machine with the MAC address 00-50-56-00-00-02 on its primary network interface boots, PXE will deliver it the PXE config made just for it!
Finally, the networking lifecycle stage will end by updating the device’s current lifecycle, changing it to “os_provisioning”.
   -
           name: "add_device_lifecycle"
           ref: "device42.add_device_lifecycle"
           parameters:
               identifier_type: "device"
               identifier: "{{get_device.result.name}}"
               lc: "os_provisioning"
           on-failure: "add_device_lifecycle_fail"
That covers the entire networking_lifecycle_automation action chain. All that is left now is to boot the machine during the os_provisioning lifecycle.
OS_Provisioning Lifecycle
Everything required for OS provisioning has been configured in the previous steps, and now all that remains is for them to be turned on. Once the machines boot, they will be guided through the os_provisioning process by the careful instructions we’ve laid out for them.
The full automation that occurs during the networking lifecycle should complete quickly, so it is likely that the data center operator is still physically present to turn the machine on. If you don’t want to push the power button manually, you could always trigger any number of remote booting tools whenever devices entering the os_provisioning lifecycle. Tools or systems such as the NIC’s wake on LAN feature, HP integrated Lights-Out, or Supermicro IPMI all could make great additions.
Conclusion:
This post covers the technical details of the provisioning automation. A high level overview is available in the accompanying article Automated Server Provisioning with Device42, Stackstorm, and PXE Kickstart.
Today we’ve covered a lot of ground and made big strides towards the ideal, fully automated data center. Provisioning workflows are a great automation target because they are typically rather consistent and systematic. Even so, these workflows often times get bogged down by change request forms and inter-team delay. By implementing a pre-approved provisioning automation with a known workflow, we can alleviate so much frustration and inefficiency.
This automation also promotes a high degree of standardization in your data center which comes with its own benefits. Namely, if all the servers in your datacenter are one of a few known archetypes, automating remediation workflows for common issues becomes far more powerful and achievable. Perhaps that’s an automation to cover here in the future!
As always, these blogs and libraries are released to our readers and clients with the hope that they will empower your team with everything you’ll need to develop your own custom automations using Device42. If you’ve already been developing these types of solutions, we’d love to get in touch with you and hear all about it!

If you have any questions or suggestions, leave a comment below, or get in touch via email at [email protected] for general inquiries, or email the author directly at [email protected]. Thanks for reading!