

Using Terraform, we can automate the creation and management of certain resources contained with Device42. This allows us to automate the creation of resources such as VLANs, subnets, and IP addresses in code and easily update them later on.
Setting up Terraform
Before creating any resources, we first need to set up a minimal Terraform project. This involves specifying the required Device42 Terraform provider and configuring it to authenticate with your account.
The code below accomplishes this: We first specify the poroping/device42 provider and then configure it with the host, username, and password of a Device42 account.
Note: The account used must have sufficient permissions to create, update, and destroy resources via Device42’s REST API.
terraform {
  required_providers {
    device42 = {
      source = "poroping/device42"
      version = "0.0.6"
    }
  }
}

variable "password" {}

provider "device42" {
  host     = "demo.device42.com"
  username = "[email protected]"
  password = var.password
  insecure = true
}
You can place this content in any file that ends with a .tf extension, but main.tf is commonly used.
The first time you run Terraform on a new project, you need to initialize the directory by running terraform init:
$ terraform init

Initializing the backend...

Initializing provider plugins...
- Reusing previous version of poroping/device42 from the dependency lock file
- Installing poroping/device42 v0.0.6...
- Installed poroping/device42 v0.0.6 (self-signed, key ID 76B3E006A4154344)

Partner and community providers are signed by their developers.

If you'd like to know more about provider signing, you can read about it here:
https://www.terraform.io/docs/cli/plugins/signing.html

Terraform has been successfully initialized!
From here, you can run terraform plan to view what changes Terraform will make (but without actually making them):
$ TF_VAR_password=[your password here] terraform plan

No changes. Your infrastructure matches the configuration.

Terraform has compared your real infrastructure against your configuration and found no differences, so no changes are needed.
Note that we are reading the Device42 user’s password from an environment variable to avoid hardcoding it in the Terraform file.
Terraform lists no changes to make since we have not defined any resources yet. Let’s do that next.
Defining Resources
The Terraform Device42 provider currently supports the following resource types:
- VLANs
- Subnets
- IP addresses
Creating VLANs
We can define a new VLAN resource like this:
resource "device42_ipam_vlan" "my_vlan" {
  number = "42"
  name   = "FooBar"
}
If we now run terraform plan, we can see that Terraform will create a new VLAN resource:
$ TF_VAR_password=[your password here] terraform plan

Terraform used the selected providers to generate the following execution plan. Resource actions are indicated with the following symbols:
  + create

Terraform will perform the following actions:

  # device42_ipam_vlan.my_vlan will be created
  + resource "device42_ipam_vlan" "my_vlan" {
      + check_if_exists = false
      + id              = (known after apply)
      + name            = "FooBar"
      + number          = "42"
      + tags            = (known after apply)
      + vlan_id         = (known after apply)
    }

Plan: 1 to add, 0 to change, 0 to destroy.
From here, we can run terraform apply to create the new VLAN:
$ TF_VAR_password=[your password here] terraform apply

Terraform used the selected providers to generate the following execution plan. Resource actions are indicated with the following symbols:
  + create

Terraform will perform the following actions:

  # device42_ipam_vlan.my_vlan will be created
  + resource "device42_ipam_vlan" "my_vlan" {
      + check_if_exists = false
      + id              = (known after apply)
      + name            = "FooBar"
      + number          = "42"
      + tags            = (known after apply)
      + vlan_id         = (known after apply)
    }

Plan: 1 to add, 0 to change, 0 to destroy.

Do you want to perform these actions?
  Terraform will perform the actions described above.
  Only 'yes' will be accepted to approve.

  Enter a value:
Before applying the changes, Terraform gives us a chance to look over the plan output first. If the plan looks good, enter yes to apply the changes. If successful, we can see our VLAN created as follows:
device42_ipam_vlan.my_vlan: Creating...
device42_ipam_vlan.my_vlan: Creation complete after 1s [id=43000]

Apply complete! Resources: 1 added, 0 changed, 0 destroyed.
Importing VLANs
You can add an existing VLAN to be managed by Terraform. If you’re familiar with Terraform, other providers use Terraform’s terraform import functionality to do this. Device42 works differently. We need to use a check_if_exists flag on the resource’s definition.
We can import an existing VLAN by changing our VLAN definition to the following:
resource "device42_ipam_vlan" "my_vlan" {
  check_if_exists = true

  number     = "42"
  name       = "FooBar"
}
In some cases, you may receive the following error if you have multiple VLANs with the same number:
│ Error: error multiple vlans found, filter better.
│
│   with device42_ipam_vlan.my_vlan,
│   on main.tf line 19, in resource "device42_ipam_vlan" "my_vlan":
│   19: resource "device42_ipam_vlan" "my_vlan" {
This error message means that multiple VLANs were found when Terraform first checked if a VLAN with a given number exists. To resolve this, we can add tags to our Terraform resource and associated VLAN in Device42 to narrow down the number of VLANs found to a single VLAN.
resource "device42_ipam_vlan" "my_vlan" {
  check_if_exists = true

  number     = "42"
  name       = "FooBar"
  tags_exist = "terraform_vlan"
}
Now we can run terraform apply again to import the existing resource into Terraform instead of creating a new one. Note that, even though Terraform says it will create a new resource in the plan output, it will not create a new one if an existing one with the given parameters is found first when the check_if_exists flag is set to true.
Subnets
Creating other resource types works similarly to creating VLANs. We define a resource in Terraform, check the plan output, and apply it once it looks as we expect it to. To create subnets, you can do the following in Terraform:
resource "device42_ipam_subnet" "my_subnet" {
  mask_bits      = "24"
  name           = "FooBar Subnet"
  network        = "10.10.10.0"
  parent_vlan_id = device42_ipam_vlan.my_vlan.id
  tags           = "foobar"
}
The subnet definition is similar to the VLAN one above, but with one notable difference: We reference the ID of the VLAN as the parent of the subnet with parent_vlan_id = device42_ipam_vlan.my_vlan.id.
This automatically associates the new subnet to the VLAN we previously created. The advantage of this is that any changes to the VLAN will be reflected in the subnet such that it is always set as the parent of the subnet.Running terraform apply at this point will recognize that the VLAN was already created and has no modifications and will only create the newly defined subnet.
Terraform will perform the following actions:
  # device42_ipam_subnet.my_subnet will be created
  + resource "device42_ipam_subnet" "my_subnet" {
      + check_if_exists    = false
      + create_from_parent = false
      + customer_id        = (known after apply)
      + id                 = (known after apply)
      + mask_bits          = "24"
      + name               = "FooBar Subnet"
      + network            = "10.10.10.0"
      + parent_mask_bits   = (known after apply)
      + parent_subnet_id   = (known after apply)
      + parent_vlan_id     = "43004"
      + parent_vlan_name   = (known after apply)
      + parent_vlan_number = (known after apply)
      + subnet_id          = (known after apply)
      + tags               = "foobar"
    }

Plan: 1 to add, 0 to change, 0 to destroy.

Do you want to perform these actions?
  Terraform will perform the actions described above.
  Only 'yes' will be accepted to approve.

  Enter a value: yes

device42_ipam_subnet.my_subnet: Creating...
device42_ipam_subnet.my_subnet: Creation complete after 1s [id=2834]

Apply complete! Resources: 1 added, 0 changed, 0 destroyed.
IPs
Lastly, we can create IP addresses in the same way:
resource "device42_ipam_ip" "my_ip" {
  ipaddress = "10.10.10.1"
  notes     = "FooBar"
  subnet_id = device42_ipam_subnet.my_subnet.subnet_id
}
Here we again relate the new IP address by defining a device42_ipam_ip resource. We relate this back to the subnet created above by setting the subnet_id equal to device42_ipam_subnet.my_subnet.subnet_id from the subnet resource.
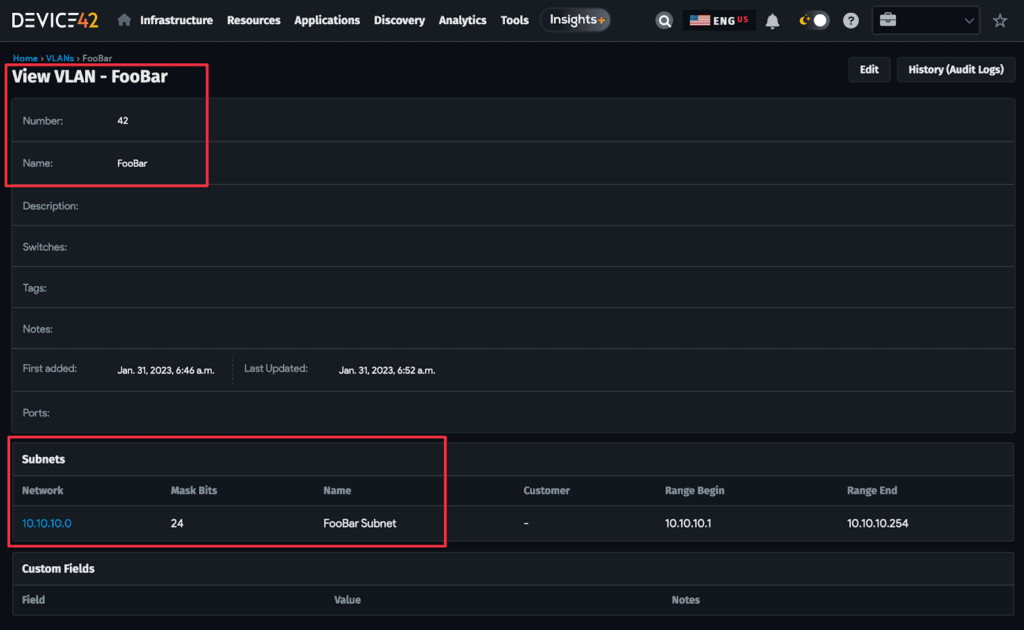
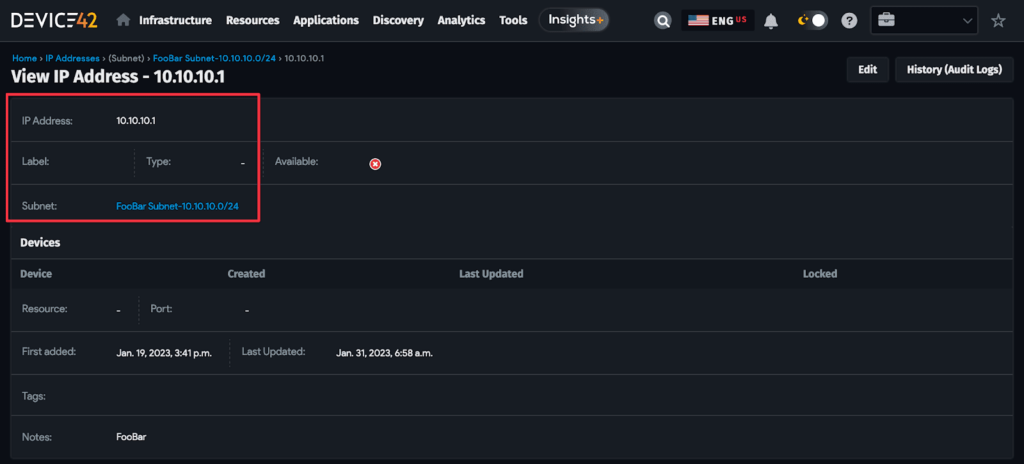
Running terraform apply will create the IP addresses and we can see in the Device42 web console that our three resources have been created and are associated with one another as expected:
Putting it all together, the final Terraform file for creating these resources is as follows:
terraform {
  required_providers {
    device42 = {
      source = "poroping/device42"
      version = "0.0.6"
    }
  }
}

variable "password" {}

provider "device42" {
  host     = "demo.device42.com"
  username = "[email protected]"
  password = var.password
  insecure = true
}

resource "device42_ipam_vlan" "my_vlan" {
  check_if_exists = true

  number     = "42"
  name       = "FooBar"
  tags_exist = "foobar"
}

resource "device42_ipam_subnet" "my_subnet" {
  mask_bits      = "24"
  name           = "FooBar Subnet"
  network        = "10.10.10.0"
  parent_vlan_id = device42_ipam_vlan.my_vlan.id
  tags           = "foobar"
}

resource "device42_ipam_ip" "my_ip" {
  ipaddress = "10.10.10.1"
  notes     = "FooBar"
  subnet_id = device42_ipam_subnet.my_subnet.subnet_id
}
Next Steps
This covers the basics of creating and managing Device42 resources through Terraform. Terraform provides additional functionality to help scale your projects out between multiple team members, organize your code, and refactor your code. A few of these topics are touched on below.
Backend
By default, as in the examples above, Terraform keeps a state file (terraform.tfstate) containing information on the expected state of each resource. When a plan is generated, this state file is compared against the state found by the provider and any differences are corrected to match the Terraform configuration as it is written.
Since this is a local file, running terraform plan with the same code and credentials on a team member’s computer will result in a different plan output. To solve this problem, Terraform supports multiple options for shared backends. For example, you could configure Terraform to keep a copy of the state file on AWS S3. Whenever Terraform is run, this shared file on S3 is used so that all team members share the same, consistent state. Other backends are supported too. See the Terraform documentation for more.
Data structures and loops
Terraform supports more complex data structures, such as lists and maps. Using these structures can reduce code duplication and the amount of code that must be written.For example, if there are many IP addresses to create within Device42, you can put these into a list to be iterated over rather than defining explicit IP address resources for each. By putting the relevant IP addresses in a list by way of a local variable and then iterating over that list with a for_each meta-argument, an IP address resource will be created for each even though we only defined one IP address resource block as shown below.
locals {
  ip_addresses = [
    "10.10.10.1",
    "10.10.10.2",
    "10.10.10.3",
  ]
}

resource "device42_ipam_ip" "my_ip" {
  for_each = toset(local.ip_addresses)

  ipaddress = each.value
  subnet_id = device42_ipam_subnet.my_subnet.subnet_id
}
Running terraform plan will then show that it intends to create three IP address resources:
Terraform will perform the following actions:

  # device42_ipam_ip.my_ip["10.10.10.1"] will be created
  + resource "device42_ipam_ip" "my_ip" {
      + id         = (known after apply)
      + ipaddress  = "10.10.10.1"
      + notes      = (known after apply)
      + subnet_id  = "2834"
      + suggest_ip = false
    }

  # device42_ipam_ip.my_ip["10.10.10.2"] will be created
  + resource "device42_ipam_ip" "my_ip" {
      + id         = (known after apply)
      + ipaddress  = "10.10.10.2"
      + notes      = (known after apply)
      + subnet_id  = "2834"
      + suggest_ip = false
    }

  # device42_ipam_ip.my_ip["10.10.10.3"] will be created
  + resource "device42_ipam_ip" "my_ip" {
      + id         = (known after apply)
      + ipaddress  = "10.10.10.3"
      + notes      = (known after apply)
      + subnet_id  = "2834"
      + suggest_ip = false
    }

Plan: 3 to add, 0 to change, 0 to destroy.
This approach may be taken further by using maps and nested lists to create a complex structure of VLANs, subnets, and IP addresses with minimal code duplication.
Modules
Another feature Terraform provides is the concept of modules. The primary function of modules is code reuse. For example, we may want to write a custom network module that creates VLAN, subnet, and IP address resources according to arguments given to it. This avoids the need to duplicate Terraform code for each network, which would otherwise only differ by some variable names.
To do this, we need to create a directory for our new modules. All Terraform modules reside in dedicated directories. If we call our module network, the directory structure would look like this:
device42_terraform_example/
  main.tf
  network/
    main.tf
With the structure defined, the network/main.tf file can then be filled with the following:
terraform {
  required_providers {
    device42 = {
      source = "poroping/device42"
      version = "0.0.6"
    }
  }
}

variable "ip_addresses" {type = list(string)}
variable "network_name" {}
variable "subnet" {}
variable "vlan_number" {}
variable "vlan_tags" {}

resource "device42_ipam_vlan" "my_vlan" {
  check_if_exists = true

  name       = var.network_name
  number     = var.vlan_number
  tags_exist = var.vlan_tags
}

resource "device42_ipam_subnet" "my_subnet" {
  mask_bits      = "24"
  name           = "${var.network_name} Subnet"
  network        = var.subnet
  parent_vlan_id = device42_ipam_vlan.my_vlan.id
  tags           = var.network_name
}

resource "device42_ipam_ip" "my_ip" {
  for_each = toset(var.ip_addresses)

  ipaddress = each.value
  notes     = var.network_name
  subnet_id = device42_ipam_subnet.my_subnet.subnet_id
}
This accomplishes a few things:
- It first tells Terraform what the required providers are to use this module.
- It then declares the variables that this module expects to be given.
- Finally, it defines the resources to be created.
Using the module is a matter of calling it with the necessary arguments from the top-level main.tf file:
module "network_1" {
  source = "./network"

  ip_addresses = ["10.10.10.1", "10.10.10.2", "10.10.10.3"]
  network_name = "FooBar 1"
  subnet       = "10.10.10.0"
  vlan_number  = 42
  vlan_tags    = "foobar_1"
}
We give the module a unique name of network_1, tell Terraform where to find the module with source = “./network”, and provide the required arguments.
A second network module with different arguments can be defined too:
module "network_2" {
  source = "./network"

  ip_addresses = ["10.10.11.1", "10.10.11.2", "10.10.11.3"]
  network_name = "FooBar 2"
  subnet       = "10.10.11.0"
  vlan_number  = 42
  vlan_tags    = "foobar_2"
}
In order to apply this configuration, we first need to run terraform init to inform Terraform of the new module (this only needs to be run the first time after defining a new module). Then we can run terraform plan to show the plan output of all the module’s resources to be created:
Terraform will perform the following actions:

  # module.network_1.device42_ipam_ip.my_ip["10.10.10.1"] will be created
  + resource "device42_ipam_ip" "my_ip" {
      + id         = (known after apply)
      + ipaddress  = "10.10.10.1"
      + notes      = "FooBar 1"
      + subnet_id  = (known after apply)
      + suggest_ip = false
    }

  # module.network_1.device42_ipam_ip.my_ip["10.10.10.2"] will be created
  + resource "device42_ipam_ip" "my_ip" {
      + id         = (known after apply)
      + ipaddress  = "10.10.10.2"
      + notes      = "FooBar 1"
      + subnet_id  = (known after apply)
      + suggest_ip = false
    }

  # module.network_1.device42_ipam_ip.my_ip["10.10.10.3"] will be created
  + resource "device42_ipam_ip" "my_ip" {
      + id         = (known after apply)
      + ipaddress  = "10.10.10.3"
      + notes      = "FooBar 1"
      + subnet_id  = (known after apply)
      + suggest_ip = false
    }

  # module.network_1.device42_ipam_subnet.my_subnet will be created
  + resource "device42_ipam_subnet" "my_subnet" {
      + check_if_exists    = false
      + create_from_parent = false
      + customer_id        = (known after apply)
      + id                 = (known after apply)
      + mask_bits          = "24"
      + name               = "FooBar 1 Subnet"
      + network            = "10.10.10.0"
      + parent_mask_bits   = (known after apply)
      + parent_subnet_id   = (known after apply)
      + parent_vlan_id     = (known after apply)
      + parent_vlan_name   = (known after apply)
      + parent_vlan_number = (known after apply)
      + subnet_id          = (known after apply)
      + tags               = "FooBar 1"
    }

  # module.network_1.device42_ipam_vlan.my_vlan will be created
  + resource "device42_ipam_vlan" "my_vlan" {
      + check_if_exists = true
      + id              = (known after apply)
      + name            = "FooBar 1"
      + number          = "42"
      + tags            = (known after apply)
      + tags_exist      = "foobar_1"
      + vlan_id         = (known after apply)
    }

  # module.network_2.device42_ipam_ip.my_ip["10.10.11.1"] will be created
  + resource "device42_ipam_ip" "my_ip" {
      + id         = (known after apply)
      + ipaddress  = "10.10.11.1"
      + notes      = "FooBar 2"
      + subnet_id  = (known after apply)
      + suggest_ip = false
    }

  # module.network_2.device42_ipam_ip.my_ip["10.10.11.2"] will be created
  + resource "device42_ipam_ip" "my_ip" {
      + id         = (known after apply)
      + ipaddress  = "10.10.11.2"
      + notes      = "FooBar 2"
      + subnet_id  = (known after apply)
      + suggest_ip = false
    }

  # module.network_2.device42_ipam_ip.my_ip["10.10.11.3"] will be created
  + resource "device42_ipam_ip" "my_ip" {
      + id         = (known after apply)
      + ipaddress  = "10.10.11.3"
      + notes      = "FooBar 2"
      + subnet_id  = (known after apply)
      + suggest_ip = false
    }

  # module.network_2.device42_ipam_subnet.my_subnet will be created
  + resource "device42_ipam_subnet" "my_subnet" {
      + check_if_exists    = false
      + create_from_parent = false
      + customer_id        = (known after apply)
      + id                 = (known after apply)
      + mask_bits          = "24"
      + name               = "FooBar 2 Subnet"
      + network            = "10.10.11.0"
      + parent_mask_bits   = (known after apply)
      + parent_subnet_id   = (known after apply)
      + parent_vlan_id     = (known after apply)
      + parent_vlan_name   = (known after apply)
      + parent_vlan_number = (known after apply)
      + subnet_id          = (known after apply)
      + tags               = "FooBar 2"
    }

  # module.network_2.device42_ipam_vlan.my_vlan will be created
  + resource "device42_ipam_vlan" "my_vlan" {
      + check_if_exists = true
      + id              = (known after apply)
      + name            = "FooBar 2"
      + number          = "42"
      + tags            = (known after apply)
      + tags_exist      = "foobar_2"
      + vlan_id         = (known after apply)
    }

Plan: 10 to add, 0 to change, 0 to destroy.
Even though we have only defined two network modules, each containing a single VLAN, subnet, and IP address resource, Terraform will create ten resources when applied. This is where the power of Terraform begins to show. After these resources are created, managing and updating them requires only small configuration changes to take effect across all defined resources.
State manipulation
As your Terraform code becomes more complex, you will likely find the need to refactor pieces of it. If you change the name of a resource or move it to a new module, Terraform will see that as the original resource being deleted and a new one being created elsewhere. In some limited cases, it may be acceptable to allow Terraform to destroy and recreate a resource but in most cases, this is not practical and may result in downtime or risk data loss.
Instead, Terraform provides state manipulation commands that allow the modification of state files to match changes made to our code. For example, let’s say we have a resource “device42_ipam_vlan” “my_vlan” resource defined and we wish to rename it to “your_vlan”. We make the change in our Terraform file and initially, Terraform will see this as destroying the old VLAN and creating a new one:
Terraform will perform the following actions:

  # device42_ipam_vlan.my_vlan will be destroyed
  # (because device42_ipam_vlan.my_vlan is not in configuration)
  - resource "device42_ipam_vlan" "my_vlan" {
      - check_if_exists = true -> null
      - id              = "43004" -> null
      - name            = "FooBar" -> null
      - number          = "42" -> null
      - tags_exist      = "foobar" -> null
      - vlan_id         = "43004" -> null
    }

  # device42_ipam_vlan.your_vlan will be created
  + resource "device42_ipam_vlan" "your_vlan" {
      + check_if_exists = true
      + id              = (known after apply)
      + name            = "FooBar"
      + number          = "42"
      + tags            = (known after apply)
      + tags_exist      = "foobar"
      + vlan_id         = (known after apply)
    }

Plan: 1 to add, 0 to change, 1 to destroy.
By using terraform state mv as shown below, Terraform will be made aware of the name change, update the state file accordingly, and not attempt to change any resources on the remote system.
$ terraform state mv device42_ipam_vlan.my_vlan device42_ipam_vlan.your_vlan

Move "device42_ipam_vlan.my_vlan" to "device42_ipam_vlan.your_vlan"
Successfully moved 1 object(s).
$ TF_VAR_password=[your password here] terraform plan

device42_ipam_vlan.your_vlan: Refreshing state... [id=43004]

No changes. Your infrastructure matches the configuration.
The same can be done for moving resources into and out of modules with a state mv command of the form terraform state mv device42_ipam_vlan.my_vlan module.network_1.device42_ipam_vlan.my_vlan.
The terraform fmt command
Terraform has a well-defined code format. A quick win for standardizing code formatting between multiple engineers who may write code differently is to run the terraform fmt command in a directory containing .tf files. Terraform will automatically reformat these files to match the canonical format.
Further reading
The full documentation for the Device42 Terraform provider is located at https://registry.terraform.io/providers/poroping/device42/latest/docs.