

Host discovery is tricky when you manage a network of non-trivial size. Determining which servers are running, where they are on your network, and what software they are running is challenging, even with network scanning tools. But Nmap is a virtual Swiss Army Knife for network scanning.

Nmap is an open-source security tool for network discovery and security auditing. We’ll dive right into using it for host discovery but for a more general introduction, you can take a look at the official Nmap book. This guide will walk through the most common and useful Nmap scans for host discovery to demonstrate how to effectively use Nmap on your own networks. We’ll also show you how these scans can be performed more easily within Device42 and integrated with the rest of your Device42 resources.
This guide is written with Nmap 7.80 running on Ubuntu 22.04 through an AWS EC2 instance. There should be minimal to no discrepancies with other environments.
List Scans
Before doing any active scans on the target network, we can start by doing a so-called “list scan”. A list scan doesn’t send traffic to any hosts but rather attempts a reverse DNS lookup to determine if a hostname can be found for the target. Occasionally, this will provide useful information.For example, doing a list scan against one of Google’s IP addresses reveals a hostname for a server seemingly in the Seattle area (sea30s13-in-f14.1e100.net):
$ dig google.com

142.251.211.238

$ nmap -sL 142.251.211.238

Starting Nmap 7.80 ( https://nmap.org )
Nmap scan report for sea30s13-in-f14.1e100.net (142.251.211.238)
Nmap done: 1 IP address (0 hosts up) scanned in 0.69 seconds
Ping Scans
When scanning for hosts, at the most basic level, we can use Nmap on a single host without doing any port scanning. We use the -sn scan option (for “no port scan”) to tell Nmap to ping the given IP address/block for hosts.
$ nmap -sn 10.0.1.11

Starting Nmap 7.80 ( https://nmap.org )
Nmap scan report for ip-10-0-1-11.us-west-2.compute.internal (10.0.1.11)
Host is up.
Nmap done: 1 IP address (1 host up) scanned in 0.00 seconds
In this case, we can see that the given host, 10.0.1.11, is up and responding to pings. This ping scan is similar to the traditional ping command, but by default an Nmap ping scan will also attempt to connect to any TCP service running on ports 80 and 443 with ACK and SYN packets respectively. These ports are customizable with the -PS and -PA options if you know there’s a particular service running on another port that you would like to send traffic to.Because of this additional traffic that Nmap sends, the default ping scan behaves slightly differently to the traditional ping command: Targets on the internet will likely not respond to ICMP pings and would appear down, so Nmap’s -sn configuration uses additional techniques to determine if a host is up. However, a pure ICMP ping can be replicated with
nmap -PE -sn 10.0.1.11.Note that a ping scan does not definitively determine if a host is up, only if it is responding to pings. A host that does not respond to pings would appear down with this scan type, but it is useful as a quick check to determine which hosts may be running on a network.
UDP Ping Scans
A UDP ping scan can be useful to circumvent firewalls between you and your target, as some firewalls will allow UDP traffic while blocking TCP. In this scan, Nmap sends a UDP packet to a high-numbered port that it expects to be closed. Depending on the response received, Nmap may be able to determine whether there is a host at the given address. Let’s say we have a target that is not responding to any pings:
$ nmap -sn 10.0.1.11

Starting Nmap 7.80 ( https://nmap.org )
Note: Host seems down. If it is really up, but blocking our ping probes, try -Pn
Nmap done: 1 IP address (0 hosts up) scanned in 2.06 seconds
The host appears to be down but we can tell Nmap to ignore the failed pings with -Pn and attempt a UDP ping with -PU:
$ nmap -sn -PU -Pn 10.0.1.11

Starting Nmap 7.80 ( https://nmap.org )
Nmap scan report for ip-10-0-1-11.us-west-2.compute.internal (10.0.1.11)
Host is up.
Nmap done: 1 IP address (1 host up) scanned in 0.00 seconds
With this combination, Nmap determines that the host is up.
ARP Ping Scans and IP Blocks
If you are scanning within your local network, an ARP ping is a speedy and reliable way to discover hosts. Note that Nmap can scan IP blocks rather than specific addresses, so if you would like to quickly scan a local network subnet, you can specify the block to scan.
$ nmap -sn -PR 10.0.1.1/24

Starting Nmap 7.80 ( https://nmap.org )
Nmap scan report for ip-10-0-1-11.us-west-2.compute.internal (10.0.1.11)
Host is up (0.000075s latency).
Nmap scan report for ip-10-0-1-12.us-west-2.compute.internal (10.0.1.12)
Host is up (0.000061s latency).
Nmap scan report for ip-10-0-1-13.us-west-2.compute.internal (10.0.1.13)
Host is up.
Nmap done: 256 IP addresses (3 hosts up) scanned in 1.90 seconds
Here, Nmap scanned the entire /24 block for hosts in under two seconds.
Port Scanning
Some hosts may not respond to pings of any type, at least as far as one can tell. If this is the case, you may need to scan for ports.
Basic Port Scanning
By default, Nmap performs TCP SYN scans for ports. The advantage of a TCP SYN scan is that it can be performed quickly over many ports. It starts to initiate a connection, waits for a SYN/ACK response from the server to denote that the specific port is open, but does not complete the TCP three-way handshake.
A SYN scan over the 1,000 most common ports can be run as follows:
$ nmap -sS -Pn 10.0.1.11

Starting Nmap 7.80 ( https://nmap.org )
Nmap scan report for ip-10-0-1-11.us-west-2.compute.internal (10.0.1.11)
Host is up (0.0000040s latency).
Not shown: 999 closed ports
PORT   STATE SERVICE
22/tcp open  ssh

Nmap done: 1 IP address (1 host up) scanned in 0.05 seconds
Here, we can see that Nmap found an open port for an SSH server running on 10.0.1.11 and the other 999 ports it tried were closed. Note that the -Pn flag was used here to tell Nmap to ignore a host that was seemingly down. This is not necessary if it can be determined that the host is up.
UDP Scanning
A TCP SYN scan will generally work well for services using TCP, but what about UDP services such as DNS? UDP scanning is generally slower than basic port scanning and inherently more difficult since no response is expected at the UDP transport layer. In a UDP scan, Nmap will first determine if a port is closed by checking if an unreachable ICMP error is received. If a response is received, the port is determined to be open. If no response is received, Nmap will list the state as open|filtered to denote the ambiguity of its state. Consider the following cases of scanning a UDP service, DNS. First we scan localhost:
$ nmap -sU -p 53 localhost

Starting Nmap 7.80 ( https://nmap.org )
Nmap scan report for localhost (127.0.0.1)
Host is up (0.000027s latency).

PORT   STATE  SERVICE
53/udp closed domain

Nmap done: 1 IP address (1 host up) scanned in 0.04 seconds
Nmap determines that no service is running and the port is closed.Then we scan a public DNS server, 8.8.8.8, that will respond to our UDP traffic:
$ nmap -sU -p 53 8.8.8.8

Starting Nmap 7.80 ( https://nmap.org )
Nmap scan report for dns.google (8.8.8.8)
Host is up (0.0066s latency).

PORT   STATE SERVICE
53/udp open  domain

Nmap done: 1 IP address (1 host up) scanned in 0.05 seconds
Nmap reports that the port is open.Finally, scanning a host that does not have a DNS service running such as google.com will show that Nmap cannot determine from the UDP scan alone if the port is open or not:
$ nmap -sU -p 53 google.com

Starting Nmap 7.80 ( https://nmap.org )
Nmap scan report for google.com (142.250.217.78)
Host is up (0.0078s latency).
Other addresses for google.com (not scanned): 2607:f8b0:400a:807::200e
rDNS record for 142.250.217.78: sea09s29-in-f14.1e100.net

PORT   STATE         SERVICE
53/udp open|filtered domain

Nmap done: 1 IP address (1 host up) scanned in 0.25 seconds
Other Types of Port Scans
Nmap supports many other types of scans in addition to the default TCP SYN and UDP scans. So many, in fact, that it is outside the scope of this guide to cover them all here. The Nmap documentation gives an excellent overview of all of them. Generally, however, the more esoteric port scan types are not useful for host discovery.
Operating System Discovery
Nmap builds on port scanning to detect which operating system a target is running. To do this, Nmap analyzes the response from and runs multiple tests against the host. Nmap then compares the information it gathers against a database of known OS fingerprints to identify the OS running on the host.Use the -O flag to run a scan with OS detection (note that this is an uppercase letter “O”, not zero or lowercase “o”):
$ nmap -sS -O 10.0.1.11

Starting Nmap 7.80 ( https://nmap.org )
Nmap scan report for ip-10-0-1-11.us-west-2.compute.internal (10.0.1.11)
Host is up (0.000011s latency).
Not shown: 999 closed ports
PORT   STATE SERVICE
22/tcp open  ssh
Device type: general purpose
Running: Linux 2.6.X
OS CPE: cpe:/o:linux:linux_kernel:2.6.32
OS details: Linux 2.6.32
Network Distance: 0 hops

OS detection performed. Please report any incorrect results at https://nmap.org/submit/ .
Nmap done: 1 IP address (1 host up) scanned in 1.53 seconds
Here we can see that Nmap correctly determines that the host is running Linux. However, in this case we happen to know (by checking directly on the host) that it has a 5.x kernel version, which Nmap incorrectly identifies as 2.6. Remember that Nmap’s OS detection is an educated guess and needs to be confirmed through other means, if possible.
OS-detection results will vary based on the information gathered from a host. For example, results are more accurate when at least one open port and one closed port are found. If we scan the same host with a scan type that does not gather as much information, Nmap will not be confident enough in the OS to take a guess:
$ nmap -sN -O 10.0.1.11

Starting Nmap 7.80 ( https://nmap.org )
Nmap scan report for ip-10-0-1-11.us-west-2.compute.internal (10.0.1.11)
Host is up (0.000018s latency).
Not shown: 999 closed ports
PORT   STATE         SERVICE
22/tcp open|filtered ssh
Too many fingerprints match this host to give specific OS details
Network Distance: 0 hops

OS detection performed. Please report any incorrect results at https://nmap.org/submit/ .
Nmap done: 1 IP address (1 host up) scanned in 2.79 seconds
Application Discovery
Nmap can also determine which software is listening on a port. In the example we’ve been using above, Nmap finds that there is an SSH server running on port 22. If we want to know which SSH server is listening, we can use the -sV scan.
$ nmap -sV -p 22 10.0.1.11

Starting Nmap 7.80 ( https://nmap.org )
Nmap scan report for ip-10-0-1-11.us-west-2.compute.internal (10.0.1.11)
Host is up (0.000026s latency).

PORT   STATE SERVICE VERSION
22/tcp open  ssh     OpenSSH 8.9p1 Ubuntu 3ubuntu0.1 (Ubuntu Linux; protocol 2.0)
Service Info: OS: Linux; CPE: cpe:/o:linux:linux_kernel

Service detection performed. Please report any incorrect results at https://nmap.org/submit/ .
Nmap done: 1 IP address (1 host up) scanned in 0.34 seconds
Nmap correctly reports that the SSH server on this host is OpenSSH 8.9. Application discovery can be useful to find outdated hosts on your network that may be vulnerable to exploits. Another example of this would be to scan HTTP ports for specific web servers. Here we can see that gnu.org is running Apache 2.4.29:
$ nmap -sV -p 80 gnu.org

Starting Nmap 7.80 ( https://nmap.org )
Nmap scan report for gnu.org (209.51.188.116)
Host is up (0.071s latency).
Other addresses for gnu.org (not scanned): 2001:470:142:5::116
rDNS record for 209.51.188.116: wildebeest1p.gnu.org

PORT   STATE SERVICE VERSION
80/tcp open  http    Apache httpd 2.4.29
Service Info: Host: nongnu.org

Service detection performed. Please report any incorrect results at https://nmap.org/submit/ .
Nmap done: 1 IP address (1 host up) scanned in 7.27 seconds
Keep in mind that, as with OS detection, these versions are educated guesses and are not guaranteed to be correct.
The -A Flag
Finally, it’s possible to tie all of the above into one convenient flag: -A. This flag will enable OS detection, application discovery, and a traceroute for a host combined with doing a scan of the 1,000 most common ports. This makes for an easy-to-remember command and an excellent first step for getting information on a host before delving into some of Nmap’s more obscure scan modes.
$ nmap -A 10.0.1.11

Starting Nmap 7.80 ( https://nmap.org )
Nmap scan report for ip-10-0-1-11.us-west-2.compute.internal (10.0.1.11)
Host is up (0.000010s latency).
Not shown: 999 closed ports
PORT   STATE SERVICE VERSION
22/tcp open  ssh     OpenSSH 8.9p1 Ubuntu 3ubuntu0.1 (Ubuntu Linux; protocol 2.0)
Device type: general purpose
Running: Linux 2.6.X
OS CPE: cpe:/o:linux:linux_kernel:2.6.32
OS details: Linux 2.6.32
Network Distance: 0 hops
Service Info: OS: Linux; CPE: cpe:/o:linux:linux_kernel

OS and Service detection performed. Please report any incorrect results at https://nmap.org/submit/ .
Nmap done: 1 IP address (1 host up) scanned in 2.18 seconds
With one short command, we learn that this host is running Linux with OpenSSH 8.9 on port 22 and seemingly no other open ports. Combine this with an IP block instead of a specific IP address to get this information from every host on your network in one go.
Nmap Scanning with Device42
There are three problems with using Nmap directly on the command line:
- You need to set up Nmap and remember all the scan types and other flags to set.
- You need to manage and organize the results of your scan.
- You don’t have access to any historical information about the network you’re scanning.
If you are looking for a more powerful tool, Device42 has an Nmap-based autodiscovery feature that solves all of these problems. Device42 can manage your Nmap scan on a set schedule and automatically import discovered devices into your IT management database. Let’s take a look at how that works.
Nmap Autodiscovery Spec
Before configuring a scan in Device42, you’ll need to have a Device42 Remote Collector set up on your network. See the installation documentation for details on how to do this.
First, we need to create an Nmap autodiscovery spec that will be used to scan our network. In Device42, go to Discovery > Nmap From > Add Nmap autodiscovery spec.
Give the autodiscovery spec a name, specify the Remote Collector to use in the network to be scanned, and then add the target host or hosts to scan. In the screenshot below, we’ve added the 10.92.11.0/24 block. It’s possible to scan a larger CIDR block or only a single host if necessary. You can optionally add tags to the “Tags for discovered devices” field to further organize discovered hosts.
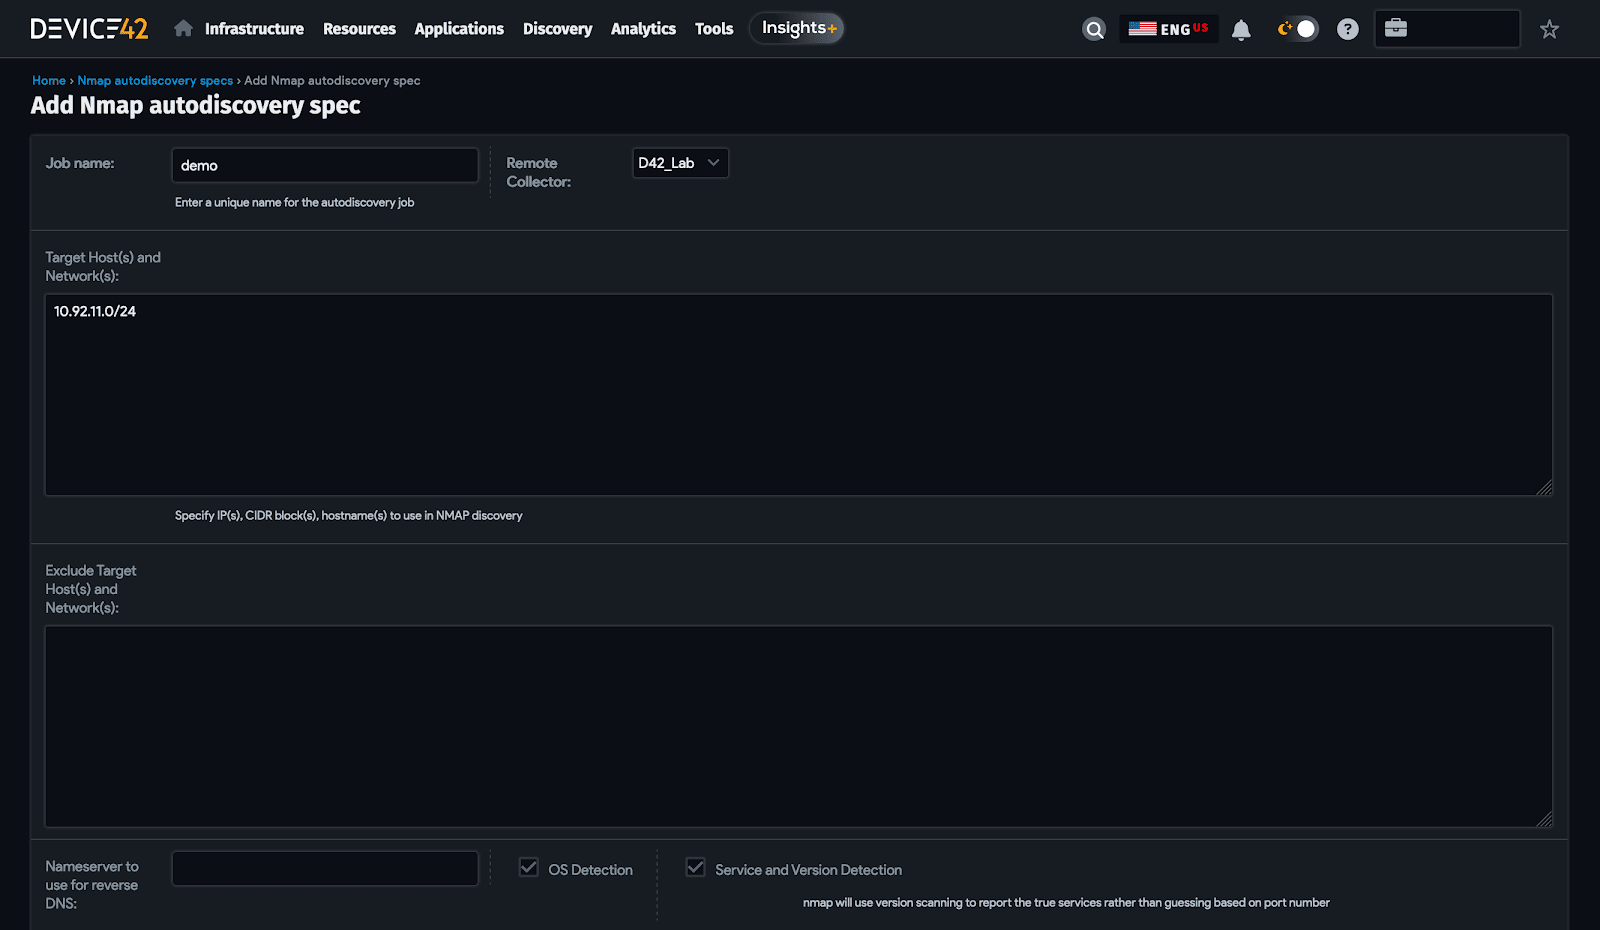
Add Nmap autodiscovery spec
Device42 handles all of the Nmap options and command line arguments for you, so there’s little to configure here. You can enable the “OS Detection” and “Service and Version Detection” options, which correspond to Nmap’s operating system and application discovery flags documented above.
Scanning and Reviewing Results
Once the autodiscovery spec is created, start the scan by selecting “Run Now”. The scan may take some time depending on how many hosts are being scanned. When this scan was finished, 109 hosts had been found in the given CIDR block.
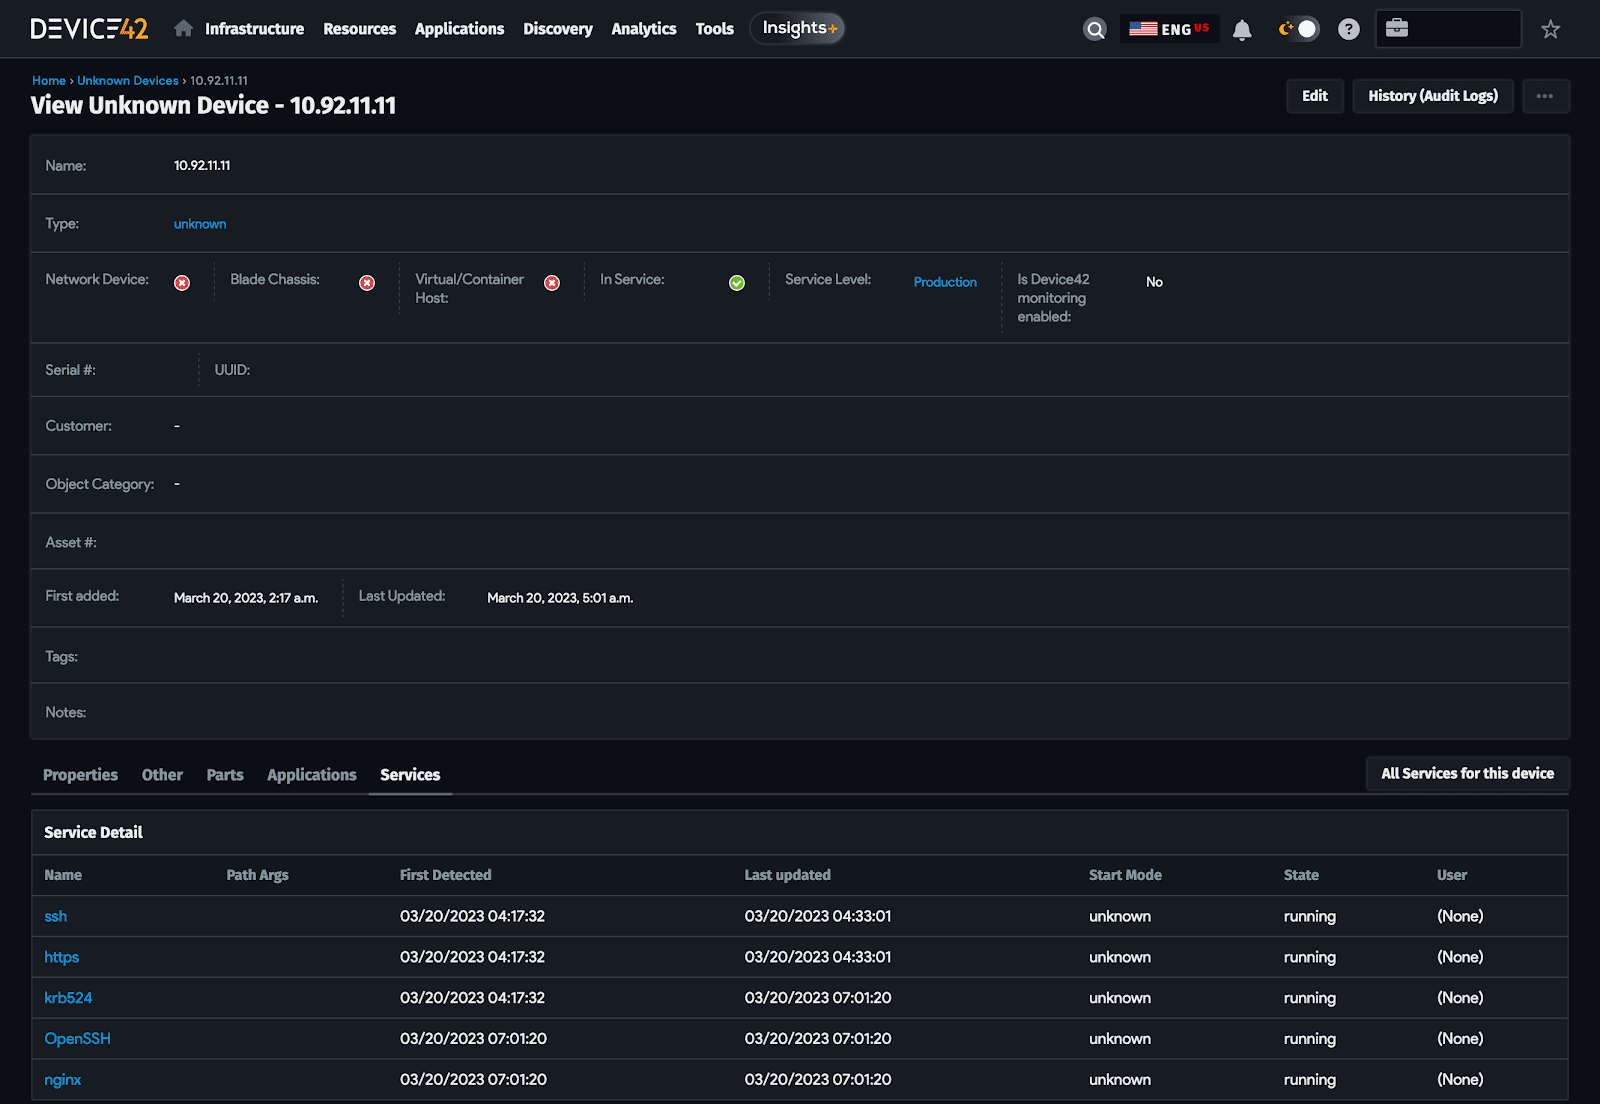
Not only does Device42 manage the Nmap scan for you, but it also automatically imports discovered hosts as devices to be reviewed and tracked. The results of the scan using the Nmap command-line tool would be a simple text output in a terminal that would need to be manually imported or scripted into a host-management tool.
Scheduled Scans
Another advantage to Nmap scanning with Device42 is the ability to easily set recurring scheduled scans. For instance, to ensure that any new hosts on your networks are inventoried automatically.
To schedule recurring scans, specify the day and time at the bottom of the Nmap autodiscovery spec:

Choosing the right tool for the job
Nmap is a great tool to always have close at hand, as it is versatile, easy to install, and requires no setup or configuration. If you regularly perform more customized host discovery on large or complex networks, Device42 offers features that go over and above what you can do with just Nmap.The examples above only scratch the surface of the advantages of using Device42. You can read more about our other auto discovery features or take a look at our case studies to see how we help our customers with host discovery, asset management, and more.