

Even the best-written, most performant, and reliable backend is useless if a client cannot find it to use it. The problem of service discovery is: How do we make a client aware of the existence of a service to connect to it?
Similarly, autodiscovery is about discovering what resources are running on a given network. Discovering resources is important for programs looking to use a service and also for humans auditing what is running on a network.
But what exactly is the difference between these concepts and how does one make use of them?
Service Discovery vs. Autodiscovery
On the surface, the difference between service discovery and autodiscovery can be a blurry one. Although the two concepts both involve the discovery of services, they serve independent, if not complementary, purposes.
Service discovery is a critical component of a system: it allows clients to find servers. At the highest level, service discovery is the process of automatically locating and accessing network services within a distributed system. Autodiscovery, however, is a tool for IT managers to audit and inventory the resources running on their networks. Autodiscovery is the automated process of identifying and gathering information about devices, applications, and services within a network to facilitate efficient management and monitoring.
Although both processes discover services, each has its own purpose and mechanism. Let’s take a closer look at these two concepts, their methods, and some introductory implementation examples.
Service Discovery
Service discovery is a critical component in the functioning of any system that relies on independent workers to distribute tasks. Service discovery typically involves three primary steps:
1. Service Registration: A service worker first registers itself with a centralized service-discovery database providing information about its location, network, and any other metadata relevant to the service. This registration lets the centralized service-discovery database know that the worker exists and is available for tasks to be sent to it.
2. Service Discovery: Another system that needs to use the service queries the centralized database to gather information about the available workers and how to submit tasks to them.
3. Routing and Load Balancing: Finally, most (but not necessarily all) services will have some mechanism for load balancing or routing tasks to their workers or both. This would most commonly involve external requests first being routed through a load balancer, which in turn submits the request to a worker, and returns the response to the external system. This mechanism allows the load balancer to evenly distribute the load between workers, which ensures that no individual worker is under capacity or overcapacity.
Service Discovery Implementations
There are a myriad of service discovery implementations of different types and variations, and which implementation is appropriate will depend on your use case. In fact, depending on your framework or platform, the problem of service discovery may be entirely abstracted away and already solved. In case it is not though, here are some of the most common service discovery implementations and when they are most useful.
Server-Side Service Discovery
Server-side service discovery implementations are most common with web services. In server-side discovery models, the domain DNS records point to a public-facing load balancer. This load balancer either maintains a service registry of available workers directly or knows the location of a service registry to query. The workers register themselves with the service registry on startup. Requests to the load balancer are routed to workers depending on the available workers in the service registry and their respective current workloads.
Server-side service discovery is well suited to web services as all the logic for load balancing and service discovery is abstracted away from the client and can be changed without needing any corresponding client-side changes.
Client-Side Service Discovery
Client-side service discovery pushes some of the work of server-side service discovery to the client. Workers for the service register themselves with a central service registry as in server-side models, but the client queries the registry directly rather than through a load balancer. The client then forwards the request to a chosen worker based on a client-determined metric.
Client-side discovery models remove the bottleneck of a load balancer, but their main disadvantage is that the client logic becomes far more complicated. Client-side service discovery also requires a certain level of trust in a client to ensure it is load balancing requests appropriately. For these reasons, client-side service discovery is better suited to systems with high levels of control over the client program.
DNS-Based Service Discovery
Client-side and server-side service discovery both require a worker to register with a central service registry so that clients and load balancers know it exists. Standard DNS queries can be used to discover services without needing this step, or even a central service registry. Known as zero-configuration networking (zeroconf), DNS-based service discovery methods use PTR, SRV, and TXT records to discover and describe the services offered by a given host. A host advertises its services via DNS records and a client queries those records to determine what is available on the network and how to connect to the discovered services.
DNS service discovery (DNS-SD) operates over traditional unicast DNS, but DNS-SD can also be used in conjunction with multicast DNS (mDNS) to send a multicast query to all hosts on a network to discover services via DNS-SD records. The disadvantage of mDNS service discovery is that it relies on a multicast DNS query, so it will only work on a local area network.
Decentralized
A more esoteric service-discovery implementation involves fully decentralized systems. These are generally more complex due to their decentralized nature but also have no single point of failure. Decentralized service discovery can be performed with a peer-to-peer Gossip protocol, a distributed system such as Apache Zookeeper, or a blockchain-based approach that stores information about workers in a distributed ledger. The details of a system like this will vary greatly based on the needs of a specific application and would accordingly need to be researched independently.
Service Discovery Examples
Let’s now consider two examples of service discovery in practice within a containerized environment: One using Docker Swarm, the other Kubernetes.
Both examples demonstrate a common application of service discovery by using a load balancer to distribute HTTP requests between workers.
Docker Swarm Service Delivery Example
Although Kubernetes is more common, a basic service discovery example using Docker Swarm is easy to follow along with as all you need for an environment setup is to install Docker on your local system.
For simplicity, the application run here is an out-of-the-box Nginx server without any customizations, but any container that returns some HTTP response could be used instead.
In addition to the many benefits Docker containerization provides, Docker contains an embedded DNS server. Any container running a query will first hit the Docker DNS server, which will return results for other containers on the same network, if they exist. Moreover, Docker Swarm can act as a load balancer for the services it runs. These features combined make for a simple server-side service-discovery implementation that is handled entirely by Docker with only basic configuration required.
To demonstrate this, let’s start by initializing Docker Swarm on a local Docker instance:
$ docker swarm init

Swarm initialized: current node (37k8n14yasy6auc2fdhn2o5fz) is now a manager.

To add a worker to this swarm, run the following command:

    docker swarm join --token SWMTKN-1-31d27jw4n2plqhpcnnqga0b8itol4vilgohaf8g9a0mb61z3ji-ba3fckjna1cu8g5n8q904siui 10.10.10.2:2377

To add a manager to this swarm, run 'docker swarm join-token manager' and follow the instructions.
Next, to communicate between containers and load balancers, we need to create an overlay network for the containers to live in:
$ docker network create --driver overlay demo

uxuibj142fxqu2kzv0ykqokft

$ docker network ls

NETWORK ID     NAME              DRIVER    SCOPE
uxuibj142fxq   demo              overlay   swarm
Now we’ll run a container that will serve as a worker for the service. As explained above, this example uses an out-of-the-box Nginx container for simplicity, but you can use any container that responds to HTTP requests.
The container run below:
- Is named nginx-deployment for DNS queries to identify it.
- Is on the overlay network created above.
- Maps port 8080 to 80, so we can connect to it from the host for demonstration purposes.
- Creates two replicas to demonstrate Docker’s load balancing to one container in the service for a given request.
$ docker service create --name nginx-deployment --network demo --publish 8080:80 --replicas 2 nginx:latest

on7jfhlwknjsf2tobulqxym66
overall progress: 2 out of 2 tasks
1/2: running   [==================================================>]
2/2: running   [==================================================>]
verify: Service converged

Confirm that the container is running with a normal docker ps (there should be two containers running since two replicas were specified above):

$ docker ps

CONTAINER ID   IMAGE          COMMAND                  CREATED          STATUS          PORTS     NAMES
5147fc1eade4   nginx:latest   "/docker-entrypoint.…"   17 seconds ago   Up 15 seconds   80/tcp    nginx-deployment.2.855dpvq427dbj2c30ksw7b5a5
f53b6c843e0c   nginx:latest   "/docker-entrypoint.…"   17 seconds ago   Up 15 seconds   80/tcp    nginx-deployment.1.1fu85hg8tnsxcapos2nkn4b0v
Now that the service is running, we can start a second container on the same network to query it. For simplicity, the same nginx image is used for this container as it is already downloaded, but we’ll only use it to execute a shell.
$ docker service create --name shell --network demo nginx:latest

30qc8a5w5qwgvnscsixs2k0gb
overall progress: 1 out of 1 tasks
1/1: running   [==================================================>]
verify: Service converged

Finally, to demonstrate Docker routing requests to one of the Nginx containers, let’s execute a shell and make a request.

$ docker ps

CONTAINER ID   IMAGE          COMMAND                  CREATED              STATUS              PORTS     NAMES
5147fc1eade4   nginx:latest   "/docker-entrypoint.…"   About a minute ago   Up About a minute   80/tcp    nginx-deployment.2.855dpvq427dbj2c30ksw7b5a5
f53b6c843e0c   nginx:latest   "/docker-entrypoint.…"   About a minute ago   Up About a minute   80/tcp    nginx-deployment.1.1fu85hg8tnsxcapos2nkn4b0v
3359286e16bb   nginx:latest   "/docker-entrypoint.…"   6 minutes ago        Up 6 minutes        80/tcp    shell.1.qzmaw8vga9c8vgf42f1d24lit

$ docker exec -it 3359286e16bb /bin/bash
In the shell we opened, update APT, and install dnsutils and curl, as neither is installed by default in the Nginx image:
root@3359286e16bb:/# apt-get update && apt-get install –yes curl dnsutils
Now we can query the Nginx service created earlier:
root@3359286e16bb:/# nslookup nginx-deployment

Server:         127.0.0.11
Address:        127.0.0.11#53

Non-authoritative answer:
Name:   nginx-deployment
Address: 10.0.1.7
Note that it’s also possible to query a specific container by using its full name as shown in the docker ps output:
# Container 1:
root@3359286e16bb:/# nslookup nginx-deployment.1.1fu85hg8tnsxcapos2nkn4b0v
Server:         127.0.0.11
Address:        127.0.0.11#53

Non-authoritative answer:
Name:   nginx-deployment.1.1fu85hg8tnsxcapos2nkn4b0v
Address: 10.0.1.8

# Container 2:
root@3359286e16bb:/# nslookup nginx-deployment.2.855dpvq427dbj2c30ksw7b5a5
Server:         127.0.0.11
Address:        127.0.0.11#53

Non-authoritative answer:
Name:   nginx-deployment.2.855dpvq427dbj2c30ksw7b5a5
Address: 10.0.1.9
To make an HTTP request to the service:
root@3359286e16bb:/# curl nginx-deployment

<!DOCTYPE html>
<html>
<head>
<title>Welcome to nginx!</title>
<style>
html { color-scheme: light dark; }
body { width: 35em; margin: 0 auto;
font-family: Tahoma, Verdana, Arial, sans-serif; }
</style>
</head>
<body>
<h1>Welcome to nginx!</h1>
<p>If you see this page, the nginx web server is successfully installed and
working. Further configuration is required.</p>

<p>For online documentation and support please refer to
<a href="http://nginx.org/">nginx.org</a>.<br/>
Commercial support is available at
<a href="http://nginx.com/">nginx.com</a>.</p>

<p><em>Thank you for using nginx.</em></p>
</body>
</html>
Because we mapped port 8080 to 80 when creating the service, it’s also possible to send a request to the service from the host system outside of a container:
$ curl localhost:8080

<!DOCTYPE html>
<html>
<head>
<title>Welcome to nginx!</title>
<style>
html { color-scheme: light dark; }
body { width: 35em; margin: 0 auto;
font-family: Tahoma, Verdana, Arial, sans-serif; }
</style>
</head>
<body>
<h1>Welcome to nginx!</h1>
<p>If you see this page, the nginx web server is successfully installed and
working. Further configuration is required.</p>

<p>For online documentation and support please refer to
<a href="http://nginx.org/">nginx.org</a>.<br/>
Commercial support is available at
<a href="http://nginx.com/">nginx.com</a>.</p>

<p><em>Thank you for using nginx.</em></p>
</body>
</html>
This demonstrates that Docker is taking the HTTP requests and load balancing them to the containers backing the service. The problem of service discovery in this case is entirely handled by Docker for us.
Kubernetes Service Discovery Example
Like Docker Swarm, Kubernetes employs a service-discovery implementation that meets the needs of many containerized applications. The example below uses a Kubernetes cluster running on Google Cloud Platform, but any Kubernetes hosting will be sufficient. The set up of a cluster will vary depending on the platform, so we’ve omitted this step here. What follows assumes you have a cluster running with kubectl configured to control it.
As with our Docker Swarm service delivery example, this example uses a load balancer to distribute HTTP requests between workers and an out-of-the-box Nginx server.
First, let’s use kubectl to deploy an Nginx container to a pod on the cluster. The YAML for this is hosted on the Kubernetes website as an example, but we’ll include it here for the sake of demonstration.
$ kubectl apply -f https://k8s.io/examples/application/deployment.yaml

deployment.apps/nginx-deployment created

The YAML file above runs a basic Nginx container as such:

apiVersion: apps/v1
kind: Deployment
metadata:
  name: nginx-deployment
spec:
  selector:
    matchLabels:
      app: nginx
  replicas: 2
  template:
    metadata:
      labels:
        app: nginx
    spec:
      containers:
      - name: nginx
        image: nginx:1.14.2
        ports:
        - containerPort: 80
The pod’s creation can be verified by checking the output of kubectl get pods (note that two are running since two replicas were specified in the YAML above):
$ kubectl get pods

NAME                                READY   STATUS    RESTARTS   AGE
nginx-deployment-5564967b86-5mqzg   1/1     Running   0          28s
nginx-deployment-5564967b86-sjmnz   1/1     Running   0          28s
With the Nginx pod running, we can now create a load balancer service object that will handle load-balancing requests to containers in the pod and service discovery with those containers:
$ kubectl expose deployment nginx-deployment --type LoadBalancer --port 80 --target-port 80

service/nginx-deployment exposed
To confirm it was created:
$ kubectl get service nginx-deployment

NAME               TYPE           CLUSTER-IP      EXTERNAL-IP     PORT(S)        AGE
nginx-deployment   LoadBalancer   10.52.131.138   34.168.13.112   80:32756/TCP   81s
Note that here, the external IP is visible too. Now you should be able to visit the IP in a web browser and view the default Nginx response. That’s certainly good, but to demonstrate how Kubernetes is handling service discovery for us, it’s necessary to open a shell in the cluster and do some closer inspection. Below, a base Ubuntu image is run in a temporary container to take a look at what Kubernetes is doing under the hood. It’s also necessary to update APT and install curl and dnsutils once the container starts.
$ kubectl run shell --rm -i --tty --image ubuntu:latest -- /bin/bash

root@shell:/# apt-get update && apt-get install --yes curl dnsutils
From inside this shell, it’s now possible to query the service name, nginx-deployment. Note how Kubernetes resolves the DNS name:
root@shell:/# nslookup nginx-deployment

Server:         10.52.128.10
Address:        10.52.128.10#53

Name:   nginx-deployment.default.svc.cluster.local
Address: 10.52.131.138
You can also send an HTTP request to see the same response as it would be rendered from a web browser by hitting the external IP:
root@shell:/# curl nginx-deployment

<!DOCTYPE html>
<html>
<head>
<title>Welcome to nginx!</title>
<style>
    body {
        width: 35em;
        margin: 0 auto;
        font-family: Tahoma, Verdana, Arial, sans-serif;
    }
</style>
</head>
<body>
<h1>Welcome to nginx!</h1>
<p>If you see this page, the nginx web server is successfully installed and
working. Further configuration is required.</p>

<p>For online documentation and support please refer to
<a href="http://nginx.org/">nginx.org</a>.<br/>
Commercial support is available at
<a href="http://nginx.com/">nginx.com</a>.</p>

<p><em>Thank you for using nginx.</em></p>
</body>
</html>
This demonstrates how, similar to Docker Swarm, Kubernetes maintains an internal DNS server that resolves queries about its services. These services are responsible for handling a registry of the containers that back the service, solving the issue of service discovery automatically.
One final item of note about the Kubernetes service-discovery implementation is that it will also automatically set environment variables pointing to its services within containers. This introduces a problem with long-running containers where services that change their IPs for any reason will have outdated information, but if that’s not the case, then using the environment variables can simplify logic and overhead by avoiding a DNS query. These variables are visible by running env from the shell opened above:
root@shell:/# env
KUBERNETES_SERVICE_PORT_HTTPS=443
KUBERNETES_SERVICE_PORT=443
NGINX_DEPLOYMENT_PORT_80_TCP_PROTO=tcp
NGINX_DEPLOYMENT_PORT_80_TCP=tcp://10.52.131.138:80
KUBERNETES_PORT_443_TCP=tcp://10.52.128.1:443
NGINX_DEPLOYMENT_PORT_80_TCP_ADDR=10.52.131.138
NGINX_DEPLOYMENT_SERVICE_PORT=80
NGINX_DEPLOYMENT_PORT_80_TCP_PORT=80
NGINX_DEPLOYMENT_SERVICE_HOST=10.52.131.138
KUBERNETES_PORT_443_TCP_PROTO=tcp
KUBERNETES_PORT_443_TCP_ADDR=10.52.128.1
NGINX_DEPLOYMENT_PORT=tcp://10.52.131.138:80
KUBERNETES_SERVICE_HOST=10.52.128.1
KUBERNETES_PORT=tcp://10.52.128.1:443
KUBERNETES_PORT_443_TCP_PORT=443
Note all of the NGINX_DEPLOYMENT_* environment variables.
Autodiscovery
In contrast to service discovery, autodiscovery is the process of automatically detecting devices and resources on a network or in a system to track and audit them and provide the network managers insight into them.
Autodiscovery can involve scanning network addresses for live resources or scanning a cloud provider account for running resources. Typically, the results of a scan are placed into a management database for further review, inventorying, and management. Exactly how this scan works is dependent on the system being scanned. For example, a LAN may be scanned with a tool like Nmap or a cloud provider such as AWS may be scanned through the cloud provider API.
Kubernetes Autodiscovery with Device42
Let’s say that your applications are running and the problem of service discovery is solved. Now you want to manage the resources running those applications. This is where the concept of autodiscovery comes into play.
As mentioned above, autodiscovery is the process of automatically scanning a network or cloud provider for running resources to track, audit, and manage IT infrastructure. In the case of Kubernetes, this would be discovering which clusters, services, and pods are running. Fortunately, Device42 makes this easy with its autodiscovery and resource management functionality. Device42 can be configured to scan for running Kubernetes resources on the major cloud providers to track and manage what is running in those clouds.
The example covers setting up an autodiscovery job for a Kubernetes cluster running on Google Cloud within Device42. However, Device42 also supports AWS and Azure.
Autodiscovery Job Set Up
First we need to set up the necessary permissions in Google Cloud.
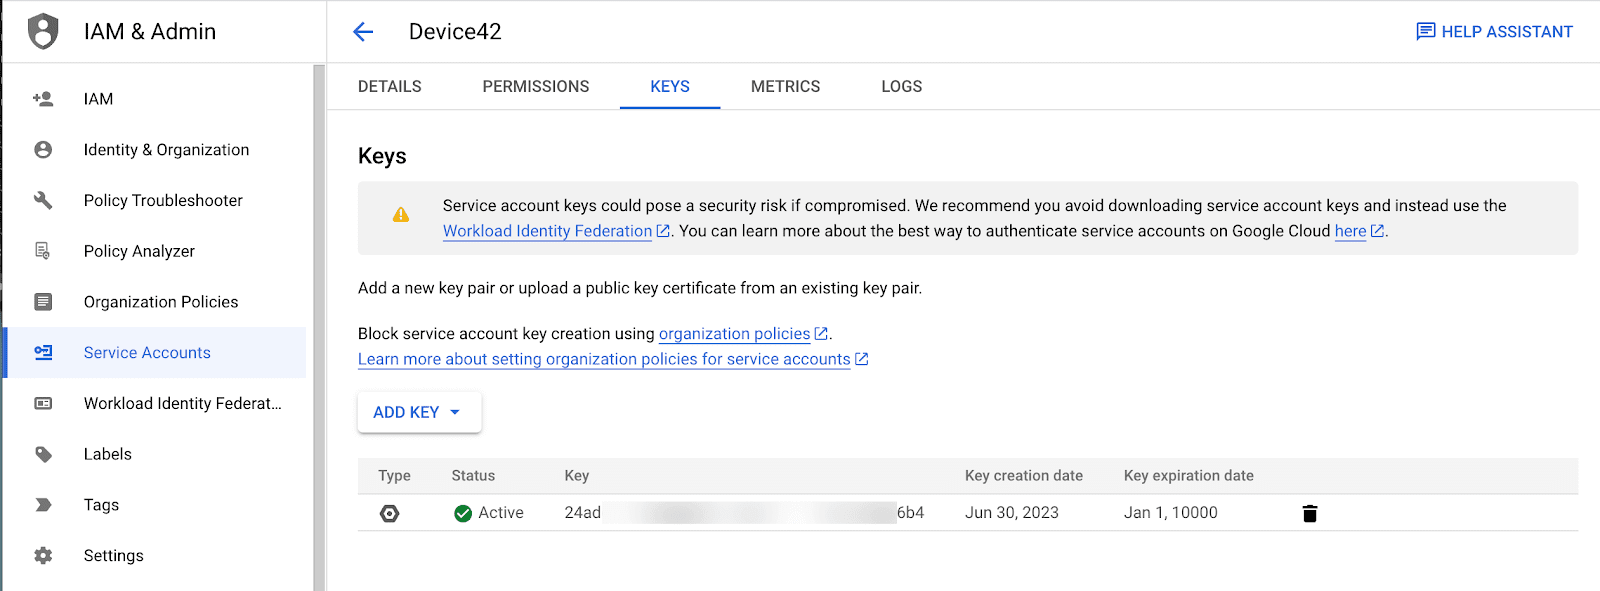
- From the Service Accounts section in IAM, create a new service account for Device42. This account should have at least “Viewer” permissions.
- For this newly created account, from the “Keys” tab, create a new key and download the corresponding JSON file.
- From the API Library section, ensure that the following APIs are enabled:
Now, in Device42, navigate to Discovery > Cloud > Add Cloud Autodiscovery, and enter the following settings:
- Name: As preferred.
- Type: Google Cloud.
- Credentials JSON: Create a new secret with the value being the contents of the API key JSON file downloaded above.
- Project ID: The ID of the Google Cloud project to scan. This can be found on the Google Cloud welcome page.
- Zones: The Google Cloud zones to scan. All of them can be selected, but at least the zones with resources in them should be selected here.
- Kubernetes Discovery: Select this to enable the scanning of Kubernetes resources.
Resources tagging and an autodiscovery schedule can be configured as desired. Select “save” when finished.

Autodiscovery Setup
Importing and Viewing Resources
With the autodiscovery job configuration completed, “Run Now” can be selected to run it. This may take a few minutes, depending on how many zones were selected to scan.
It’s important to note that any Kubernetes resources discovered will not be displayed in the scan report as an added resource. In order to see the results of the Kubernetes scan, navigate to Resources > Containers > Kubernetes. In this case, the “demo” cluster created for the example above was successfully found:
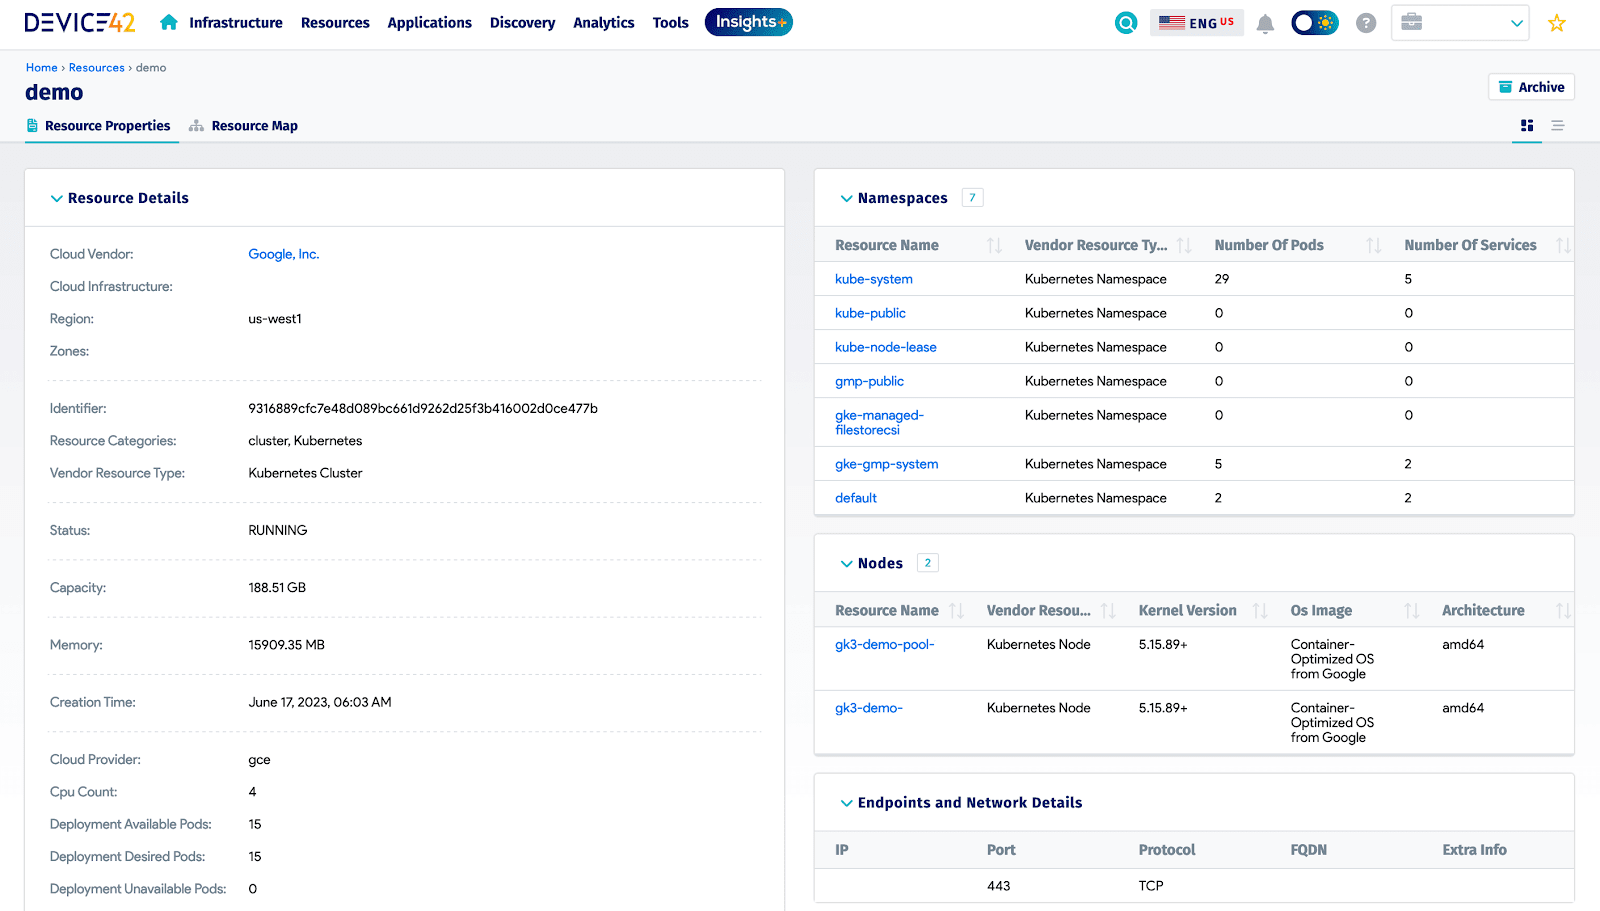
Kubernetes Overview
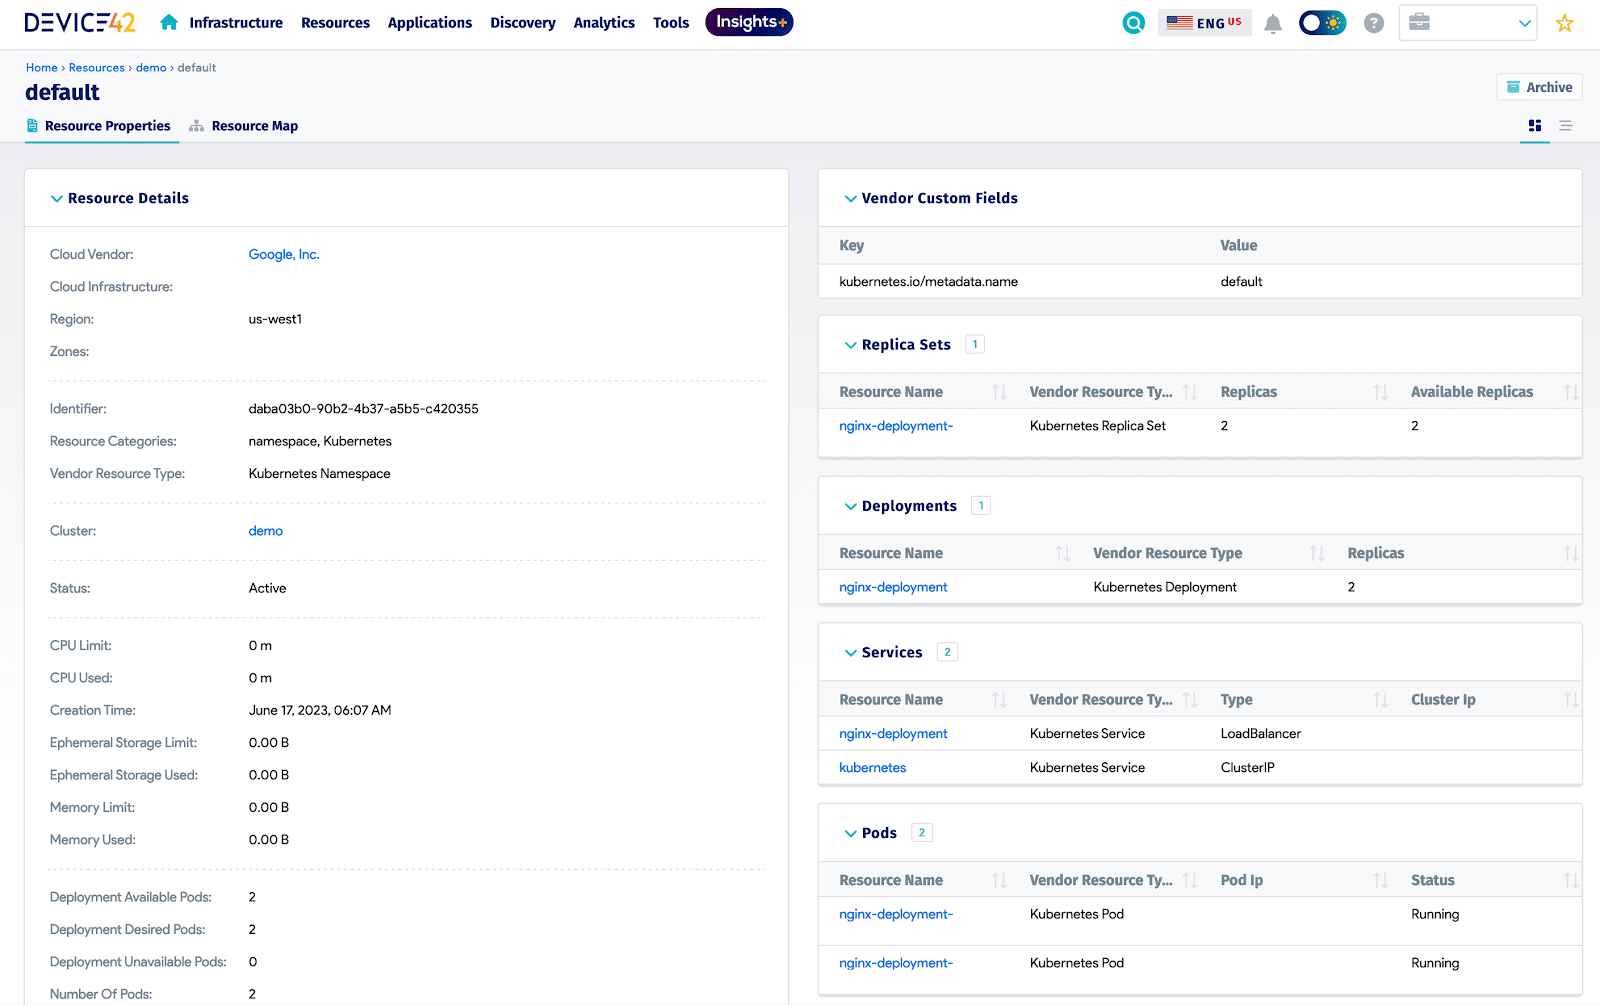
You can click into this cluster to view additional details. Note how the Nginx pods and service that were previously created were also found and imported for auditing:
Kubernetes Details