
Using Device42 with Salt: External Pillar
Part 0: Introduction
Today we’re introducing Device42’s new Device42-SaltStack integration. SaltStack offers a variety of Infrastructure as Code tools that Sysadmins and Dev-Ops Engineers can use to automate configuration tasks on their network. In this post we will demonstrate how to utilize configuration item details from Device42 in SaltStack using a feature known as Salt Pillars.
Salt is highly modular, providing the flexibility needed to automate most configuration tasks. Processes can be created to provision new servers, remediate errors that occur, process lifecycle events of server role changes, and return information about the current state of the network. Possibilities abound without a doubt, but all of them require an accurate source of information about your network.
Integrating information from a CMDB application like Device42 can enrich SaltStack with valuable details about your network. To do this, we will need a way for Salt to store details about its minions as they appear in Device42. To accomplish that, we will extend the functionality of SaltStack with something called an External Pillar.
Device42’s existing SaltStack integration currently allows for Device42 automatic discovery to locate and import all the minions managed by your Salt master. Once all the minions are discovered, they can each begin to benefit from the various integrations and features provided by Device42 (IPAM, Application Mappings, and much more). All this provides Salt with a single source of truth as a foundation for its state management and remote execution.
First, we should probably cover what Pillars are. SaltStack offers a few ways to store information about its minions, two being Grains and Pillars. Grains are relatively static data-stores that contain information about the underlying system of the minion. Pillars, on the other hand, are the preferred location to store key:value pair information about each of your minions that can be updated from external sources. Pillars can be defined in text files (.sls), or can be loaded in from an external source, such as Device42. The value of storing key configuration item details from Device42 in Salt Pillars is derived from the ability to use the automatically discovered, up to date data you trust in Device42 both to target minions and customize configuration within Salt. Any Salt workflow, state configuration, execution module, or query will be able to utilize data you store in Device42.
We will look at a few example use cases for this integration and walkthrough the setup and usage too. Here’s what we will go through in this post:
- Configuring the new integration
- How to use the simple query generator to add basic fields from Device42 to a Salt Pillar.
- How to target Salt minions by their Device42 service level.
- How to add Device42 fields to a Salt pillar by writing custom queries with Device42 Object Query Language, aka DOQL.
- A simple use case example where we’ll get network information from all devices with dynamic IP addresses.
- A more in depth use case example that references Pillar data from Device42 with compound targeting
- A real-world use case that will apply a state configuration to production devices.
With Device42 CI detail fields stored in Salt Pillars, specific targeting like the following:
“find all Ubuntu 16.04 servers running GCC version < 5.5 on the 2nd floor of the NYC datacenter and restart their apache service, please and thank you.”
will become as simple as:
$ salt -C “I@d42:os_name:Ubuntu
and I@d42:os_version:16.04
and I@d42:gcc_version:^(1|2|3|4|5).(1|2|3|4)$
and I@d42:datacenter:NYC
and I@d42:datacenter_floor:2”
service.restart apache2
Using data from Device42, we can translate this very specific request into a pleasingly intuitive Salt command! I’ll cover more about the format of these Salt commands in Part 2 when we discuss compound targeting, but to get there, we need to get this external pillar configured first.
So let’s get to it!
Part 1: Setup
Environment
This tutorial was written on an Ubuntu 14.04 server using Salt 2016.11.1 (Carbon), Python 2.7.6, and the packages listed in requirements.txt.
Install process
First let’s clone the d42_salt_external_pillar repository from Github here and place it onto the Salt Master server. This repo contains a small script that will be used to query Device42 and import the values returned into the Salt Pillar. There is nothing too complicated about this script; it uses the minion’s name to query D42 and returns a set of values as specified by the configuration in settings_d42.yaml. More on configuration in a little bit.
Create a new directory /srv/ext/pillar/. This directory will contain our external pillar modules, including the D42 external pillar script and settings file.
$ mkdir -p /srv/ext/pillar
You may store the repo directory wherever you like, but two files need to be moved in order to use the external pillar. Rename settings_d42_example.yaml to settings_d42.yaml. Then copy d42.py and settings_d42.yaml to /srv/ext/pillar/.
$ mv settings_d42_example.yaml settings_d42.yaml

$ cp d42.py /srv/ext/pillar && cp settings_d42.yaml /srv/ex/pillar
Install the python dependencies using pip like so:
$ pip install -r requirements.txt
Edit settings_d42.yaml with information relevant to your network. Fill the “host” field with your Device42 appliance IP and the “user” / “pass” fields with the proper credentials for your D42 appliance.
Next we need to configure the Salt Master to use the external pillar module. To set this, open up /etc/salt/master/ and add the following:
extension_modules: /srv/ext
ext_pillar:
  - d42:
The “external_modules” field tells our Salt instance where to look for custom modules like our external pillar script. When adding an external pillar module, Salt expects a field “ext_pillar” in the Salt master config to contain a list of external pillar script names. Salt will expect these external pillar scripts in /srv/ext/pillar/ to match the name listed in “ext_pillar”.
That takes care of all the install configuration. Now we just need to restart the salt-master and salt-minion processes like so:
$ service salt-master restart
$ service salt-minion restart
Refreshing the Pillar with values returned from the external pillar script
Let’s see if refreshing our minion’s pillar data works. Send a refresh_pillar command to your minions like this:
$ salt ‘*’ saltutil.refresh_pillar

Look’s good!
The response of our saltutil.refresh_pillar command returned true for the minion named “ubuntu”.
Now that we have refreshed the pillar data on our minions, there should be new data available that came straight from Device42. You can list what data is currently in your pilla using the pillar.items command:
$ salt ‘*’ pillar.items
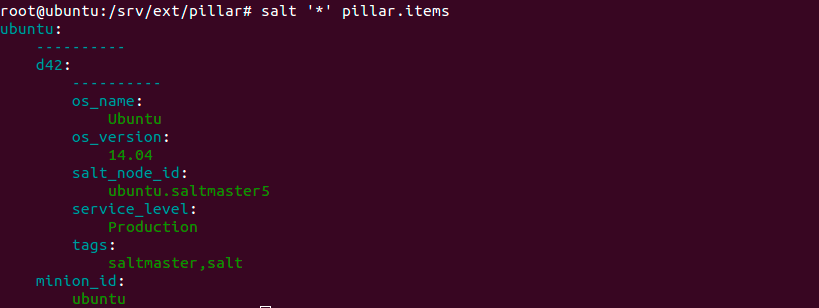
All the fields available on this minion’s pillar
You should see something like this based on what default fields you have listed in your settings yaml. Now that we have everything set up, lets talk about how it works and look at some use cases.
Part 2: How to work with the D42 External Pillar Integration
Two methods to fill the Salt Pillar
There are a few simple components to become familiar with before we can leverage our D42 data in SaltStack with this external pillar integration. This external pillar script supports DOQL queries as one method of defining what fields to return from Device42, as well as a basic generator that reads from fields listed in “settings_d42.yaml” under “default_fields_to_get”. The basic query generator feature will be enough to get you started, but using DOQL means you will gain access to virtually any data you store in Device42. We’ll cover how to write and use DOQL queries for this purpose in the “Advanced Usage” section.
Regardless of which method you use to gather fields from D42, the file settings_d42.yaml is where you will configure what is imported into your minion’s Salt Pillars. The two fields where you control this query behavior are:
- “query”: Contains a custom DOQL query for which fields to return from D42 and add to the minion’s Salt Pillar. If this field is empty, the basic query generator will run.
- “default_fields_to_get”: If the query field is empty, the default behavior is to generate a simple query using the fields listed within “default_fields_to_get”. Note: the query generator will only return fields in the default device table from the D42 database.
Basic Usage: Using the query generator to populate the Pillars
To get started, let’s use the generative query feature to retrieve the name of the operating system, the version of the operating system, and the device’s tags from Device42. Open up your “settings_d42.yaml” file and add the fields to “default_fields_to_get”:
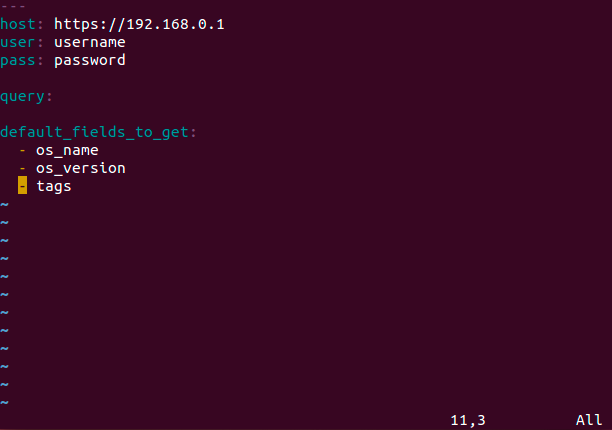
Whenever the query field is empty, the d42.py external pillar script will generate a simple DOQL query using the fields in “default_field_to_get”. Remember, the generated query only queries from the “view_device_v1” table. The generated query for this example will look like this:
SELECT os_name, os_version, tags FROM view_device_v1 WHERE name = {{minion_name}}
After changing the contents of “settings_d42.yaml” you will need to refresh the Salt Pillars like this:
$ salt ‘*’ saltutil.refresh_pillar
Now that we’ve refreshed our pillars, the data we queried from Device42 will be available to Salt. You can view the fields stored in a minion’s pillar by executing the “pillar.items” function on the minion.
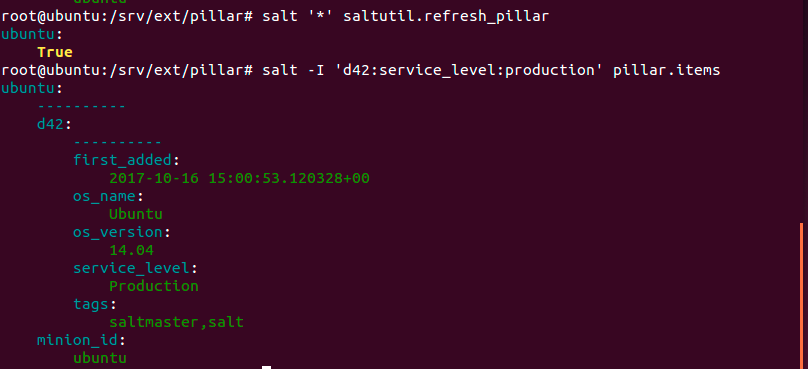
$ salt -I "d42:os_name:Ubuntu" pillar.items

Looking good!
If we want to add more fields from the main device table to the pillars, you can add them to d42_settings.yaml like so:
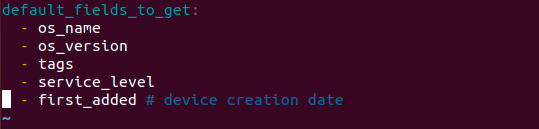
The Salt command “pillar.items” is useful to see what fields are in your Pillars.
This simple example just beings to scratch the surface, but nonetheless provides value via the “service_level” field. The “service_level” field is a native Device42 field that indicates whether a device is in production, staging, development, etc. Using the “service_level” field, we can now easily create environment-specific configuration states, remediation procedures, and any other workflows using Salt. Using the generated query is just the beginning, however; much more is possible once we begin writing our own DOQL queries.
Advanced Usage: Using DOQL to populate the Salt Pillars
The generated query we just used was useful to get started, but there is much more we can do by writing our own DOQL queries. If DOQL is new to you, check out this how to post from the Device42 documentation. DOQL provides direct access to the Device42 database and supports a multitude ad hoc queries. It’s syntax is very similar to that of SQL.
It is very important to keep one thing in mind when using DOQL queries to populate Salt Pillars. When the external pillar script runs for a given minion, one of the first things it does is reads the name of the minion from the minion’s Salt Grain. This minion name is then inserted into the DOQL query by a Python string formatter using {minion_name} as the spot to insert the minion name. This is necessary due to the fact that the external pillar script needs to be able to execute DOQL queries with respect to any Salt minion and the minon_name is the variable that changes between them.
Because of this, you might have noticed that all of the DOQL queries in this tutorial end with this WHERE statement: WHERE name = ‘{minion_name}’. This ensures that the query executed by each minion uses that minion’s name.
DOQL Example: Adding D42 custom fields to Pillar
Let’s work through a simple example. Instead of the generated query to populate the Pillars, let’s write a DOQL query to add a custom field from Device42 to the Salt Pillar. Let’s add the custom field “Salt Node ID” from Device42 to our minion’s Pillars.

Custom fields are stored in a table named view_device_custom_fields_v1 in D42’s database.
In Device42, custom fields are stored in a different table than the main device info, so we’ll have return data from two tables in our DOQL query. Open up your `settings_d42.yaml` file and add this query to the “query” field:
SELECT os_name, os_version, service_level, tags,
( SELECT value FROM view_device_custom_fields_v1
WHERE device_fk = device_pk AND key = 'Salt Node ID') AS "salt_node_id"
FROM view_device_v1 WHERE name = '{minion_name}'
For each minion, this will return a custom field storing the salt minion’s ID, which was created and populated by the Device42 Salt integration. To those generally familiar with SQL syntax, DOQL should look quite familiar to you. One thing to be aware of is the use of a string format variable {minion_name} within the final WHERE clause. The script expects to fill this with the minion’s name and thus is required.
Refresh your pillar and request the pillar items of your minions like so:
$ salt ‘*’ saltutil.refresh_pillar
$ salt ‘*’ pillar.items
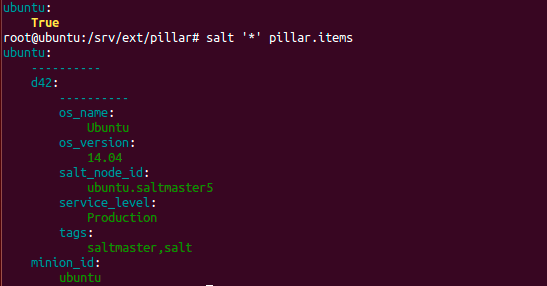 The “salt_node_id” is returned properly.
DOQL Example: Adding IP Address information to the Pillar
Let’s look at another DOQL example by adding IP information from Device42 to the Pillar. IP Address Management is a key feature of Device42 and we can extend the value of this information by putting it in the Salt Pillar. That way, the IP information becomes another piece of actionable information Salt can use for remediation, configuration, or any other process.
IP address information is stored in the “view_ipaddress_v1” table in Device42. The two fields we will bring into the Salt Pillars of our minion’s are “ip_address” and IP “type”. Type stores one of three values: static, DHCP, or reserved. Being able to target dynamic IPs vs static IPs in Salt is certainly useful for a range of networking tasks. With the ability to target devices with dynamic IPs, one could create a remediation to fix issues with wireless access points that change IPs and become unavailable. One might use this ability to renew DHCP reservations on devices with dynamic IPs as well.
Note: You might need to set this IP type field in Device42 if it is not set already. You can set an IP type in the Device42 web application by navigating to Devices > All Devices, opening a device page, activating edit mode, scrolling down to the IP section on the device page and selecting an IP type for your device.
We will be adding 2 more select sub-queries to our DOQL query from before. Open up the “settings_d42.yaml” file and set the query field to:
query: SELECT os_name,os_version,service_level,tags,
( SELECT value FROM view_device_custom_fields_v1
  WHERE device_fk = device_pk AND key = 'Salt Node ID') AS "salt_node_id",
( SELECT ip_address FROM view_ipaddress_v1
  WHERE device_fk = device_pk ) AS "ip_address",
( SELECT type FROM view_ipaddress_v1
  WHERE device_fk = device_pk ) AS "ip_type"
FROM view_device_v1 WHERE name = '{minion_name}'
Once we refresh our pillar, we will see these two fields present in our minion’s pillar:
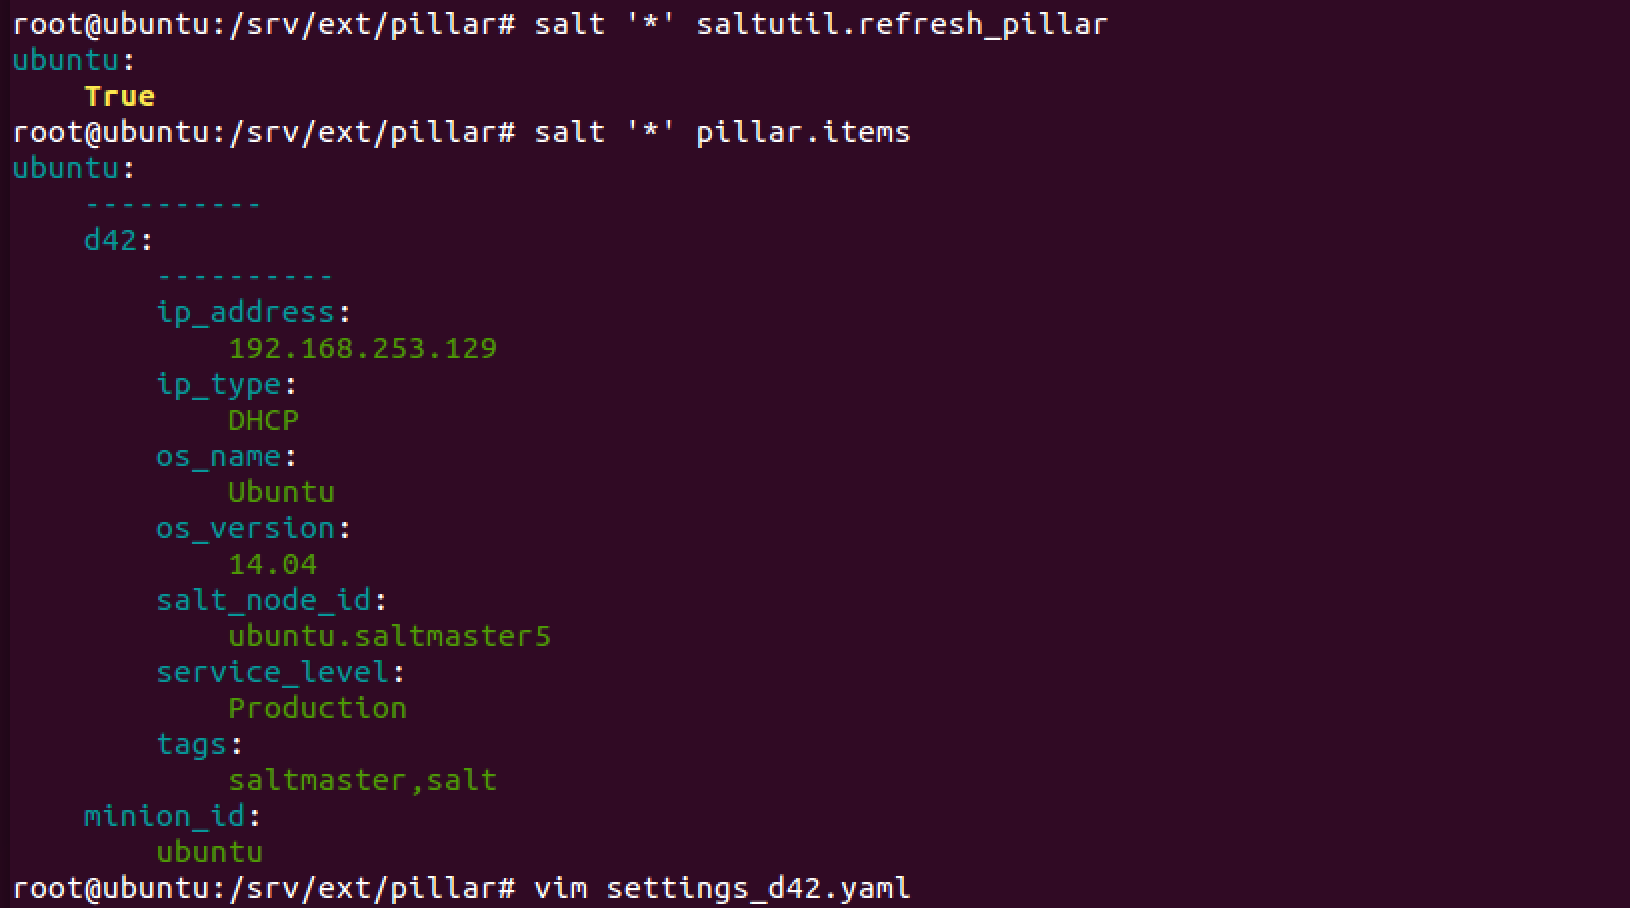
IP fields now available in your Salt Pillar.
Use Case: Get current IP info for all devices with DHCP IPs
Let’s imagine you need to check in on some servers in your network which have dynamic IPs as part of a remediation for a network error. When we have access to our IPAM information from Device42 in Salt, we have an easy way of completing this task. Lets simply run ‘ifconfig’ on all our machines using a dynamic IP. Here’s the command for that:
$ salt -I 'd42:ip_type:DHCP' cmd.run 'ifconfig'
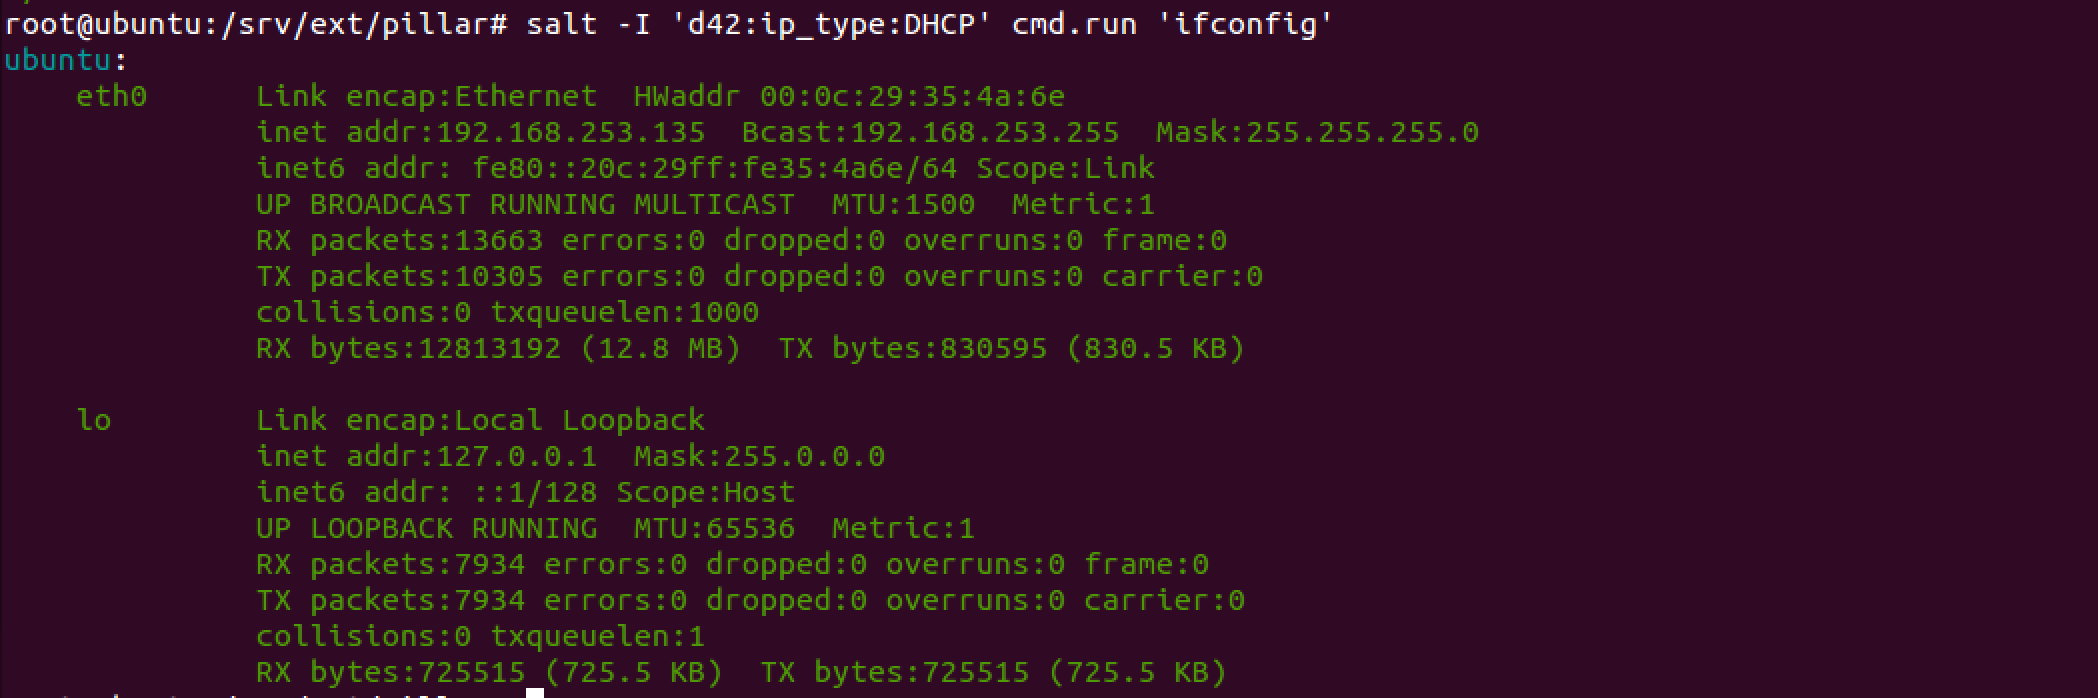
Pretty neat how simple that is, right?
Use Case: Apply configuration state to all Ubuntu production servers.
Putting all of this together, let’s imagine a situation where some configuration or remediation task needs to be performed on a certain type of server on your network – Ubuntu servers running in production with dynamic IPs, for example. You write your remediation or configuration task as a Salt state file and now you need to apply it across your network. Using the data we have stored about your network’s minions in the Pillar, we can use compound targeting to apply your state to each of them.
Compound targeting can be used in order to perform queries that rely on multiple Salt data points. Compound targeting has a bit of syntax overhead and is covered well by the Salt documentation. The “-C” flag is required to designate that a Salt command is meant to use compound matching. Inside of the query string, a capital letter followed by an @ sign (for Pillar data, I@ is used) designates where in Salt to look for the relevant field. Boolean logic operators like “and”, “or”, and “not” are available using compound targeting.
To apply our state file that performs the configuration or remediation task in our hypothetical, we could execute this salt command:
$ salt -C 'I@d42:os_name:Ubuntu and I@d42:service_level:Production' and I@d42:ip_type:DHCP state.apply

The command was a success.
Viewing the Device42 Schema
One final note before we wrap things up…
When writing DOQL queries, you’ll quickly find that you need to know all the possible fields available for you to take advantage of. The Device42 web application offers a simple way to review the full schema. Navigate your D42 web app to Help > View Schema > Object Relationship Diagram and search for the tabled named “view_device_v1”, which is an important table that stores lots of information about your devices. You can view the schema for any of the database tables in this way. With this knowledge in hand, we can write almost any DOQL queries imaginable.
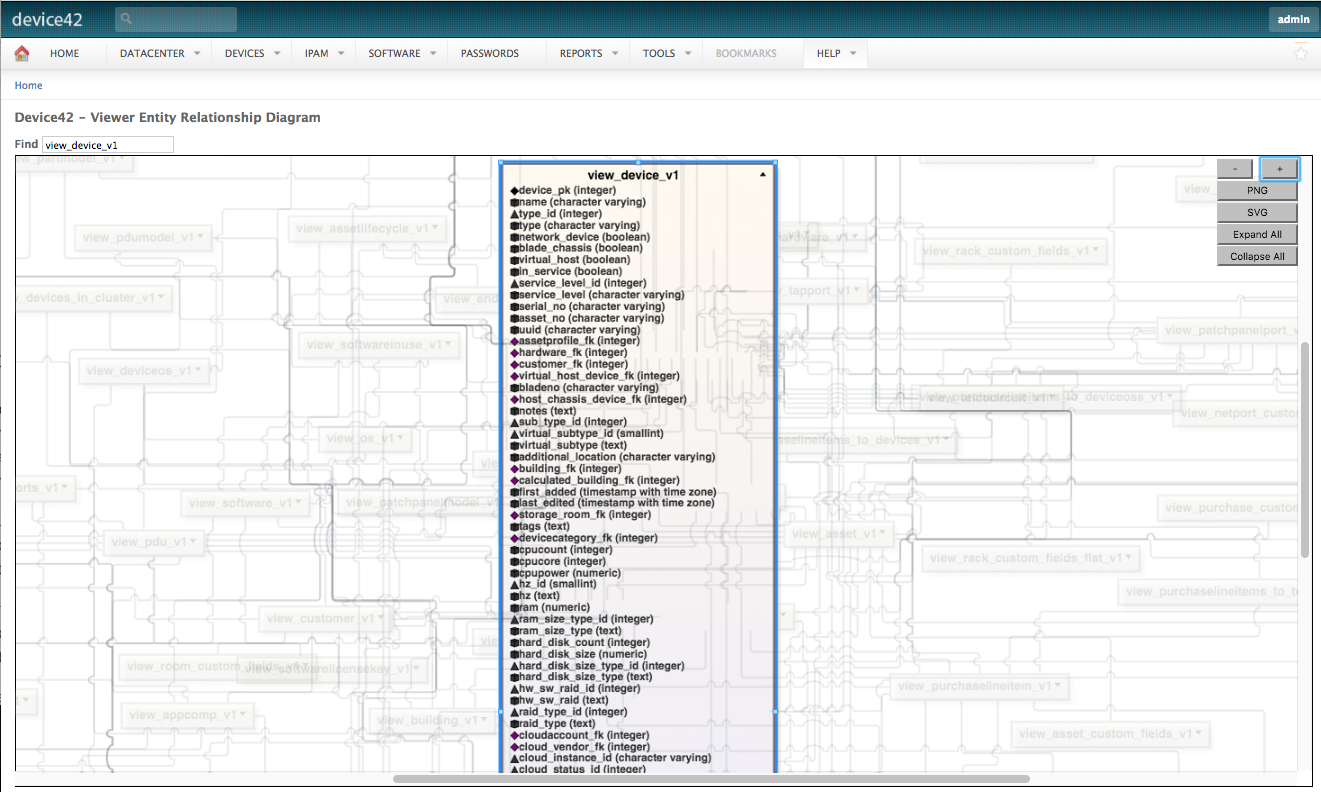
Listing of all fields available for querying on the main device table “view_device_v1” as well as all the other tables, accessible via custom DOQL queries.
Conclusion:
Today we’ve looked at how to setup and configure an exciting new integration between Device42 and SaltStack. Bringing the information provided by Device42’s single source of truth CMDB + IPAM services into SaltStack via the Salt Pillar has proved to allow for some exciting preliminary use case examples. We can quickly begin using this new integration either by utilizing simple generative queries or wield great flexibility by diving into the Device42 schema and writing custom DOQL queries.
SaltStack and Device42 seem to embody two pieces of a granular and actionable toolkit that we can use as devops engineers or system administrators in our daily workflows. The two technologies seem to compliment one another nicely. Device42 brings deep and up to date information about the network situation and SaltStack uses this information to perform any number of tasks on the network.
With all the myriad competing technologies in the IT world today, it is good for us to remember that one can find balance in the convergence of these tools. Integrating these different technologies in ways that utilize the best aspects of each tool really can prove that their value is greater than the sum of their parts.
We think this integration will provide you with a great jumping off point for further Salt + Device42 experimentations. What kinds of automations would you think to build from the starting point we’ve explored today? We’d love to hear about them! If you have any comments, questions, or want to share what automations you are working on, please feel free to get in touch with us!
Thanks for reading!