Best Practices for a Vulnerability Management Framework
Vulnerability management is the bane of many organizations’ existence. Landing firmly in the category of “necessary evil,” it often feels like a relentless, never-ending grind of scanning, patching, and long-term remediation work. Eventually, organizations realize that what they really need is a vulnerability management framework.
The challenge is that existing industry-standard vulnerability management frameworks are enormous. Standards like the Cybersecurity and Infrastructure Agency Volume 4, National Institute of Standards and Technology Cybersecurity Framework (CSF), and SysAdmin, Audit, Network, and Security Vulnerability Management Framework address vulnerability management from the perspective of the whole organization. This makes them extensive and time-consuming to digest and implement.
A more effective approach is to split your vulnerability management framework implementation into two streams. Activity One implements your overall vulnerability management governance program, while Activity Two implements the tactical operational requirements common to all frameworks.
This article provides a practical framework for Activity Two. Using a series of operational best practices summarized in the diagram shown below, it identifies the common aspects across all major vulnerability management frameworks and shows you how to implement them. This article dedicates a section to explaining each of the six best practices captured below.
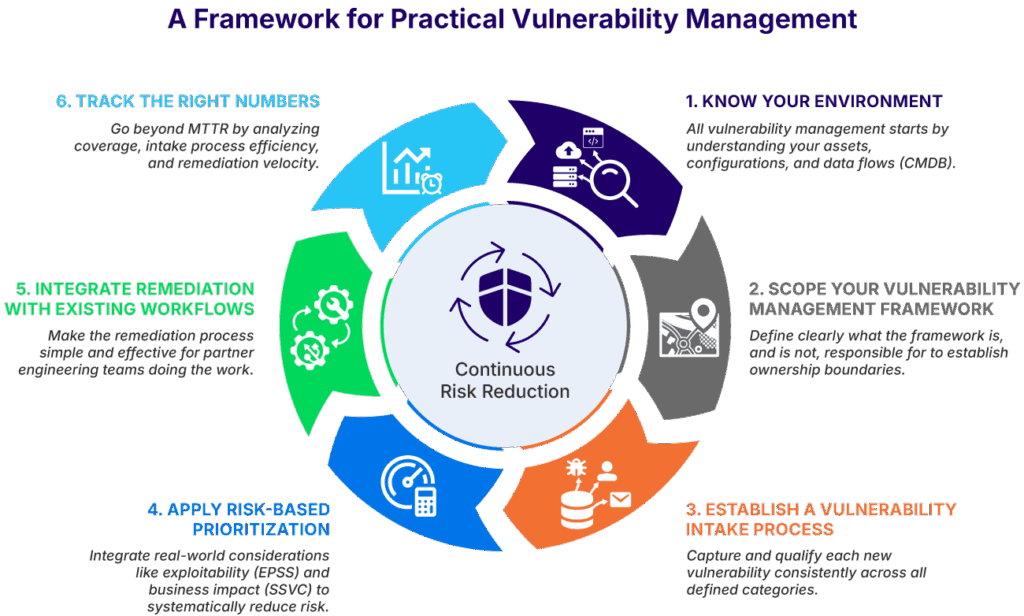
A framework for practical vulnerability management (source)
Summary of best practices for a vulnerability management framework
| Best practice | Description |
|---|---|
| Know your environment | All vulnerability management starts with understanding your environment. Without this knowledge, it is impossible to know what vulnerabilities will apply to you. |
| Scope your vulnerability management framework | An effective vulnerability management framework has a clearly defined scope that establishes what it is responsible for and what it’s not. This enables you to develop the rest of your framework according to your area of responsibility. |
| Establish a vulnerability intake process | Capturing and qualifying each new vulnerability is essential. To do this consistently and effectively, you need to establish an intake process that covers everything included in your scope. |
| Apply risk-based prioritization | Risk-based prioritization is the only way to systematically reduce the vulnerability risk to your organization. To do this, you need to integrate real-world considerations such as exploitability and business impact. |
| Integrate remediation with existing workflows | Most vulnerability management teams rely on partner engineering teams to perform remediation work. As a result, your vulnerability management framework should make this process as simple and effective as possible. |
| Track the right numbers | A sophisticated measurement system is the only way to know if your vulnerability management framework is actually working. This means going beyond mean time to remediate (MTTR) and analyzing your coverage, intake, and remediation velocity. |
Know your environment
All vulnerability management frameworks require knowing the assets, configurations, and data flows that need to be covered. Without this information, they cannot understand which vulnerabilities apply to your environment.
As a result, the first thing you need to do is to develop a comprehensive and continuously updated configuration management database (CMDB). This is more than just a simple asset register: It should include everything that makes up your computing environment, including configuration information, dataflow mapping, and installed applications.
The full scope of what your CMDB should include is described in the table below, and to be effective, you need to ensure that you are capturing and recording each of these aspects.
| Asset Category | Captured Data and Attributes |
|---|---|
| Physical infrastructure | Hardware models, serial numbers, CPU/RAM specifications, disk details, and blade chassis slot positions |
| Virtual and cloud resources | VM guest/host relationships, cloud instance IDs (AWS, Azure, GCP), resource tags, and VPC configurations |
| Networking and connectivity | IP/MAC address associations, VLAN/subnet memberships, switch port status, and Layer 2/3 topology |
| Software and OS | Operating system versions/builds, installed package lists, patch levels, and license keys |
| Applications and services | Service dependencies, database instances (Oracle, SQL, MySQL), web servers, and listening ports |
| Compliance and support | SSL certificate expiration dates, vendor warranty status, and end-of-life (EOL) / end-of-support (EOS) dates |
One of the most effective ways to do this is using a dedicated CMDB solution. This allows you to leverage the dedicated expertise of a platform like Device42 to collect and collate your data while you focus on the efficient usage of this data in your vulnerability management framework. An example of the data collected is in the screenshot below:
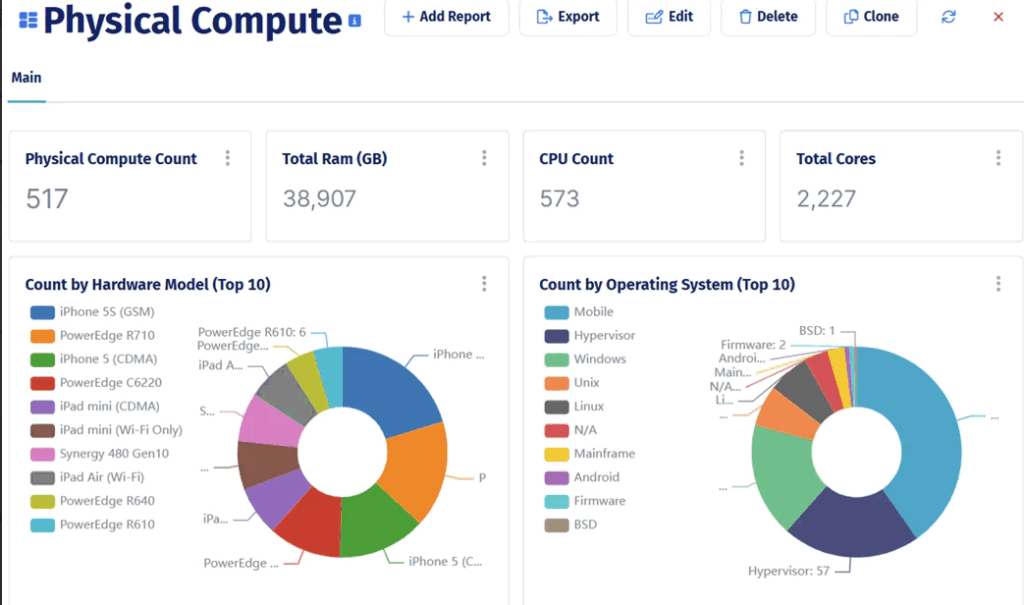
Device42 Physical Compute Dashboard view (source)
Scope your vulnerability management framework
When it comes to scoping, organizations tend to lean towards one of two extremes. Some focus exclusively on CVE management and bug fixes, while others adopt a more expansive approach. Regardless of what you choose, explicitly defining what you will and will not focus on in your vulnerability management framework is essential.
To see why this matters, consider a project team that spins up a cloud-based staging environment to test a new customer portal using an approved Linux container image. As they do, they associate an overprivileged identity and access management (IAM) role with permission to write production S3 buckets, open port 22 (SSH) to the entire internet, and deploy it outside of the organization’s CI/CD pipeline.
While each of these issues is serious, a more pressing question is who is responsible for each one. If this isn’t defined, your vulnerability management framework will be unable to detect and remediate vulnerabilities proactively.
To establish this ownership, you need to go through a structured scoping process. It should ensure that all major vulnerability areas in your organization are assigned to a team. A starting list of vulnerability areas is provided below, and you can add and remove areas as needed.
| Vulnerability Area | Description |
|---|---|
| Software vulnerabilities (CVEs) | Known vulnerabilities in operating systems, applications, libraries, and firmware |
| Missing or failed patching | Systems where patches exist but are not successfully applied |
| System and cloud misconfigurations | Insecure configuration of hosts, networks, or cloud resources |
| Exposure management | Internet-facing services, ports, APIs, and management interfaces |
| Workload-scoped identity misconfigurations | Excessive permissions attached directly to a workload or host |
| Asset inventory yaps | Unknown, unmanaged, or unowned assets |
| Configuration drift | Deviation from approved baselines over time |
| Exception and risk acceptance tracking | Accepted vulnerabilities and compensating controls |
| Verification and closure validation | Confirming vulnerabilities are actually resolved |
| CI/CD pipeline controls | Build, deployment, and release enforcement |
| Application architecture and design flaws | Insecure design patterns or trust models |
| Data classification and handling | Sensitivity, residency, and data governance |
| Security awareness and training | Human behavior and social engineering risk |
Establish a vulnerability intake process
Next, all vulnerability management frameworks need a formalized process for accepting and validating new vulnerabilities. You need to design how this will occur in your environment.
The diagram below shows you an example of what this looks like. It progresses each new vulnerability through a series of steps to go from intake to validation, along with branching actions at each stage. If this looks complex, don’t worry—the subsections below show you how to break down each of the three top-level steps so that you can build an equivalent of this process for your own organization.
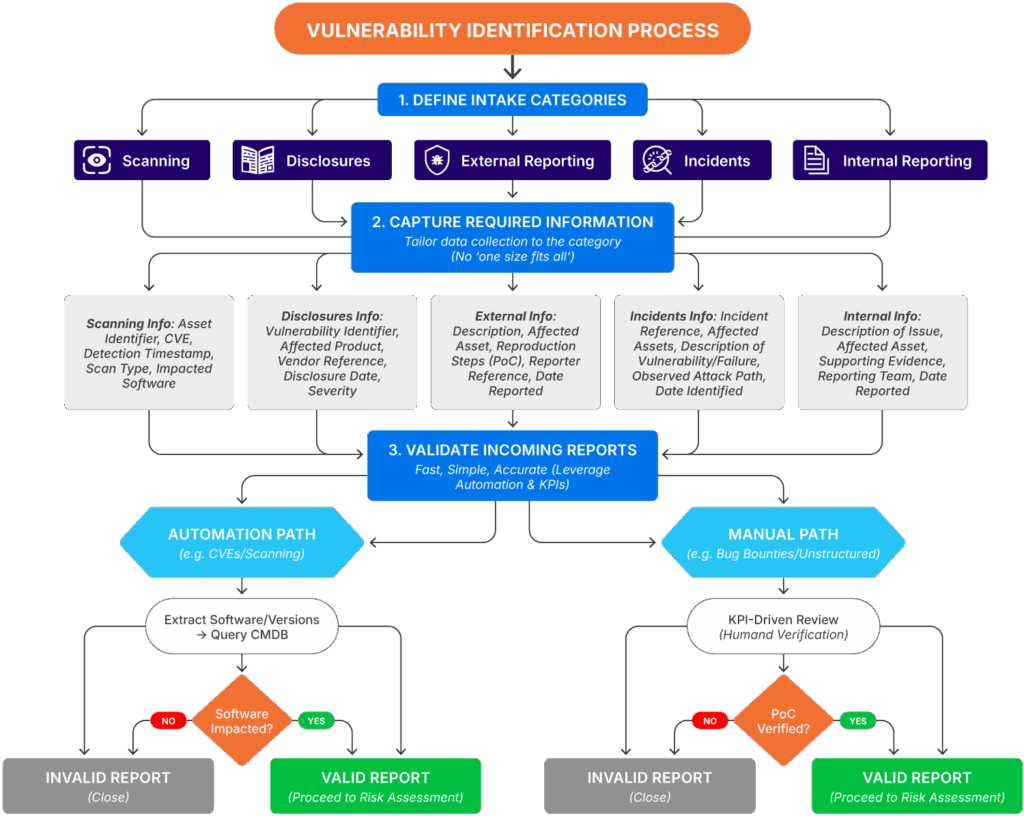
Example of a vulnerability identification process (source)
Define intake categories
Start by defining your intake categories. This defines how you expect new vulnerabilities to come to you and should include every form of intake you wish to support, including vulnerability scans, advisories, bug bounty programs, and so on.
An example of what this looks like is contained below, with some high-level categories to get you started. Depending on your team’s capacity, size, and capability, you can make this as generic or specialized as needed.
| Intake Category | Description |
|---|---|
| Scanning | Vulnerabilities identified through routine, automated assessments of the environment using tools that detect previously disclosed vulnerabilities |
| Disclosures | Newly disclosed vulnerabilities received via CVE publications, vendor security advisories, or product-specific notifications |
| External reporting | Vulnerabilities reported by external parties, including bug bounty programs, penetration testers, security researchers, and unrelated third parties |
| Incidents | Vulnerabilities identified during the investigation of security incidents or near-miss events, where an existing control failure or unknown weakness is uncovered |
| Internal reporting | Vulnerabilities reported by internal stakeholders (excluding incidents), such as engineering, IT operations, platform teams, or security staff outside the vulnerability management function |
Capture required information
Next, you need to define what information is needed to progress an intake item. This should be done on a per-intake-category basis, with the goal of capturing enough detail to move the item forward (with the caveat that for some items, like CVE notifications, you may have practical limitations on what you can include).
An example of what this looks like is provided in the table below. It uses the intake categories from the previous section and adds the information requirements for each one. As before, you can modify and update this table as needed for your own environment.
| Intake Category | Information Requirements |
|---|---|
| Scanning |
|
Disclosures |
|
| External reporting |
|
| Incidents |
|
| Internal reporting |
|
Validate incoming reports
Finally, you need to define how each intake item is validated. Your focus should be on automation wherever possible, while allowing for unstructured data in categories such as bug bounties.
To do this, develop a flowchart for each category that describes how you will progress from notification to validation. An example of this is included in the image below, demonstrating how a CVE report leverages your CMDB to decide if the incoming report is valid.
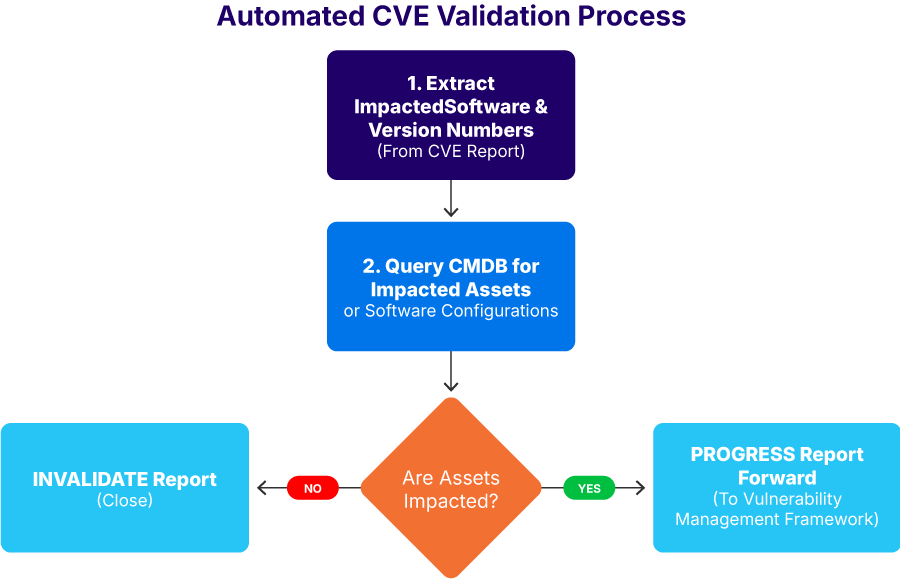
Automated CVE validation process (source)


Discover assets automatically including hardware, software, and cloud infrastructure

Match the assets against your software and hardware license agreements

Comply with your service license needs comprehensively and confidently
Apply risk-based prioritization
Most vulnerability management teams don’t struggle with vulnerability identification. Instead, they have the opposite problem: far too many vulnerability identifications and far too little prioritization. They become so swamped managing their intake queue that they lack the cognitive capacity to distinguish between immediate, pressing vulnerabilities and those that can be put on the back burner for later.
As a result, your vulnerability management framework must include risk-based prioritization. It should go beyond pure technical analysis and include real-world risk considerations such as exploitability and business impact.
To see why this matters, consider the difference between two CVEs, both with a critical rating of 9.8 out of a possible 10. The first is CVE-2024-38077, a Windows Remote Desktop Licensing Service remote code execution vulnerability, aka MadLicence. This vulnerability allowed for remote code execution, potentially allowing attackers to gain complete control over affected systems. Importantly, however, this vulnerability was reported by security researchers with no evidence of public exploitation at the time of release. The targeted service was not enabled by default, and it required a heap overflow attack (technically complex) to be effective.
Contrast this to CVE-2023-3519. At the time of release, it was noted that more than one victim had been identified and that it allowed an adversary to plant a webshell on impacted versions of NetScaler ADC and Gateway appliances without needing authentication. Put another way, this CVE was being actively exploited, and it used a well-known product that, by definition, was internet-facing.
As you can see, even though both CVEs had the same criticality, one was far more urgent than the other. The one with confirmed, active exploitation, with an almost inevitable internet-facing pathway, is by far the most pressing issue, likely requiring the immediate paging of all involved engineering teams. In contrast, the other CVE is deeply serious but not quite as serious.
These are the types of scenarios your prioritization model needs to cover, and to do this, you need three component approaches.
Establish exploitability
There is a vast difference between a vulnerability that is actively exploited in the wild and one that is theoretical. For most organizations, active exploitation triggers a number of contingency capabilities, including critical incident commands, incident response, and executive involvement. Therefore, your first step is establishing its exploitation status.
One industry standard way to do this is by using the Exploit Prediction Scoring System (EPSS). This system considers the sources shown in the image below to calculate an exploitation likelihood score that you can immediately pass into your vulnerability prioritization system. Alternatively, you can develop a custom calculation internally.
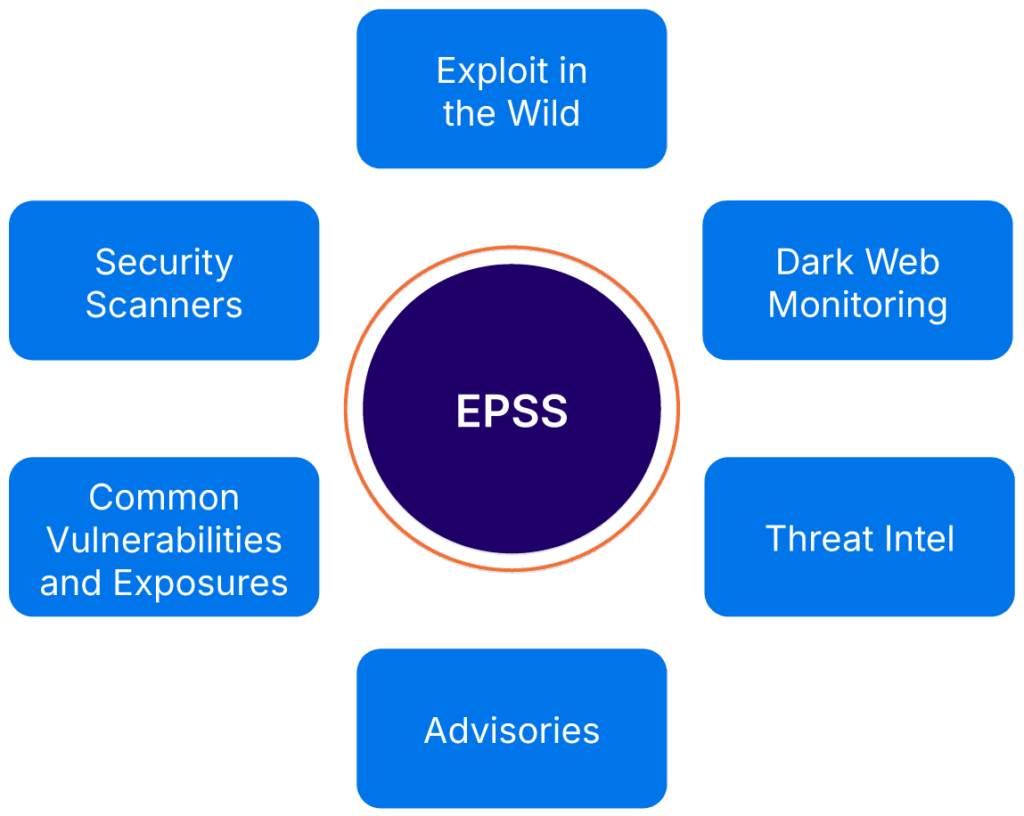
Overview of EPSS inputs (source)
Calculate business impact
Next, you need to calculate the real business impact of a vulnerability. This helps you understand the impact of a given vulnerability on a particular class of asset. For instance, all other things being equal, an exploitable, non-authenticated remote code execution (RCE) vulnerability on a production database has a far greater business impact than the same vulnerability on a developer’s testing environment.
To do this, group your assets into a series of business-criticality levels. Then add this information to your CMDB. Most businesses use four groups of assets, as shown in the table below; however, there is no real limit if you want to use more.
| Criticality Level | Category | Description | Example Assets |
|---|---|---|---|
| Level 4 | Mission critical | Core systems required for immediate business operations | Production databases, customer portals, payment gateways, primary DNS |
| Level 3 | Business operational | Systems essential for daily internal productivity | Internal HR portals, VPN concentrators, file shares, Active Directory |
| Level 2 | Development / staging | Pre-production environments where software is tested (no live customer data) | QA servers, UAT environments, build pipelines (CI/CD) |
| Level 1 | Isolated / sandbox | Non-sensitive environments with no connection to production or corporate networks | Local dev environments, isolated lab routers, research sandboxes |
Combine everything into an overarching prioritization framework
Finally, you need to convert the information you’ve been gathering into into a structured prioritization process that considers each vulnerability in context.
The best way to do this is to use the Stakeholder-Specific Vulnerability Categorization (SSVC) framework. This is a well-established, extensively researched approach to that is technology-agnostic. Even better: It is designed to be easily automatable and customizable. Alternatively, you can develop your own approach; however, you should be aware that this is a complex task and will require significant resources.
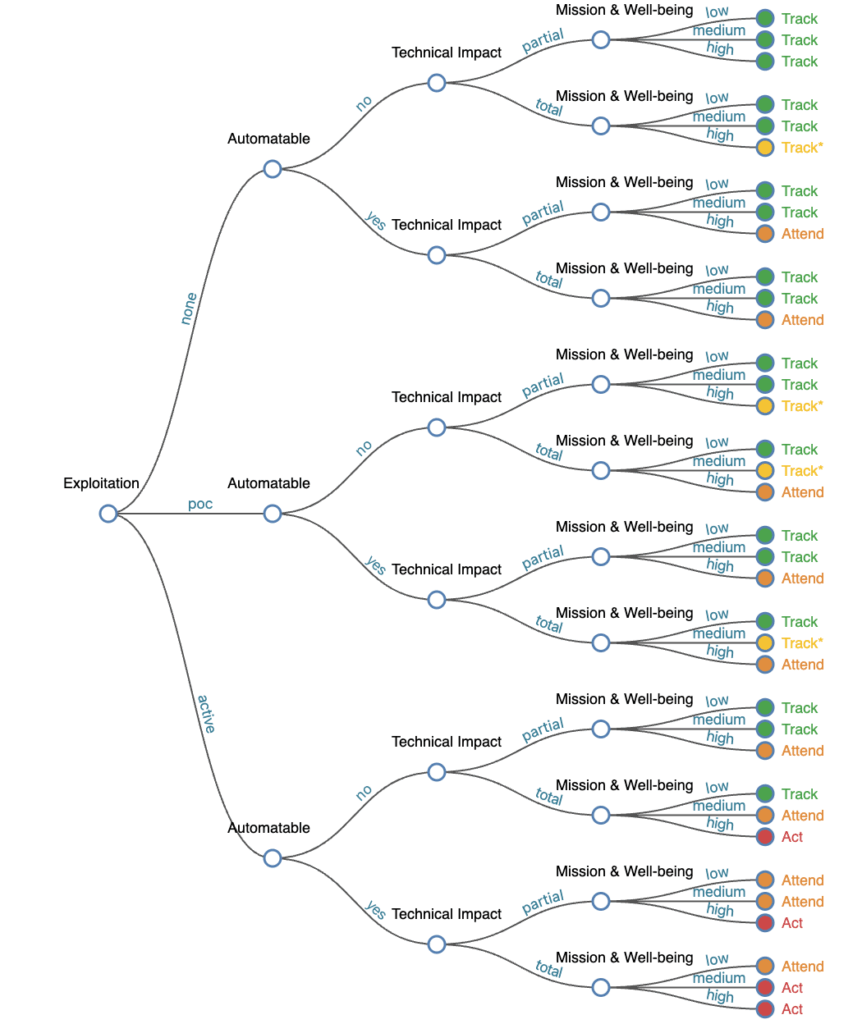
CISA SSVC full tree calculator (source)

Integrate remediation with existing workflows
Vulnerability management frameworks are only as effective as their ability to remediate identified and qualified vulnerabilities. This is the outcome that reduces risk.
However, one of the defining features of vulnerability management is that while vulnerability management teams may own the risk, they almost never own the fix. Instead, they rely on partner engineering teams to implement remediation. As a result, you should invest time in making sure that these interactions are as seamless as possible. The sections below help you do this.
Identify workstream owners
There’s nothing more frustrating for a vulnerability management team than receiving an urgent, priority-one vulnerability with a tight remediation timeframe and then needing to spend the next 4-5 hours trying to figure out who actually owns the impacted asset. Not only is this an incredible waste of time in a high-pressure scenario, it’s also completely unnecessary if you’ve already set up your CMDB.
Your first task is ensuring that every asset, configuration, and data flow has the right owner identified and that this information is recorded in your CMDB. This will have several practical benefits, not least of which is that you will not be waking up a series of random software engineers at midnight for a system they have no oversight over. More importantly, your ownership information should go beyond the division or executive level and instead identify the exact team or team lead responsible for maintaining and developing it.
Integrate with existing engineering frameworks
Too often, vulnerability teams create parallel work tracking streams that don’t integrate with existing engineering systems. While this may address some perceived tracking and reporting issues, it is almost guaranteed to cause friction and frustration with engineering teams, as it will require them to enter the same information twice. In turn, this raises the chance of workstreams being missed.
A more practical approach is implementing a two-stage tracking system that separates risk and task ownership. In this approach, all vulnerabilities are tracked in “your” system, while the work orders are automatically passed to your engineering teams. As work progresses, the vulnerability management system is updated.
Ensure positive confirmation
It is all too easy to see a ticket marked “Done” in an engineering system and assume that this means the vulnerability has been remediated. Instead, you should adopt a “trust but verify” model that ensures that the vulnerability management team is the one positively confirming that work has been completed.
To do this, make sure that your vulnerability management framework includes a process to positively verify every vulnerability that is marked as done by your engineering teams. This can be done automatically (where possible) or by triggering a review request.
Capture exceptions
Finally, not every vulnerability can be remediated—sometimes, for whatever reason, the risk has to be accepted or a potentially longer-running investigation authorized. In these instances, you need to have a predefined exception process so that you, your partner engineering teams, and executive teams can systematically assess the exception and provide approval.
Although this process will be unique to your organization, there are a few key points your exception process should cover:
- All exceptions should be time-bound and regularly reviewed. Typically, this is every quarter, although the exact timeframe is up to you.
- Ensure that all impacted stakeholders, such as product owners, detection and response teams, and engineering teams are involved.
Track the right numbers
As with any systematic work activity, tracking the right numbers is just as important as the tasks being completed. It allows you to measure your progress, identify areas for improvement, and become aware of problems before they spiral out of control.
This is just as important for your vulnerability management framework. To do this well, you need to go beyond surface-level measurements like the mean time to remediation (MTTR) and include extra measurements that give you deeper insight into the performance of your framework.
To see why this is the case, consider the MTTR statistic. On the surface, it sounds great because it measures the average time it takes to remediate a vulnerability once it’s identified. Theoretically, reducing this time would be a positive, as it indicates you are becoming faster at remediating the vulnerabilities in your environment. However, when you dig deeper into this statistic, you quickly realize this isn’t the whole story. For instance, if lower-priority vulnerabilities are being remediated faster but higher priorities are being remediated slower, this would actually be a worse result for your organization even though the MTTR is decreasing.
Although this is a simplistic example, it illustrates the point. Going beyond surface-level measurements is essential in your vulnerability management framework, as this is the only way you can measure your organization’s actual risk.
The sections below explore a more holistic approach. They are designed to give you a solid measurement framework that you can use to jump-start your vulnerability management framework. No matter which of the three major frameworks you choose, the measurements covered below will help.
Understand your coverage
As discussed at the start of this article, a vulnerability management framework can only be as effective as the accuracy of its coverage. If you don’t know what assets you have in your environment, you can’t defend them, and ultimately, this will invalidate most of your subsequent work.
As a result, the first thing you should measure is how effective your environment coverage is. This results in the metrics below.
| Metric | Description | Goal | Why It Matters |
|---|---|---|---|
| Scanner-to-CMDB reconciliation (if you’ve included vulnerability scanning) | The ratio of assets seen by your vulnerability scanners versus assets recorded in your CMDB | 100% | If your CMDB sees 1,200 IPs but your scanner only has 1,000, you have 200 “Shadow IT” assets. |
| Ownership mapping rate | Percentage of assets in your environment that have a defined “Workstream Owner” or “Admin Group” assigned | 100% | This directly impacts your remediation speed. |
| Unknown asset discovery rate | Number of unknown assets identified by your CMDB per period of time (week or month) | 0% | A low rate indicates that all assets are being onboarded correctly. |
| Blind spot percentage | Percentage of your infrastructure not covered by vulnerability identification | 0% | Identifies “dark space” in your infrastructure where vulnerabilities can hide and spread undetected. |
Analyze your intake process
Next, you need to ensure that your intake process is as optimized as possible. This ensures that vulnerability notifications and events are being processed efficiently and that the information being included is sufficient to enable further remediation.
These metrics are described in the table below and should be specified on a per-category basis, using the categories you identified earlier in this article.
| Metric (by intake category) | Description | Goal | Why it Matters |
|---|---|---|---|
| Intake volume | Total count of vulnerabilities received per category (scanning, external, incident, etc.) | Visibility | Tracks which sources are the “loudest,” which allows you to resource them properly. |
| Initial validation rate | Percentage of incoming reports assessed as “valid” versus “invalid” (e.g., software not present in CMDB) | > 95% valid
(may not be possible for CVEs) |
Reduces wasted time from misconfigured scanners or ineffective intake forms. |
| Mean time to validation (MTTV), also known as mean time to acknowledge or triage | Average time from initial report receipt to validation | < 24h for manual assessment; < 15m for automated assessment | Reduces the entire vulnerability management lifecycle. |
| Touch rate | Number of times a report needs to be “touched” before it progresses | < 3 for manual assessment;1 for automated assessment | Reduces the “back and forth” to gather information before it can progress. |
Calculate remediation velocity
Finally, you need to calculate your remediation velocity. This measures the effectiveness of your remediation program as well as acting as a proxy for your engineering partnerships. While this should include your MTTR, broken down by your SSVC categories, it should also include some other metrics, as shown in the table below.
| Metric | Description | Goal | Why it Matters |
|---|---|---|---|
| Mean time to remediate (MTTR) by SSVC tier | Average time from detection to full remediation (noting that you’ve already calculated the first part) | Tiered targets, but in general… High: < 7 daysMedium: < 14 daysLow: < 30 days |
It tracks how each SSVC tier is performing. |
| Ownership assignment accuracy | Percentage of vulnerabilities correctly assigned on the first try | > 99% | This metric tracks the accuracy of your CMDB ownership records. |
| Reopen rate | Percentage of vulnerabilities marked done that fail the positive confirmation test | < 5% | The reopen rate tracks how effective engineering fixes are; high failure rates can indicate a problem with information provision. |
| Exception rate | Number of vulnerabilities with valid exceptions | Minimize | This figure provides insight into the number of “challenging” vulnerabilities currently being managed. |
| Exception age | Average age of exceptions | Minimize | Multiple long-running exceptions indicate heightened organizational risk. |
Conclusion
Instead of swimming around in a sea of unending vulnerability chaos, organizations need a vulnerability management framework that shifts vulnerability management from a reactive task to a repeatable, risk-focused discipline that supports both technical teams and business objectives. This is the only way modern organizations can survive.
However, as you learned in this article, full implementation of one of the three major vulnerability management frameworks is an enormous undertaking that can take a significant amount of time, time that your existing teams can ill afford. What you really need is an operational framework that you can implement now while the broader organizational implications are addressed elsewhere.
This article presented you with this framework. It identified the operational realities that are common across all the major frameworks and then showed you how to implement them in your environment. It allows you to improve your operational reality while setting the stage for full implementation later. Ultimately, this allows you to focus on the things you can control: efficient resolution of incoming vulnerabilities and proactive reporting.
Remember that no organization can eliminate every vulnerability, nor can you control the vulnerabilities that come into your team. However, with the right framework, backed by a comprehensive CMDB like Device42, you can respond to each one swiftly and confidently while intelligently managing your organization’s risk.