Vulnerability Management Best Practices
Imagine getting the below notification.
“An issue has been detected in the payments cluster. Two of our critical servers are acting abnormally, and a large stream of traffic is being routed to a Russian-based IP address, creating severe latency, widespread instability, and potentially exposing sensitive payment data.”
Investigation reveals that production systems were compromised through a known vulnerability.
A fix for this issue had already been released, and the exploit was publicly known. Given the availability of top-tier tools, this incident should have been prevented. In theory, the safeguards in place should have ensured complete protection.
Unfortunately, despite the availability of advanced tools and timely fixes, an absence of a well-defined vulnerability management process can still result in vulnerabilities being exposed.
This article explains what an effective vulnerability management process looks like: a structured, repeatable set of processes, backed by accountability and data that turns vulnerability detection into action before an incident occurs.
Summary of vulnerability management process best practices
| Best practice | Description |
|---|---|
| Maintain a living asset inventory | Provides complete, current visibility into the environment for precise vulnerability detection, ownership assignment, and risk prioritization. |
| Ingest vulnerabilities from multiple sources | Ensures full vulnerability coverage and visibility across infrastructure, cloud environments, applications, and development pipelines. |
| Triage and assign findings to owners | Speeds up remediation by making sure validated vulnerabilities are prioritized and assigned to the appropriate owners. |
| Monitor remediation progress | Keeps remediation efforts on track to prevent prolonged exposure and maintain accountability. |
| Manage vulnerability exceptions | Ensures governance over unremediated vulnerabilities to prevent temporary exceptions from turning into permanent exposures. |
| Report metrics and drive improvement | Allows organizations to measure the effectiveness of their vulnerability management process. |


Discover assets automatically including hardware, software, and cloud infrastructure

Match the assets against your software and hardware license agreements

Comply with your service license needs comprehensively and confidently
Maintain a living asset inventory
Despite its importance, maintaining an accurate (or living) asset inventory is one of the most challenging issues in cybersecurity. Modern environments are dynamic, with systems that start up and shut down in minutes, cloud services that appear unexpectedly, and endpoints that constantly move across networks. Assets are constantly added, modified, or removed, and any delay in discovery can create blind spots that weaken the vulnerability management program.
The problem is that organizations require a current and complete view of assets. It is the only way they can detect vulnerabilities accurately, assign ownership, and make informed risk-based decisions at scale.
Creating an environment that meets the needs of an organization, while managing the inherent complexity of modern networks, requires three steps. These are described in the subsections below.
Automate asset discovery
Start by automating your asset discovery. You do this by setting up an effective Configuration Management Database (CMDB) system, and then ensuring all your configuration information is constantly streamed into it.
The figure below illustrates what this looks like. It shows an automated discovery workflow, with asset information being constantly ingested and analyzed in a closed-loop process. Each step improves inventory accuracy and ensures that what is tracked truly reflects what exists in the organisation’s environment.
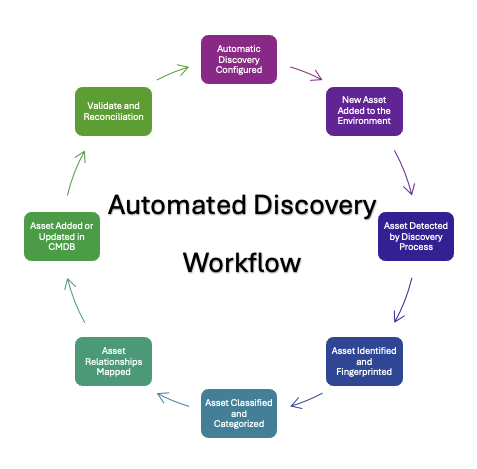
Figure 1 – Automated Discovery Workflow (source)
One of the best ways to do this is by integrating a CMDB-specific platform like Device42. Platforms like this have built-in automation and analysis capabilities that will make your CMDB effective, freeing you and your team to focus on other aspects of your vulnerability management.
Assign consistent metadata to each asset
Once assets are identified, they should be enriched with metadata that provides business, operational, and technical context. Metadata includes details such as:
- Business owner
- Relationship to other assets
- Business criticality
- Data sensitivity
- Exposure level
- Operational role.
These details provide a clear understanding of how vulnerabilities impact the organization’s environment and help prioritize remediation efforts. For example, knowing that a system stores sensitive data and has exposure to the Internet significantly changes the vulnerability risk level for that system.
Figure 2 shows what this might look like. Using the platform mentioned above, Device42, an example asset record has been filled with metadata fields. You can see the additional context this metadata provides, including information about location, hardware, serial number and more.
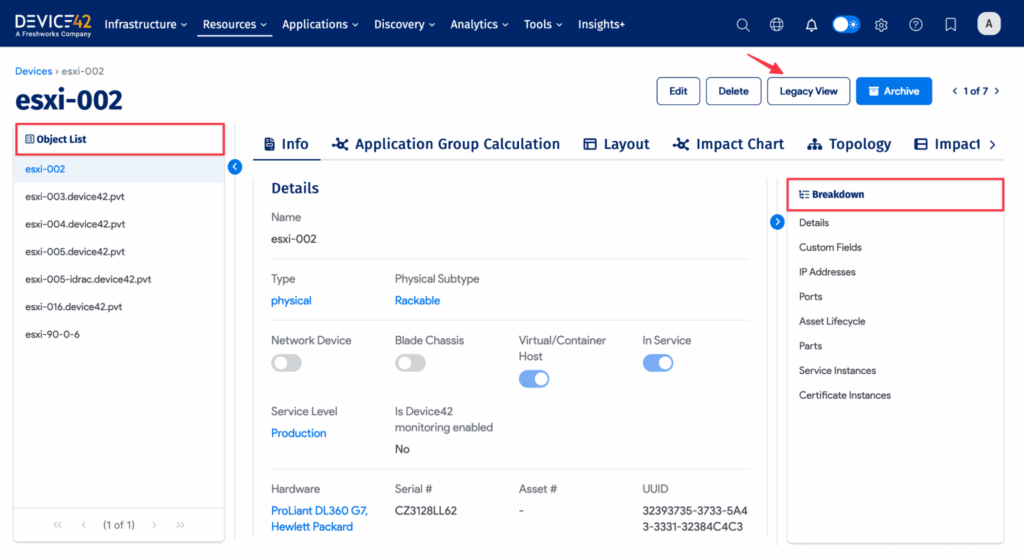
Figure 2 – Device 42 Asset Record with Metadata Tags (source)
Ultimately, having the correct metadata in an easily accessible location improves your vulnerability management process. It allows each vulnerability to be connected to a system owner, assigned a priority, and directed for resolution based on its business impact.
Set up routine reconciliation with automated reports
Finally, make sure you regularly compare discovered assets to your CMDB. This allows you to catch any discrepancies and identify orphaned systems before they become an issue.
Do this by integrating regular asset audits across your organization. Choose a regular review cycle, often quarterly, where each team completes a manual review of the assets they are responsible for. If any discrepancies are observed, investigate why they occurred and update your CMDB accordingly.

Ingest vulnerabilities from multiple sources
In a modern environment, organisations often gather information about the state of existing infrastructure, then compare it with known vulnerabilities from various sources, including
- Infrastructure scanners
- Cloud security tools
- Application testing platforms
- Manual reports.
Each source uses a different format, severity model, and level of detail. A centralized intake and orchestration layer is key to making this process easier.
When this is in place, organizations receive a unified, prioritized view that turns scattered scan data into correlated insights. Each vulnerability is appropriately linked to an asset, enriched with business context, and ready for triage and resolution, as illustrated in the figure below:
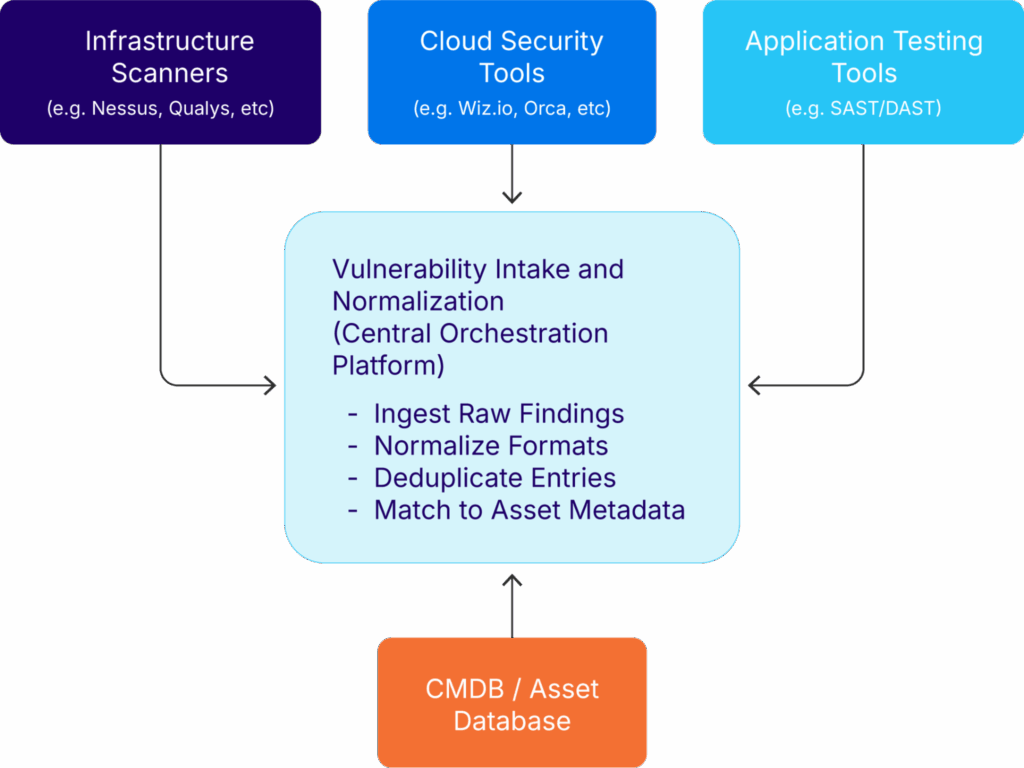
Figure 3 – Vulnerability Data Integration Flow (source)
Unfortunately, this is not the reality for most organizations, nor does it happen automatically. Instead, you need to implement the processes described in the following subsections to get there.
Standardize the metadata
Start by standardizing the metadata that describes the organization’s assets. Ensure each system has consistent attributes, such as business unit, owner, criticality, and operational role. These tags help link vulnerabilities to the correct systems with the right context. The more consistent the metadata, the easier it is to manage and act on incoming data.
Implement a centralized platform
Once metadata is standardized, send vulnerability data to a centralized platform that can ingest findings from all sources. This system should organize, eliminate duplicates, and assign vulnerabilities to the correct assets. With everything in one place, you can group findings by team, environment, or severity and assign them accordingly. This reduces confusion and speeds up triage.
Prioritize identified vulnerabilities
After data ingestion, apply a uniform scoring model to prioritize identified vulnerabilities. Consider factors like CVSS scores, known exploits, exposure level, and business impact. Use this model to rank findings across tools, making sure everyone uses the same approach. Regularly review and update scoring criteria to ensure they accurately reflect the real risk.
Triage and assign findings to owners
Many organizations struggle with unclear asset ownership and manual assignment workflows. This lack of clarity causes delays, inconsistent actions, and accountability gaps across teams.
To avoid this, implement the processes described in the following subsections.
Establish a clear ownership model
Start by establishing a clear ownership model. This means ensuring that ownership data is recorded alongside each asset, including name, team, and contact details. Then, use system tagging and metadata to track responsibility by environment, role, or business function. Finally, review and update ownership information regularly to keep it accurate and actionable.
Create a clear risk scoring model
Next, create a process that allows you to assign the right risk score to incoming vulnerabilities. This allows you to focus effort on reducing the highest-risk vulnerabilities first, rather than wasting time on vulnerabilities that may not present a risk to your organization.
Typically, this is done based on factors such as data sensitivity, system exposure, exploitability, and relevant threat intelligence. However, many businesses apply additional business logic on top of these technical considerations. If this is the case, make sure you add these to your risk scoring model.
The table below shows you what this might look like. It displays an example prioritization matrix that assigns weighted scores to six key inputs. Each input is rated from low to critical, resulting in a total score that determines the overall risk level.
| Input | Low (0) | Moderate (1) | High (2) | Critical (3) |
|---|---|---|---|---|
| Exploitability | No Exploit | Theoretical | Proof of Concept available | Active exploited |
| Asset Exposure | Internal Only | Limited External Access | Public with Restrictions | Public Internet-facing |
| Data Sensitivity | Public/Non-Sensitive | Internal Data | Regulated or Customer Data | Highly Sensitive (e.g., Private Health Information) |
| Business Impact | Low/No Disruption | Moderate Disruption | Major Service Interruption | Business-Critical System |
| Threat Intelligence | No Known Activity | Industry Relevance | Sector-Targeted | Active Campaigns in Region/Sector |
| CVSS Score | Below 4.0 | 4.0-6.9 | 7.0-8.9 | 9.0-10.0 |
Link your risk scoring with SLAs
Once you have your risk scoring process in place, you need to assign clearly defined service level agreements (SLAs) to your vulnerabilities. This focuses organizational effort and prioritization around discrete, numerical targets that convert your risk score into outcomes.
An example of what this looks like is in the figure below. You can see how each risk-score range is converted into numerical targets, driving urgency and aligning remediation efforts to where they are needed most.
| Total Score Range | Risk Tier | SLA |
|---|---|---|
| 0-6 | Low | 60 Days |
| 7-11 | Medium | 30 Days |
| 12-15 | High | 7 Days |
| 16-18 | Critical | 72 Hours |
Automate vulnerability assignment
Finally, integrate automatic vulnerability assignment into your process. Manual ticket assignment is a significant contributor to delays in vulnerability remediation. Findings often remain unresolved while teams wait for someone to review, deduplicate, categorize, and assign them manually. This slows response times, introduces inconsistency, and makes it harder to meet SLAs.
Instead, automate the triage and assignment process. Using the asset tags, metadata, and ownership records you’ve already gathered when setting up your CMDB, you should be able to automatically assign each vulnerability to the appropriate system owner for remediation.
Monitor remediation progress
Once you’ve assigned vulnerabilities to the relevant system owners, you need to track them through to completion. This ensures that your remediation efforts are on track and that ultimately, the overall risk to the organization is being reduced.
Do this by implementing a structured oversight program as described in the sections below.
Organize remediation into well-defined campaigns
Start by organizing as many remediations as possible into well-defined campaigns. Note that while there will always be exceptions to this rule, or urgent vulnerabilities that need you to ‘drop everything and remediate,’ the goal is to minimize context switching and any related preparation work where possible. You do this by grouping your remediation efforts by factors such as vulnerability type, business unit, system owner, or asset classification.
Here’s an example of some of the ways you can define your vulnerability campaigns.
| Campaign Name | Scope | Owner | Open Findings | Resolved | Past 30 days SLA | Next Review Date |
|---|---|---|---|---|---|---|
| Q1 Critical Vulns | All critical CVEs org-wide | Security Engineering | 55 | 120 | 18 | 2024-09-15 |
| Web App Cleanup | GWS API Top 10 Issues in Prod | Cloud Ops | 8 | 78 | 5 | 2024-09-01 |
| Cloud Exposure | Public-facing cloud assets | Cloud Ops | 16 | 49 | 3 | 2024-09-05 |
| Finance Remediation | Finance business unit assets | GRC + IT Operations | 24 | 55 | 9 | 2024-09-08 |
Integrate automatic progress tracking and escalation
Even the best teams with the best processes can miss things when they get overwhelmed or priorities change. In the case of vulnerabilities, a seemingly simple risk can quickly evolve into something catastrophic for your organization.
To mitigate this, integrate automatic progress tracking and escalation processes into your vulnerability assignment. Depending on your toolset, this should include:
- Automatic reminders integrated into your organization’s messaging platforms
- Automatic escalations to managers based on your organization’s structure
- Automatic notifications to your vulnerability management team when SLAs are being breached
Verify successful remediation
Next, make sure that the only way to close an open vulnerability is when it has been successfully remediated, or an approved exception has been logged (exceptions are discussed in the next section). Doing this prevents false closures that leave risks unaddressed, strengthening your overall vulnerability management process.
Make sure that remediation verification is as easy as possible. Outside of technical complexity, you shouldn’t create a situation where confirming a remediation is so complex that it destroys trust in the entire process.
Some of the easier ways to do this are through targeted vulnerability scans or repeating any proof-of-concepts (PoCs) provided by vulnerability researchers.
Use dashboards
Finally, use dashboards to monitor the overall status of your vulnerability management process. Key areas that most organizations need include:
- Open versus resolved findings
- SLA compliance by severity
- Remediation throughput by team
- Mean Time to Remediate (MTTR), with filters to drill down on asset type and business units
- Campaign coverage
Using these dashboards, organizations can quickly measure their program effectiveness across multiple dimensions. In turn, they can make informed adjustments or identify bottlenecks well before the issues become critical.
Manage vulnerability exceptions
Sometimes, fully resolving a vulnerability within the defined SLA isn’t practical or technically feasible. In these cases, exceptions provide the flexibility needed to balance operational realities with risk management. However, without proper structure, exceptions can quickly become unmanaged risks. Informal approvals through hallway conversations, emails, or undocumented workarounds often lead to long-term exposures that were never intended to last.
Integrate the best practices below into your vulnerability management process to avoid the negative aspects of vulnerability exceptions.
Establish a formal exception request process
Start by establishing a formal vulnerability exceptions process. This should include details like the business justification, risk acceptance, and who has the authority to approve it. Make sure that every exception is linked to the relevant inventory asset, and that it automatically includes review and expiration cycles.
An example of what this could look like is included below:
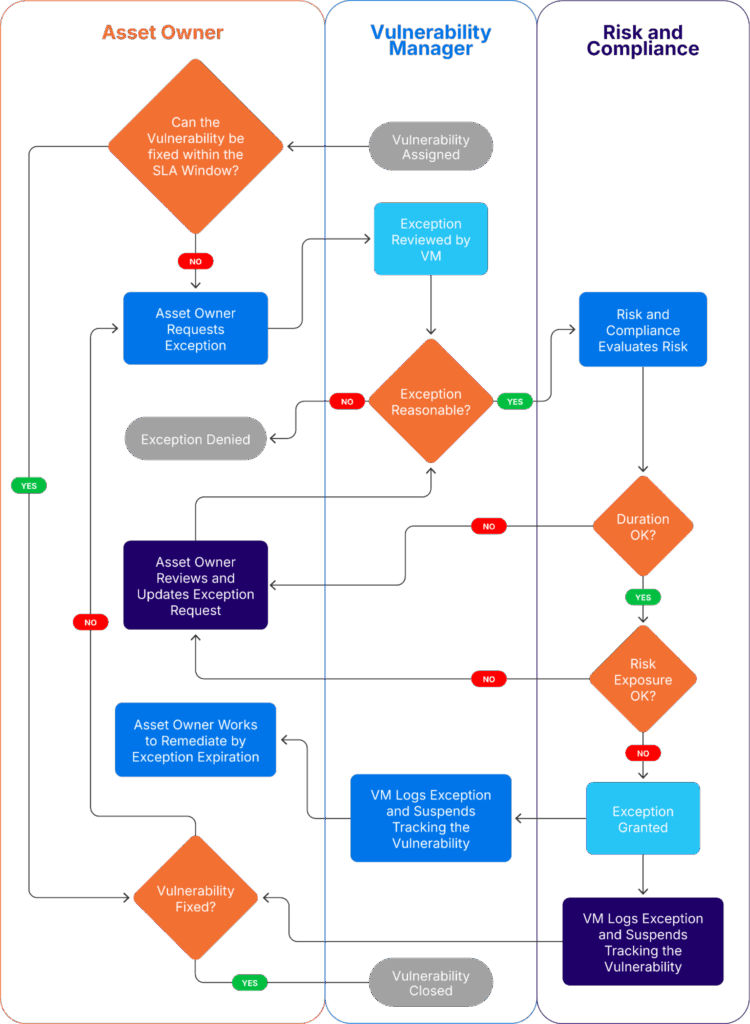
Figure 5 – Example exception workflow (source)
Report on exceptions
Once you’ve created your vulnerability exception process, integrate the data into your normal reporting and visualizations. For instance, most organizations would probably want to track the number of open exceptions there are at any given time, filtered by impacted systems, expired approvals, and the associated level of risk.
Report metrics and drive improvement
When aligned with business objectives, metrics become tools for ongoing improvement. They help organizations determine where to allocate resources, which processes need adjustments, and how effectively teams perform. Yet, many organizations struggle to derive value from the data they gather.
To address this, tailor your metrics to focus on what matters most. Utilize asset metadata, such as criticality, environment, and business unit, to segment reporting and effectively highlight operational impact. Track key indicators such as mean time to remediate (MTTR), SLA compliance by severity, and active exceptions. Incorporate these metrics into regular reviews to identify bottlenecks, spot risks, and improve overall program performance.
The table below provides you with a list of metrics to use in your vulnerability management process, along with a brief explanation of what they measure and why they matter:
| KPI | What It Measures | Why It Matters | Best-Practice Target |
|---|---|---|---|
| Mean Time to Remediate (MTTR) | Average time from detection to remediation | Measures responsiveness and remediation efficiency | Critical: < 7 daysHigh: < 14 days |
| SLA compliance rate | Percentage of vulnerabilities resolved within SLA | Tracks adherence to defined timelines and accountability | ≥ 95% compliance across all risk tiers |
| Vulnerabilities by risk tier | Volume of open vulnerabilities categorized by severity | Helps prioritize remediation efforts based on risk | Critical/High findings < 5% of total backlog |
| Open vulnerabilities over time | Trend of unresolved findings across periods | Indicates whether risk is decreasing, stabilizing, or growing | Downward trend month-over-month |
| Exception volume and aging | Number of active exceptions and their age | Identifies areas where long-term risk may be unmanaged | ≤ 30 days average exception age |
| Validated remediation rate | Percentage of remediated findings that are scan-verified as fixed | Confirms the effectiveness of remediation and reduces false closure | 100% for all closed critical vulnerabilities |
| Ownership assignment rate | Percentage of findings with a clearly assigned owner | Enables accountability and follow-through | 100% assignment for all validated findings |
| Triage time | Time from ingestion to validation and prioritization | Tracks operational efficiency in front-end processing | ≤ 48 hours for critical/high findings |
Last thoughts
Creating, implementing, and maintaining an effective vulnerability management process is fundamental for effective vulnerability management. It is the only way organizations can consistently improve their vulnerability security posture, while adapting and responding to new vulnerabilities as they emerge.
Getting this right is hard. Organizations and the compute infrastructure they leverage are constantly changing. Vulnerabilities are constantly being identified, and the teams trying to make it all work are stuck in the middle.
However, using the right tooling, backed by a clear vulnerability management process, and integrated with an effective team, you and your organization can get on top of this narrative. Instead of feeling constantly behind in your vulnerability remediations, you can create an environment where vulnerabilities are detected, triaged, assigned, and resolved through a repeatable and accountable process. Fire drills will become rare because problems are addressed before they escalate.
To get to this stage, focus on implementing the best practices described in this article. Integrate a powerful CMDB into your environment. Build processes to manage vulnerabilities all the way through to remediation. Track your progress and use metrics to improve performance.
Above all, remain focused on the operational discipline of vulnerability management: consistent action, clear ownership, and organized workflows.