How to Configure an Enterprise ITAM Tool to Match Your Real Workflow
Native discovery, SaaS connectors, and ITIL-aligned lifecycle automation are now built into every major IT asset management (ITAM) platform. On paper, the asset lifecycle should run on autopilot, but a platform’s technical features cannot compensate for broken process logic.
Asset intake isn’t a new challenge that only modern tools can solve. The problem is that traditional asset tracking has a poor reputation because data entry is highly manual and disconnected from procurement and other key processes. To get your ITAM adoption right, you need to align the tool from day one with your existing ITIL practices, configuration management database (CMDB), and service catalog.
In this article, we outline a step-wise blueprint to configure your workflows and align your IT asset management tool with core ITIL practices.
Summary of key alignment steps for the ITAM lifecycle
| Step | Expected outcome |
|---|---|
| 1. Define the configuration item (CI) scope before configuring the tool | Tiered CI scope matrix and class boundaries with written sign-off |
| 2. Map service catalog items to real intake paths | Catalog items, approval chains, and mandatory CI attributes for each intake path |
| 3. Configure discovery filters and lifecycle transition rules | Six state transitions wired to HR, MDM, change, and procurement events |
| 4. Build service maps before going live | Relationships between business services and their supporting CIs |
| 5. Execute a baseline reconciliation dry run | Licensing gaps, reconciliation and compliance report of all assets |
| 6. Expose validated CI data to service desk workflows | CI context fields surfaced inside incident, problem, and request views |

A division of Freshworks, which offers a comprehensive suite of ITSM solutions.

Fastest time to value with easy implementation and agentless asset discovery

Comprehensive hardware and software inventory management

Broadest discovery from legacy technology to the latest cloud and containers
What ITAM tools cannot solve on their own
Pure-play ITAM tools, which were once designed to act strictly as systems of records and contract repos, are no longer relevant. Most ITAM tools today are unified suite platforms that also bundle the asset ledger and the discovery engine. The discovery layer serves as a raw data collection pipe; when you turn on asset discovery, the engine attempts to write every discovered endpoint to the database.
Because indiscriminate network sweeps do not align with how your enterprise actually fulfills requests, runs changes, and resolves incidents, you cannot let the raw discovery layer write directly to your production registry. Doing so allows the discovery engine to treat even temporary developer instances, lab environments, and roaming devices as permanent assets.
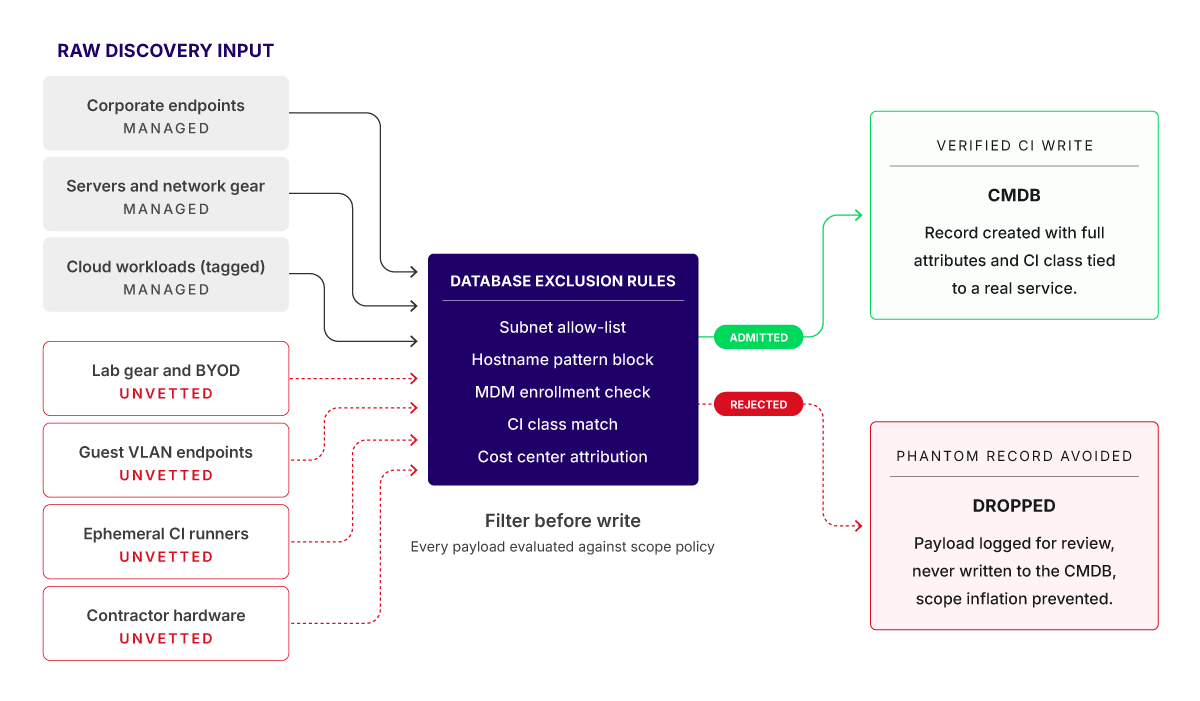
Discovery filtering before CMDB write
The engineering solution is to use the discovery layer strictly as a staging pipeline. This means that the discovery engine should still listen to the network and capture everything it can find, but raw data must pass through automated filtering rules before it is allowed to update your live CMDB. As a result, unvetted raw packets of data get dropped or held for review while verified data get admitted as governed configuration items (CIs) linked to a named financial owner.

Steps to align an ITAM tool with your workflow
Configuring an ITAM platform on top of an inefficient ITSM practice produces the same drift that the tool was supposed to solve. ITAM rollouts also commonly stall due to an unaligned ingestion layer. To stabilize your asset management framework, the platform’s data intake paths must integrate seamlessly with your existing corporate infrastructure layers before production goes live.
Prerequisites and assumptions
Before implementing a seamless data intake alignment, ensure that your environment meets these baselines:
- HR and identity systems can provide automated feeds (like webhooks for hires or transfers) to track workforce changes and SaaS subscriptions.
- A service catalog exists with defined request items, fulfillment SLAs, and approval chains.
- Your change management process produces CAB-approved change records that the ITAM tool can subscribe to.
Note that this specific alignment pattern is built for enterprises with a centralized procurement function and an SSO-managed identity layer. If your enterprise still runs decentralized buying through business unit cards, you will need to add a finance feed intake step before the rollout.
Step 1. Define CI scope before configuring the tool
Instead of letting the platform ingest everything it can discover, agree with all business units on a tiered CI scope boundary inside your rollout plan. Document this as your CI scope and class matrix. The matrix decides which records the CMDB is allowed to create, what CI class each record belongs to, and which CIs are mapped into business services for impact analysis.
The in-scope CI classes typically cover hardware (laptops, desktops, servers, network gear, mobile devices) above a cost threshold (say $500), software (all paid licenses), SaaS (all corporate-billed subscriptions), cloud resources (all instances tagged to a cost center), and business services (defined in the service catalog).
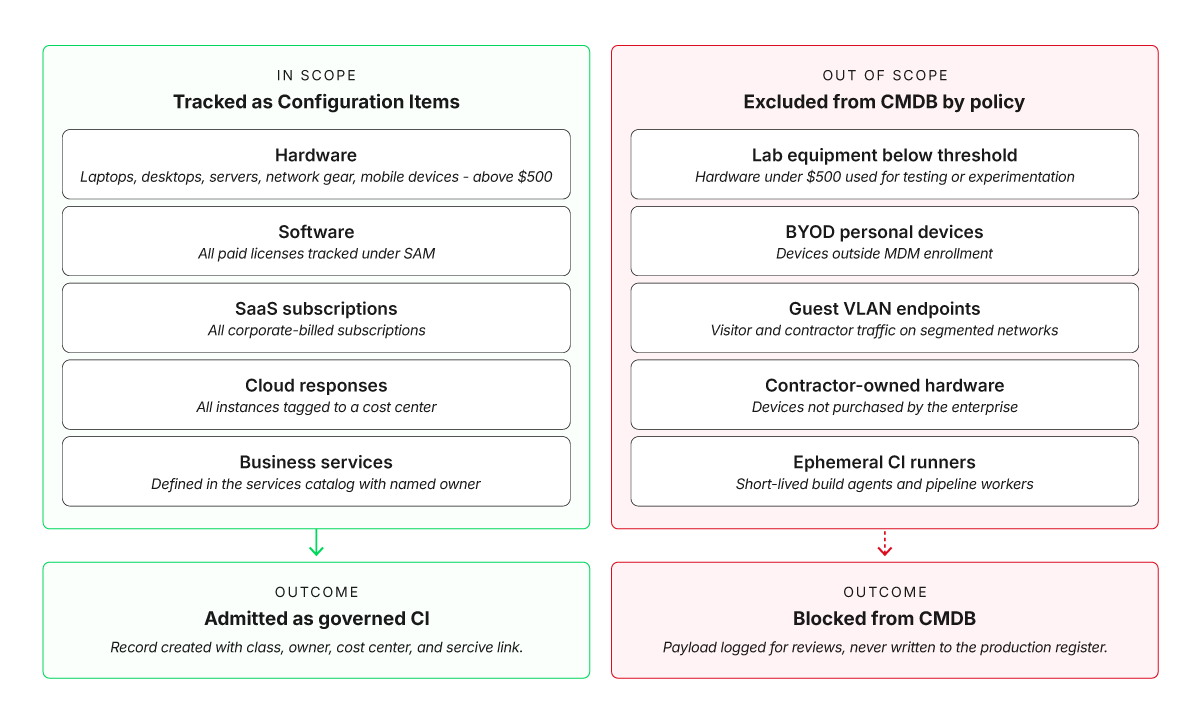
Decide which records the CMDB is allowed to create before the tool is switched on
The exclusion list typically covers lab equipment below the threshold, BYOD personal devices outside mobile device management (MDM), guest VLAN endpoints, contractor-owned hardware, and ephemeral CI runners. This boundary needs a mandatory written sign-off from finance, IT operations, security, and your service asset and configuration management (SACM) process owner before the tool is configured.
Step 2. Map service catalog items to real intake paths
When you configure the ITAM tool, do not assume that every single piece of hardware or software enters your company in the exact same way. You must set up dedicated intake rules for every way an asset can enter the company so that unapproved channels don’t bypass your controls and create duplicate records.
Document these paths in writing before altering the database schema or changing the configuration settings of the ITAM platform.
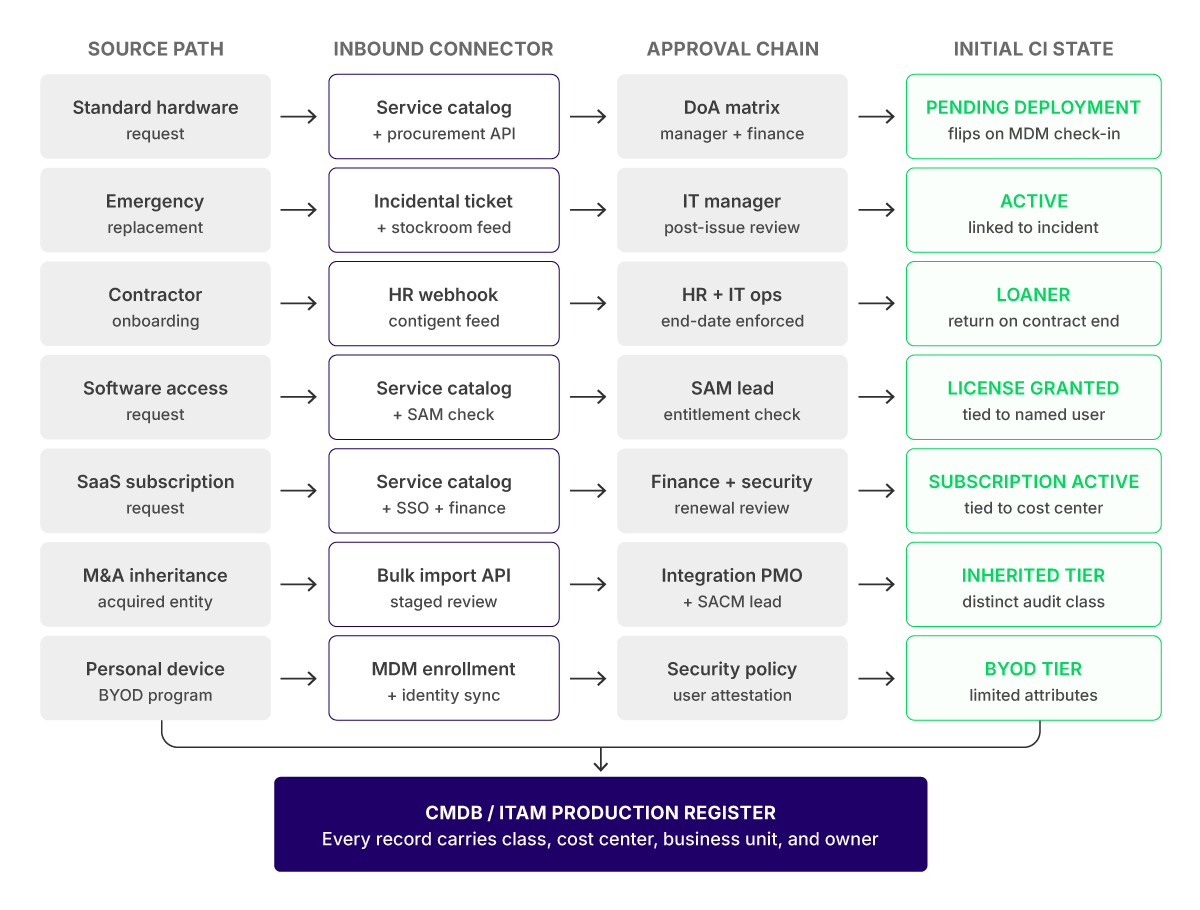
Every channel an asset uses to enter the enterprise needs its own database route, approval chain, and initial CI state
Every procurement channel needs its own automated data feed, an approval workflow, a clear starting asset status, and a way to log everything without manual data entry. If the platform cannot handle all these paths natively, build custom API endpoints before you go live. Most importantly, make sure an asset is created in your system only if the key information is filled out.
The table below shows what this mapping tells the configuration team to do and why.
| Task | Action required by the configuration team | Purpose |
|---|---|---|
| Service catalog mapping | Walk through every channel an asset uses to enter the enterprise and turn each one into a request fulfillment workflow. | Mapping real paths first ensures that every CI has a defined intake route inside the catalog. |
| Mandatory CI attribution | Make cost center, business unit, CI class, and service relationship mandatory attributes at intake. | Service mapping cannot work without the relationship attribute populated. |
| Named ownership | Assign one accountable owner per asset class with write access to their domain. | Without a named owner, no record gets corrected when it drifts. |
Step 3. Configure discovery filters and lifecycle transition rules
ITAM vendors typically tie their pricing tiers directly to the volume of active CIs or endpoints in your database. At the same time, software vendors charge you based on total installations rather than actual usage. Every installed instance is considered as an “active” license commitment.
To hard-block asset records that should not be in the pipeline, you can declare these under scope filters in the ITAM tool’s discovery configuration. Here, you are explicitly telling the platform: “Do not record these hostnames, do not bill against these endpoints, and do not count their installed software.”
Every major ITAM platform supports event-driven lifecycle updates through native integrations or webhook endpoints to talk to your other systems. However, a native integration only establishes the handshake between tools, while configuring business rules and underlying data structures is left to the ITAM administrators and process owners.
Use logic like that in the following table to configure transition rules.
| Rule | Trigger | Detailed description |
|---|---|---|
| 1. Pending deployment to active | The first MDM check-in or successful change implementation | The tool advances the CI from pending_deployment to active, stamps the deployment date, and links the CI to the change record that put it into production. If discovery sees a CI that has no matching procurement or change record, the tool flags it as unknown_origin and routes it to SACM for back-fill. |
| 2. Active to active (reassigned) | An HR transfer event or a request fulfillment ticket. | The tool updates the assigned user, line manager, cost center, and service relationships while preserving CI history. License entitlements tied to the previous user automatically release if the metric is named user. |
| 3. Active to under change | A CAB-approved change record referencing the CI | The tool flags the CI as under_change for the change window and links incident records back to the change for post-implementation review. |
| 4. Active to recovery pending (if-then-else) | An HR offboarding event | Every CI assigned to the leaver changes to recovery_pending. The tool generates a recovery task tied to the line manager and escalation to HR after a defined number of days for review. License seats and access entitlements get released in parallel. |
| 5. Recovery pending to active or disposed | Physical asset return | If the device is reassigned, it returns to active under the new user. If it is disposed, the record changes to disposed with a reference to the change record authorizing decommission. |
| 6. Active to retired | Refresh cycle policy or end-of-life flag (formalized through a standard change) | The tool puts the CI into the retired state, prompts for disposal, removes the CI from active service maps, and ensures that the device is removed from MDM before the record closes. |
Although the six rules represent the baseline foundation, there can be more advanced rules based on every enterprise’s own use case. A general recommendation is to apply the ITAM 80/20 rule (following the Pareto Principle), which states that 80% of your ITAM value, cost savings, and risk reduction comes from automating and governing just 20% of your asset processes.
Step 4. Build service maps before going live
A CI is just an object (e.g., Server-01). A service map is the web of dependencies showing that, for example, Server-01 hosts Database-X, which feeds into your Customer Payment Portal. As it turns out, CIs without service mapping are useful for inventory but useless for incident impact analysis, change risk scoring, and major incident management.
Before your ITAM tool feeds into incident and problem management workflows, define the relationships between business services and the technical CIs that support them. The mapping should answer three questions for every business service in your catalog:
- Which application CIs deliver this service?
- Which infrastructure CIs (servers, databases, network gear, cloud resources) does the application depend on?
- Which SaaS or third-party services does the workflow rely on?
Build these maps for your top ten business services first. Once those are mapped, expand coverage as part of normal change management. Make it a strict policy that no new business service can be officially approved or closed out by the change advisory board (CAB) until its service map is updated.
Step 5. Execute a baseline reconciliation dry run
One of the core capabilities of an ITAM tool is to help you automatically reconcile purchased licenses against active installations. This is the same capability that can later produce compliance reports as absolute proof during an audit.
It is good practice to run a mock audit against your largest software vendor within 90 days of go-live. The exercise should follow a fixed sequence as shown below.
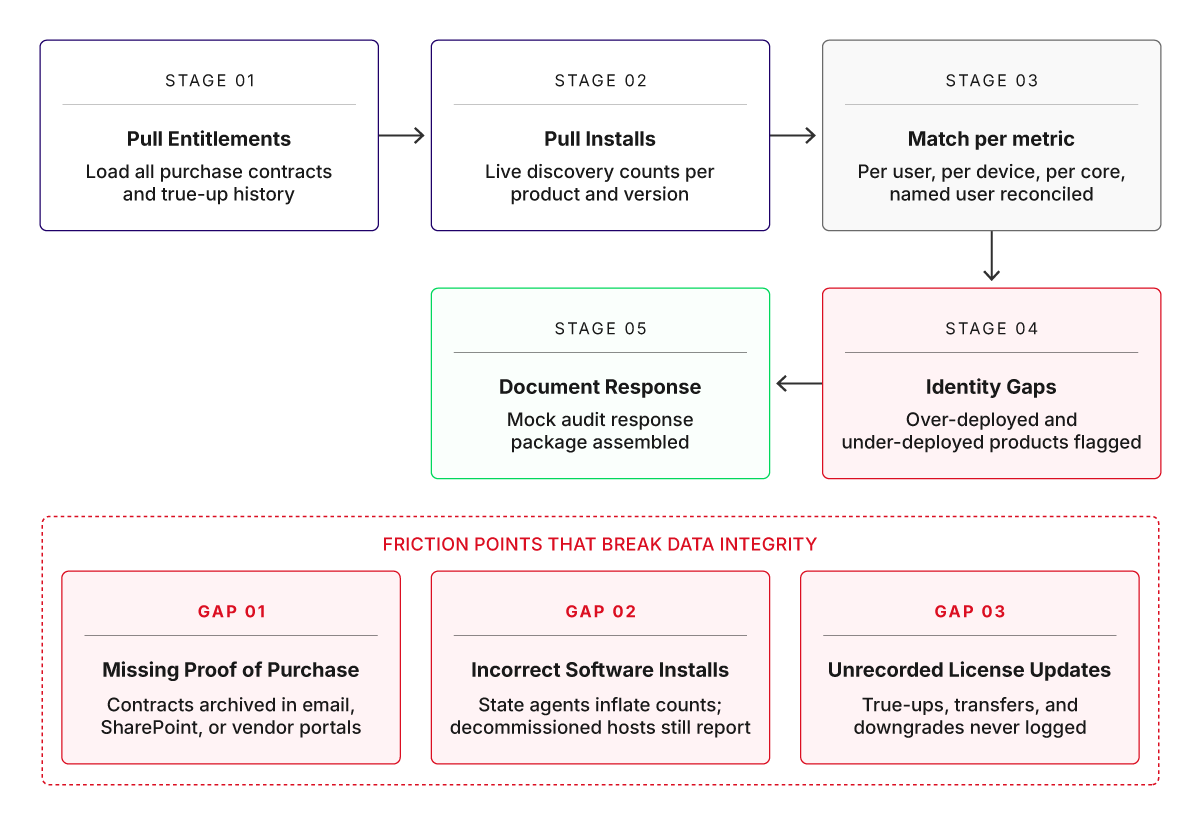
A fixed five-stage sequence to stress test entitlements against live installs
The dry run acts as a practical stress test for your ITAM workflow. There may be several gaps that you would like to fix before moving to production, but pay special attention to missing proofs of purchase, incorrect software installations, and unrecorded license updates from past purchases. For established enterprises with a mix of data centers, servers, laptops, and traditional software vendors, these three gaps are the exact friction points where data integrity breaks down every single time.
Step 6. Expose validated CI data to service desk workflows
With your data finally clean and verified, you can now activate the user interface (UI) widgets and automation rules that put these insights directly in front of your helpdesk technicians.
Note that until this point, the ITAM tool was just a database for asset managers. Following the integration, you are giving helpdesk technicians the immediate context they need to resolve issues faster.
Connect your ITAM platform to your service desk using native, out-of-the-box integrations. Most major platforms ship with prebuilt connectors for major ITSM tools. If your specific service desk isn’t natively supported, use the ITAM platform’s REST APIs or webhooks to push asset data into your ticketing system via inbound web calls.
On-demand lookup is usually the right choice over two-way sync for any service desk integration. With on-demand lookup, each time a ticket is opened, the service desk tool fetches the matching CI record from the ITAM platform in the background and renders it inside the ticket view.
Map the integration so that the following six fields render inside the incident, problem, and request views rather than on a separate tab:
- CI identity and serial number
- Warranty status with end date
- Last three incidents and changes tied to the CI
- Installed software footprint with any SAM-flagged items
- Cost center owning the CI
- Business services that depend on the CI
Verify the service desk UI layout by opening a recent ticket and confirming that all six fields appear without the technician clicking away from the ticket. If any field sits behind a separate tab or requires a search, there is scope for improvement.
With this arrangement, the configuration phase of aligning your ITAM workflow is complete. Because enterprise environments are dynamic, consider establishing a continuous process to govern and maintain the configuration from drifting.
Conclusion
Many ITSM teams view accurate CMDB data as essential to orchestrating and improving service delivery. However, as we have explored, your asset register is only as accurate as the workflows feeding it.
Device42 is built around the discovery and CMDB layers this guide discussed. If you are evaluating ITAM platforms or planning to replace a stale CMDB, the practical way to test the fit is to run discovery against a real subset of your environment and see how the data lands. Try the Device42 demo and walk through discovery, CI relationships, and service desk integration against your own infrastructure before committing to a rollout plan.