Vulnerability Management Plan Best Practices
It’s Monday morning, you’ve just arrived at the office and you’re ready to grab a cup of coffee when you hear people frantically scrambling, saying they can’t access the systems. You rush to your office to find out what’s happening, and what you discover is your worst nightmare.
Systems have been compromised overnight. Critical data has been exposed, operations are at a standstill, and you’re fielding urgent calls from every department. As you investigate further, the problem becomes clear: The vulnerability that allowed the breach was simple to fix, but it slipped through the cracks.
This scenario is more common than it should be—and it is entirely avoidable.
This article outlines real-world best practices for developing and executing a vulnerability management plan (VMP) that protects an organization without hindering its operations. These practices are considered “best” because they consistently reduce risk, adapt to diverse environments, and enable clear, repeatable actions. Whether you’re responsible for infrastructure, applications, or security policy, this guide will help you design a resilient, measurable, and actionable VMP that evolves in response to your evolving threat landscape.
Summary of vulnerability management plan best practices
| Best practice | Benefit |
|---|---|
| Track all assets in a CMDB | Eliminates blind spots and ensures accountability for every asset |
| Implement continuous vulnerability scanning | Reduces exposure time by detecting threats as soon as they emerge |
| Prioritize vulnerabilities with threat intelligence | Focuses remediation on the most likely and impactful threats |
| Establish a clear remediation policy | Eliminates ambiguity related to responsibility, timing, execution, and reporting |
| Automate patch management | Enables fast, reliable, and scalable patching while reducing and/or eliminating human error |
| Integrate with DevOps | Prevents vulnerable code from reaching production by incorporating security into development workflows |
| Use metrics and KPIs to measure effectiveness | Tracks program performance and drives accountability through data |
Track all assets in a CMDB
A foundational step in building an effective vulnerability management program is understanding what you have, its relationship to everything around it, who owns it, its criticality, and its potential exposure. This begins with maintaining a reliable and up-to-date asset inventory, ideally through a well-structured configuration management database (CMDB).
A CMDB is not merely a fancy spreadsheet; it is a living, dynamic repository that captures details about every hardware component, virtual machine, application, and cloud workload in your IT estate. Its capabilities extend to mapping relationships, dependencies, ownership, and configurations. Without this level of visibility, you are flying blind. You cannot protect what you cannot see, so assets that are not tracked are assets that are not protected.
Effective vulnerability management relies on this asset context to prioritize, assign, and resolve issues. Tools like Device42 support automated asset discovery and classification, keeping your CMDB up to date and relevant. Without automation, static inventories quickly fall behind, creating blind spots that attackers are eager to exploit.
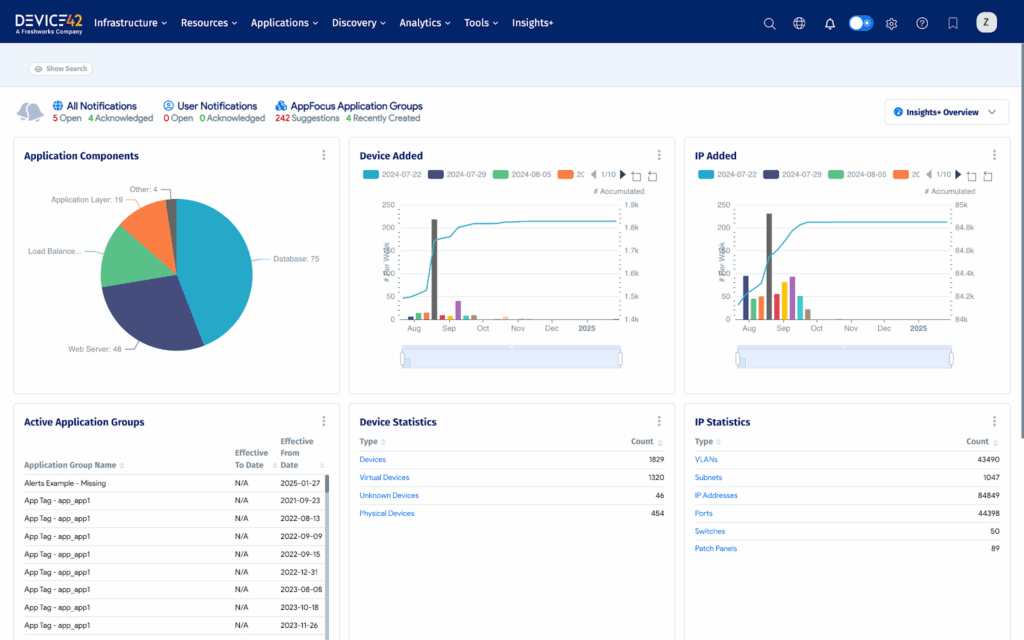
Device 42 asset discovery (source)
Implement continuous vulnerability scanning
After identifying your assets and their connections, the next step is to continuously monitor these assets for newly disclosed vulnerabilities. The main point here is straightforward but critical: Vulnerabilities appear constantly, and not on your schedule. Relying on periodic scans (weekly, monthly, or less often) leaves your organization vulnerable. New exploits can emerge within hours of a vulnerability’s disclosure, and if you’re not scanning all the time, you’re risking the exposure window.
Continuous scanning bridges that gap. Tools like Tenable.io (see figure below) and Rapid7 InsightVM enable real-time scanning and automated integration with ticketing and remediation workflows, which ensures that you identify weaknesses the moment they appear—before an attacker does. More importantly, continuous scanning becomes part of your operational muscle memory. It integrates seamlessly with your environment and keeps you alert without overwhelming your team with noise, as long as you use appropriate prioritization techniques.
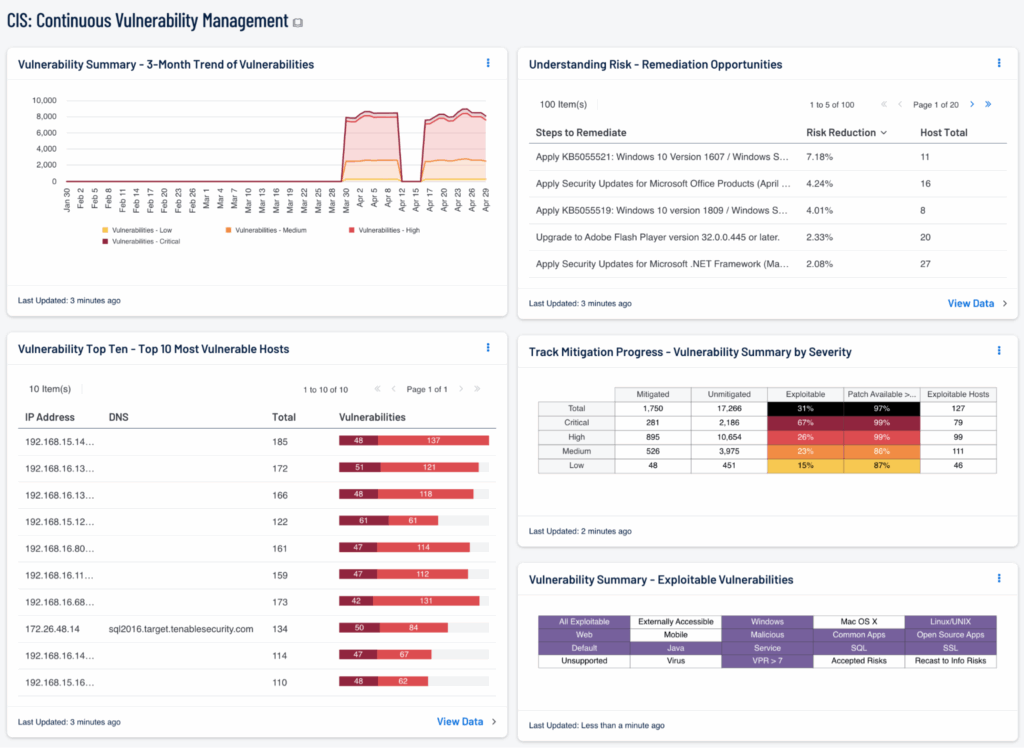
Tenable continuous monitoring dashboard (source)


Discover assets automatically including hardware, software, and cloud infrastructure

Match the assets against your software and hardware license agreements

Comply with your service license needs comprehensively and confidently
Agent-based scanning: Persistent, context-aware monitoring
Continuous scanning isn’t just about frequency; it’s also about coverage and context. This is where understanding the difference between agent-based and agentless scanning becomes essential.
Agent-based scanning employs lightweight software installed directly on endpoints such as servers, workstations, and even virtual machines to ensure continuous visibility. These agents gather detailed telemetry, including local software inventory, configuration changes, patch levels, user behavior, and real-time system status. Because they live on the device, they’re especially useful for:
- Remote or intermittently connected assets (e.g., laptops that roam outside the corporate network)
- Cloud workloads that scale up/down dynamically
- Monitoring critical systems in real time, even between scheduled scans
- Triggering alerts for unauthorized changes or deviations from the baseline configuration
However, agents require deployment, maintenance, and resource allocation. They must be updated, monitored for health, and approved by endpoint teams. In regulated environments, this can add complexity, but the benefit is high-fidelity, continuous insight.
Agentless scanning: Broad, non-intrusive coverage
Agentless scanning, on the other hand, depends on credentialed or uncredentialed network-based discovery. It checks systems over the network using protocols like SSH, SMB, WMI, or SNMP to identify vulnerabilities and misconfigurations, making it ideal for:
- Discovering unmanaged or shadow IT assets
- Scanning new systems before agents are deployed
- Validating results independently of endpoint tampering
- Capturing a fast, top-down view of your environment
However, agentless scanning has limitations. It can overlook transient systems or changes that happen between scans, and its accuracy relies on the availability of credentials and network visibility. Without proper permissions or a segmentation-aware design, it may produce false negatives or incomplete results.
Why you need both
The most effective programs combine agent-based and agentless scanning to achieve comprehensive coverage. Each method compensates for the other’s blind spots. Agentless scanning enables quick, broad discovery across the environment, including assets you weren’t aware of. Agent-based scanning offers continuous monitoring and detailed context, especially for high-value or mobile endpoints.
Platforms like Device42 support both approaches, allowing organizations to discover assets in real time and continuously evaluate their risk posture without gaps. By combining these methods, you ensure visibility across traditional, cloud, and hybrid infrastructure, while maintaining the flexibility to adapt to changes in asset inventory and attacker tactics.
Key considerations for implementation
When rolling out continuous scanning, keep these best practices in mind:
- Map scanning frequency to asset criticality: Not all assets require equal scrutiny; define tiers accordingly.
- Coordinate with the endpoint and network teams: Gain buy-in early to smooth agent deployment or credential setup.
- Prioritize vulnerability signal over volume: Use contextual risk scoring to focus on what matters most.
- Integrate findings into workflows: Link scan results to ITSM (IT Service Management), ticketing, and patching systems to operationalize remediation.
- Ensure coverage of ephemeral infrastructure: Cloud assets may only exist for hours; your scanning approach must adapt accordingly.
Done right, continuous vulnerability scanning doesn’t just close gaps; it builds institutional discipline, surfaces hidden risk, and enables proactive defense.
Prioritize vulnerabilities using threat intelligence
One of the most critical components of an effective vulnerability management program is the prioritization of vulnerabilities through threat intelligence. Vulnerability management is frequently likened to bailing water from a sinking boat—an ongoing challenge without a definitive endpoint. Each week, new common vulnerabilities and exposures (CVEs) are disclosed, software patches are published, and adversaries evolve their tactics. Treating all vulnerabilities with equal urgency is impractical. Threat intelligence reframes this process from reactive containment to proactive risk reduction.
Rather than relying solely on Common Vulnerability Scoring System (CVSS) metrics, threat intelligence offers clarity into which vulnerabilities are being actively exploited, the threat actors responsible, and the operational contexts in which these exploits occur. Solutions such as Recorded Future and CrowdStrike Falcon Intelligence (see figure below) enable the identification of emerging trends in attacker methodologies, empowering organizations to concentrate their mitigation efforts on the exposures most likely to result in compromise. This sharpens the focus of remediation efforts on the stuff that poses the greatest threat to your organization.
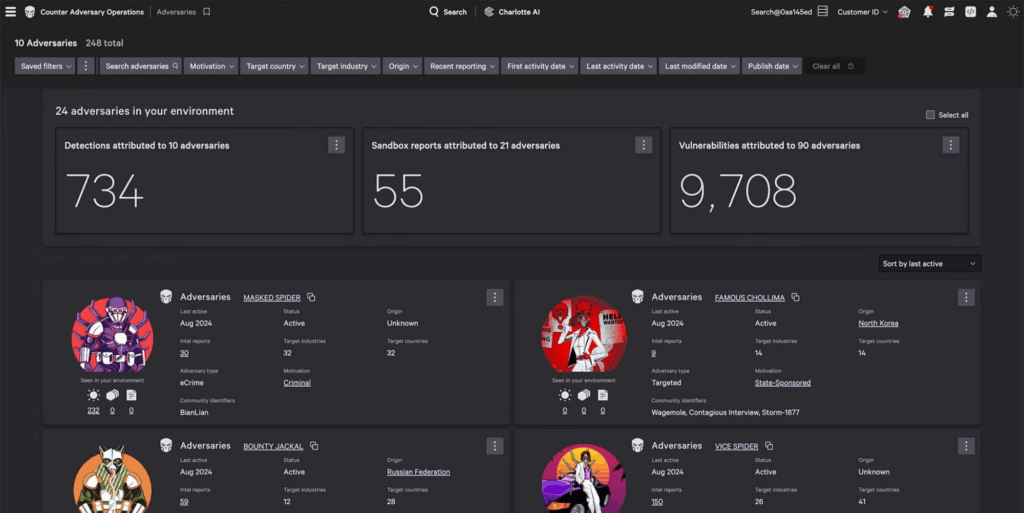
Adversary vulnerability attribution (source)
Establish a clear remediation policy
Identifying vulnerabilities is one thing; consistently fixing them is another. That’s why having a clear remediation policy is essential. A remediation policy acts as the engine that turns detection into action. Without it, vulnerability management becomes disorganized and reactive.
A strong policy clearly sets timelines for resolution, defines roles and responsibilities, and establishes escalation pathways in case issues aren’t resolved promptly. For example, critical vulnerabilities should be addressed within 72 hours, while low-severity issues might have a 30-day service-level agreement (SLA). A well-crafted policy not only encourages internal accountability but also enhances transparency for leadership, enabling clear communication of risks and alignment with business priorities.
To develop such a policy, it’s important to include key operational elements that ensure consistency, accountability, and scalability. The following table outlines essential components that every remediation policy should contain. These elements collectively foster disciplined vulnerability management and help translate policy into daily practice.
| Critical Aspect | Description | Example |
|---|---|---|
| Asset classification tiers | Categorize assets based on business impact to align remediation urgency. | Tier 1: Customer data systems Tier 2: Internal finance apps Tier 3: Dev test VMs |
| Risk-based prioritization | Define how vulnerabilities are ranked based on threat intelligence, asset criticality, and CVSS. | “Critical” = Exploited in wild + internet-facing “High” = CVSS ≥ 8.0 on crown-jewel assets |
| Defined SLA timeframes | Set specific remediation timeframes by severity level and asset class. | Critical: 72 hrs High: 7 days Medium: 30 days Low: 90 days |
| Ownership and accountability | Assign roles and responsibilities for remediation across IT and security teams. | Patch management = desktop team Configuration = server admins Coordination = SecOps |
| Exception handling process | Establish a formal process for documenting, justifying, and approving remediation delays or deferrals. | Exceptions must be approved by the Information Security Risk Council (ISRC) and reviewed quarterly. |
| Change control integration | Ensure that remediations follow existing change management procedures to avoid service disruption. | Emergency patching goes through expedited CAB (Change Approval Board) approval with rollback plans documented. |
| Tooling and automation scope | Document the tools used for scanning, ticketing, patching, and metrics collection. | Use Qualys for scanning, Freshservice for ticketing, and Power BI for KPI dashboards. |
| Communication cadence | Outline how remediation status, blockers, and escalations are reported to stakeholders. | Weekly remediation report shared with infrastructure leads and tracked in Jira. |
| Validation and verification | Define how and when remediated vulnerabilities are retested for closure. | Scans are re-run within 24 hours after the remediation window. Closure requires verified absence. |
| Metrics and continuous improvement | Define KPIs and how performance is reviewed to improve future remediation cycles. | KPIs include SLA compliance percentage, mean time to remediate (MTTR), and open vulnerability trendlines. |

Automate patch management
Even with a strong policy in place, human error remains a persistent challenge, especially in patching. This is where automation demonstrates its value: Automating patch management reduces manual mistakes and greatly shortens the exposure window.
However, automated patching is not a simple plug-and-play process. It requires careful planning, testing, and integration to prevent unintended service disruptions or failed updates. Here are four specific best practices that help turn the concept of automated patch management into a secure, operational reality.
Start with a patch classification matrix
Before enabling automation, organizations should specify what can and cannot be patched automatically. This involves classifying patches according to risk, asset importance, and business impact. For example:
- Safe to automate: Non-critical OS updates on workstations
- Needs approval: Database patches on production servers
- Manual only: Firmware upgrades or patches requiring service downtime
Creating a patch classification matrix helps guarantee that automation is used selectively and safely.
Integrate with asset and vulnerability inventory
Automated patching should not occur in isolation. It must connect with the organization’s asset inventory and vulnerability scanning tools to prioritize patches based on actual exposure. For example, if Qualys or Tenable detects a high-risk CVE on a critical system, the patch automation system can escalate that item for immediate remediation. This can be done either through full automation or by flagging it for expedited approval.
Pilot in low-risk environments first
A common mistake is deploying automation across production environments without enough testing. Always start with a pilot in a controlled setting, like test virtual machines or non-critical departments. Watch for unexpected issues such as application incompatibility, performance drops, or rollback failures. This helps build stakeholder confidence to gradually expand automation
Monitor, alert, and roll back intelligently
Automation should be combined with visibility. Make sure patching tools provide real-time logs, alerts, and rollback options. If a patch causes system failures or performance drops, teams need to quickly restore a stable state. Many tools include features like audit trails and rollback support, which are crucial for safe growth.
Integrate with DevOps
For organizations with internal development teams, integrating vulnerability management into the software development lifecycle (SDLC) is critically important. Developers face constant pressure to deliver features quickly, and without built-in security checkpoints, vulnerable code can easily make it into production. A mature vulnerability management plan must go beyond infrastructure and endpoints to include the application layer, where exploitable weaknesses can be tested with each commit.
This is where static application security testing (SAST) and dynamic application security testing (DAST) are essential. SAST examines source code, bytecode, or binaries early in development to detect issues like input validation problems, hardcoded secrets, insecure cryptographic practices, or improper error handling before the code is compiled or deployed. By identifying these vulnerabilities early, organizations decrease both remediation efforts and risk exposure.
DAST, on the other hand, tests running applications within a runtime environment. It mimics real-world attacks against staging or QA setups and can detect issues like authentication bypasses, insecure direct object references (IDOR), or misconfigured security headers. While SAST provides developers with line-of-code insights, DAST finds vulnerabilities that only appear during execution, such as logic flaws or unintended exposure through dynamic inputs.
Both SAST and DAST should be integrated into continuous integration and continuous delivery/deployment (CI/CD) pipelines. A shift-left approach makes vulnerability management a continuous, scalable, and automated process. It ensures that issues are identified and addressed during development, not after deployment, thereby reducing the attack surface before code reaches production.
Tools like Snyk (see figure below), Checkmarx, Veracode, and Burp Suite Enterprise provide native integrations with GitHub, GitLab, Jenkins, Azure DevOps, and other CI/CD systems. These tools produce actionable, developer-friendly findings within the same toolchains developers already use. Security becomes part of the build process instead of a manual review stage, which removes delays and makes secure coding a natural part of Agile workflows.
Most importantly, integrating application security into DevOps supports the overall vulnerability management plan by:
- Expanding visibility into a critical risk domain: custom software
- Reducing remediation timelines by detecting vulnerabilities earlier
- Aligning ownership by enabling developers to fix issues before handoff
- Maintaining traceability through ticketing integration and scan result retention
When security is regarded as a collaborative function rather than an afterthought, organizations don’t just prevent vulnerabilities; they embed resilience into the development process.
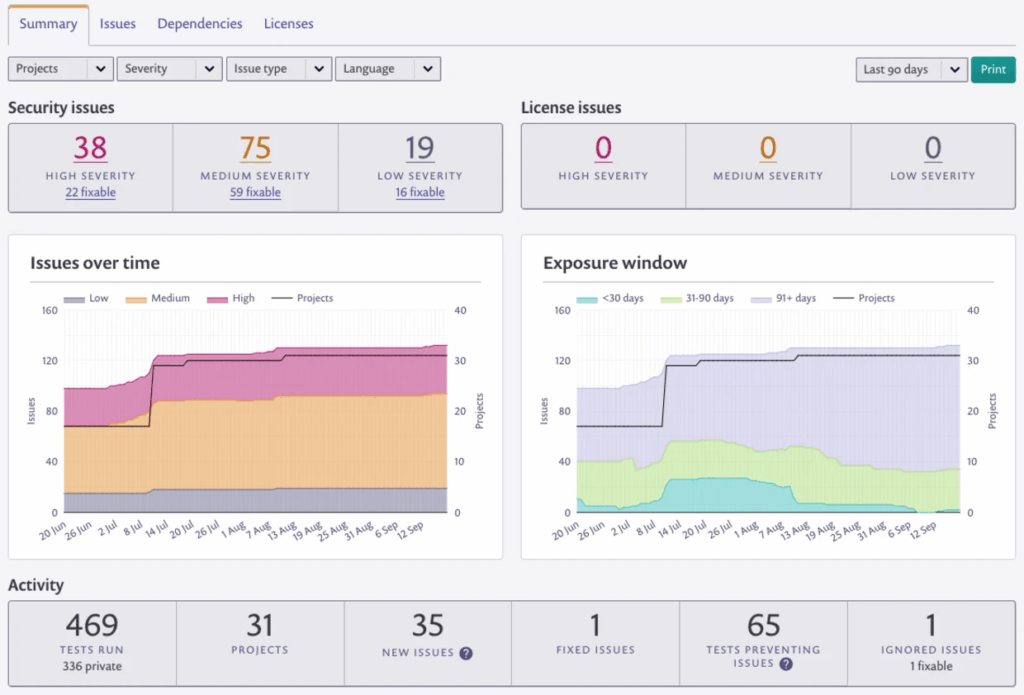
Snyk (source)
Use metrics and KPIs to measure effectiveness
Measurement is essential for maintaining a high-performance and defensible vulnerability management program. Metrics and key performance indicators (KPIs) act as your operational guide, highlighting where progress is occurring and where risks are building up. Without them, it becomes almost impossible to verify effectiveness, justify decisions, or prioritize improvements.
Metrics like mean time to remediate (MTTR), total open vulnerabilities, and SLA compliance offer real-time insights into how effectively remediation processes are working. Monitoring these over time shows whether the program is improving or stagnating.
These measurements serve two primary purposes:
- Operational guidance: Highlighting process gaps, resource constraints, and where intervention is required.
- Executive communication: Translating technical data into strategic indicators that leadership can use to assess risk posture and allocate support.
Think of these metrics as your vehicle’s dashboard—they won’t fix the engine, but they tell you when and where to pop the hood. Many security platforms come with built-in dashboards, but the real value lies in using this data to guide decisions and ensure accountability across teams.
Here’s a table describing foundational vulnerability management metrics and KPIs to track.
| Metric / KPI | Description | Why It Matters |
|---|---|---|
| Mean time to remediate (MTTR) | Average time from vulnerability discovery to resolution | Measures overall speed and responsiveness of remediation processes |
| Total open vulnerabilities | Count of unresolved vulnerabilities, optionally filtered by severity, asset type, or age | Shows the scope of exposure and helps trend backlog progress |
| SLA compliance rate | Percentage of vulnerabilities resolved within agreed-upon timeframes (e.g., 72 hours for critical) | Tracks adherence to policy and contractual obligations |
| Remediation rate by severity | Percentage of closed vulnerabilities, segmented by criticality (e.g., critical, high, medium) | Indicates whether the most dangerous issues are being prioritized |
| Vulnerability recurrence rate | Number of previously resolved vulnerabilities that reappear in subsequent scans | Detects failures in patching, image hygiene, or configuration baselines |
| Vulnerabilities per asset | Average number of vulnerabilities per endpoint, server, or cloud resource | Helps identify systemic issues or high-risk environments |
| Time to triage | Time between detection and assignment of remediation ownership | Exposes delays in workflow handoffs or prioritization bottlenecks |
| Exception rate | Percentage of vulnerabilities granted policy exceptions or deferrals | Offers insight into policy flexibility and potential abuse of exception processes |
| Exploitability rate | Percentage of open vulnerabilities with known exploits in the wild | Helps focus efforts on active threats vs. theoretical risks |
Conclusion: From vulnerabilities to vigilance
Vulnerability management isn’t just a checklist; it’s a commitment. A successful program isn’t static but rather adaptive, resilient, and aligned with the changing threat landscape. It calls for complete visibility, informed prioritization, and operational maturity across teams and technologies.
Throughout this article, we have discussed the pillars of an effective vulnerability management strategy:
- Achieving asset visibility and classification through a well-maintained CMDB, ensuring that you know exactly what you’re protecting
- Using continuous scanning and threat monitoring to ensure that no blind spots exist and nothing falls through the cracks
- Applying risk-based prioritization to align patching and remediation efforts with the vulnerabilities that pose the greatest real-world threats
- Establishing clear and enforceable policies that hold teams accountable and provide a structure for consistent execution
- Automating patch deployment and validation to reduce human error and accelerate response times
- Integrating security into your CI/CD pipeline by embedding it directly into development workflows—shifting left to identify vulnerabilities early, minimize rework, and speed up secure delivery
- Utilizing actionable metrics and reports to measure effectiveness, demonstrate value, and guide continuous improvement
When these elements work together, you’re not just identifying vulnerabilities; you’re predicting where they are most likely to happen (then fixing them proactively). You’re not simply responding to breaches; you’re stopping them before they happen. Your vulnerability management program becomes a dynamic, risk-focused system that targets threats, accelerates remediation, and adapts instantly to your most pressing vulnerabilities.